Knowledge
Enterprise Knowledge Base is a tool for centralized storage and management of information and knowledge within an organization. It helps enterprises effectively organize, store, retrieve and share various types of information and knowledge resources, and provides a foundation for enterprise-specific AI applications. Through text splitter, vectorization technology, semantic retrieval, etc., a large amount of data within the enterprise can be effectively processed and utilized, which can not only improve the performance of large models on specific tasks, but also greatly reduce the consumption of computing resources and improve the efficiency and accuracy of data processing.
In enterprise applications, the knowledge reserve of large models is expanded by mounting private knowledge bases (mounting is achieved through retrieval enhancement generation technology/RAG, which allows large models to understand, summarize, organize and answer questions, making large language models more practical and credible in actual applications), so as to provide natural language-based, conversational enterprise private knowledge access, and solve the illusion problem caused by insufficient domain knowledge of general large models when facing enterprise applications. After mounting the enterprise knowledge base, the enterprise knowledge base documents and data are stored in the vector database after vector feature extraction (embedding), and apply LLM and vectorized knowledge base to search and compare knowledge to build intelligent applications. You can choose to mount the enterprise knowledge base when orchestrating applications in Studio-Applications to facilitate AI applications to answer questions based on knowledge base files (see: Create AI Application).
My Studio-Knowledge displays all the knowledge bases and knowledge base directories you have created, as well as the number of applications associated with them. Click the "Create Knowledge Base" button in the upper right corner to create a new enterprise knowledge base (supports two methods: ① Create platform knowledge base. ② Synchronize external data sources. ). Successfully created enterprise knowledge bases will be displayed in My Studio-Knowledge.
Create Knowledge Base
Create platform knowledge base
Introduction
The core principles of creating an enterprise knowledge base and conducting knowledge governance through the "Create Platform Knowledge Base" are as follows:
Layout Recognition: The core lies in the precise analysis of document layout. Through advanced algorithms/models, layout recognition technology can accurately identify elements such as text, images, tables, etc. in documents, and store and display the parsed elements and key information in a structured manner.
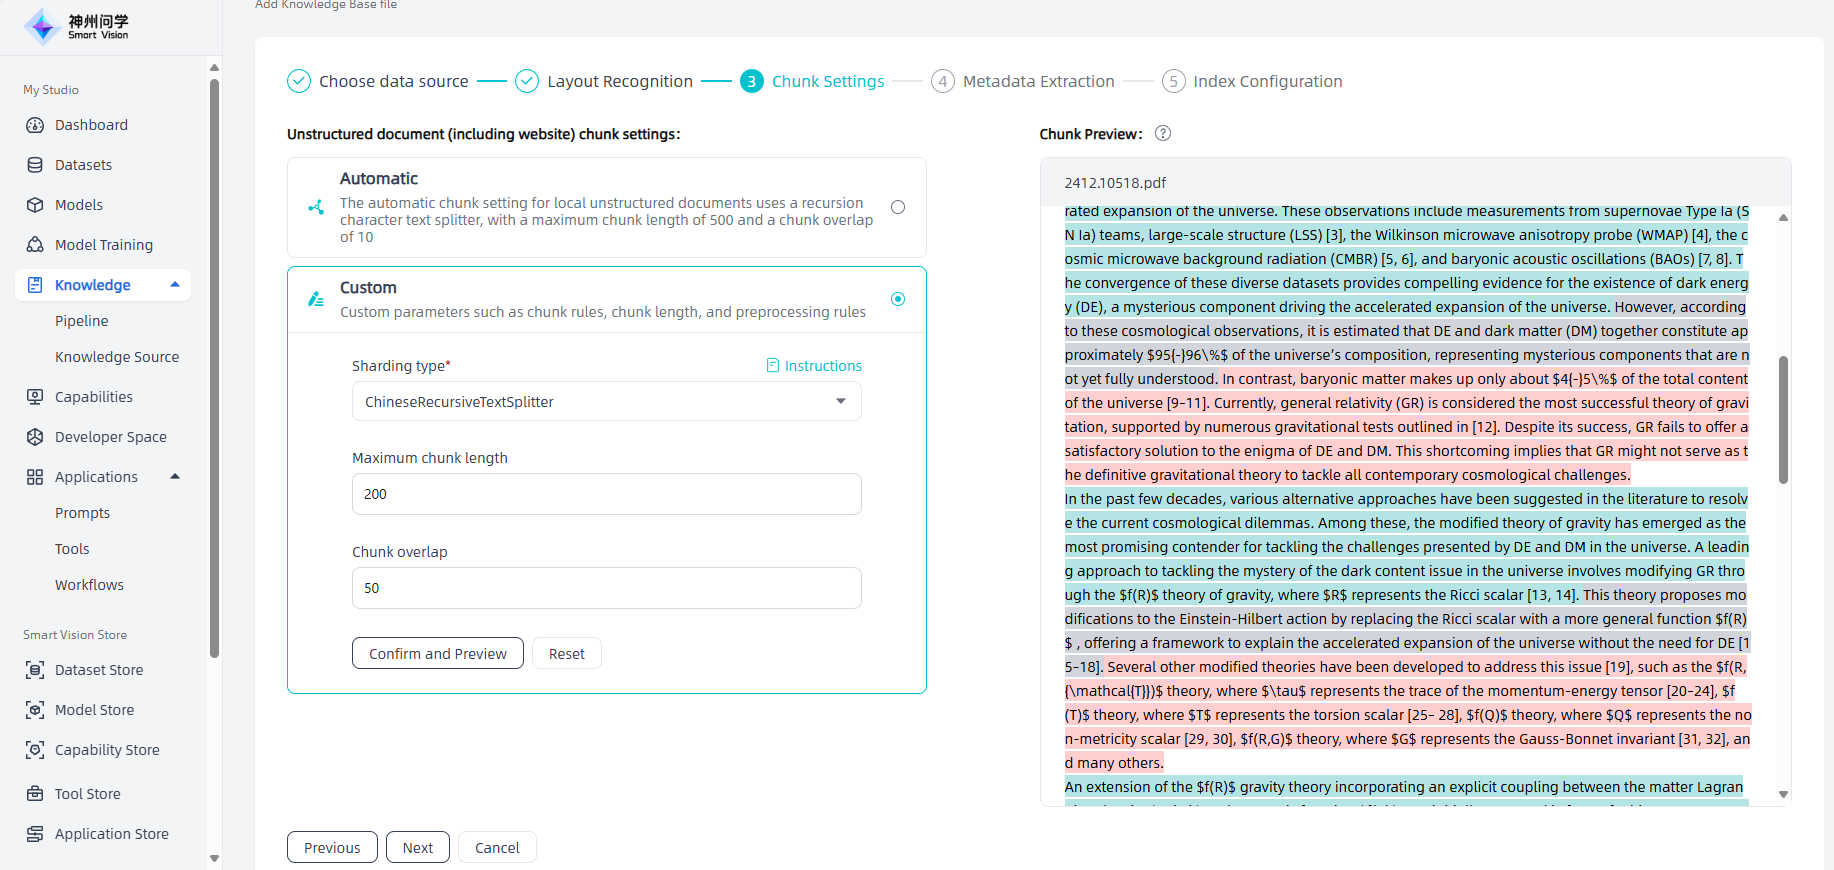
Chunk Settings: Split the knowledge in the knowledge base. You can choose between automatic segmentation or custom segmentation (freely select the type of splitter and set parameters as needed).
- Automatic:
- Local unstructured documents: A recursive character text segmenter is used, with a maximum segment length of 500 and a maximum number of overlapping characters in segments of 10.
- Table: The \n segmentation mode is used, and each row of data will be saved as a chunk.
- Local FAQ: The FAQ segmentation mode is used.
- Website: RecursiveCharacterTextSplitter is used, with a maximum segment length of 500 and a maximum number of overlapping characters in segments of 10.
- Custom-ChineseRecursiveTextSplitter: Based on RecursiveCharacterTextSplitter, Chinese punctuation marks are recognized. First, the text is split according to "\n\n". If the generated block is too large, it is split according to "\n", "。|!|?", ".\s|!\s|?\s", ";|;\s", ",|,\s" are used for segmentation. If the final text is still too large, it will be truncated according to the set chunk_size.
- Custom-RecursiveCharacterTextSplitter: Often recommended for splitting plain text, based on a list of characters (these characters are used as delimiters or "split points" in the text), trying to split the text by following the characters in the order listed in the list (the default list of characters is ["\ n\n", "\n", " ", ""]) to create chunks of text until the resulting chunks reach a manageable size. It first tries to split the text at each double line break ("\n\n"), which is usually used to separate paragraphs in the text; if the resulting block is too large, it then tries to split the text at each line break ("\n "), which is usually used to separate sentences; if the block is still too large, it finally tries to split on each space (" "), which is used to separate words; if the block is still too large, it will split on each space (" "). characters (""). This approach tries to preserve the semantic context, which is beneficial for many natural language processing tasks by keeping paragraphs, sentences, and words intact.
- Custom-MarkdownTextSplitter: The text is chunked according to the title structure of the Markdown file. This approach ensures that text with the same context is grouped together, thereby obtaining a more comprehensive vector representation in stages such as Embedding.
- Custom-TableOfContentsTitleSplitter: Split the text according to the directory structure. It can split a long document into multiple parts according to the location of the directory title. Each part contains the content from the first appearance of the directory title to the next appearance of the same directory title. This segmentation method retains the structure of the document, so that the segmented parts maintain the original chapter or topic structure.
- Automatic:
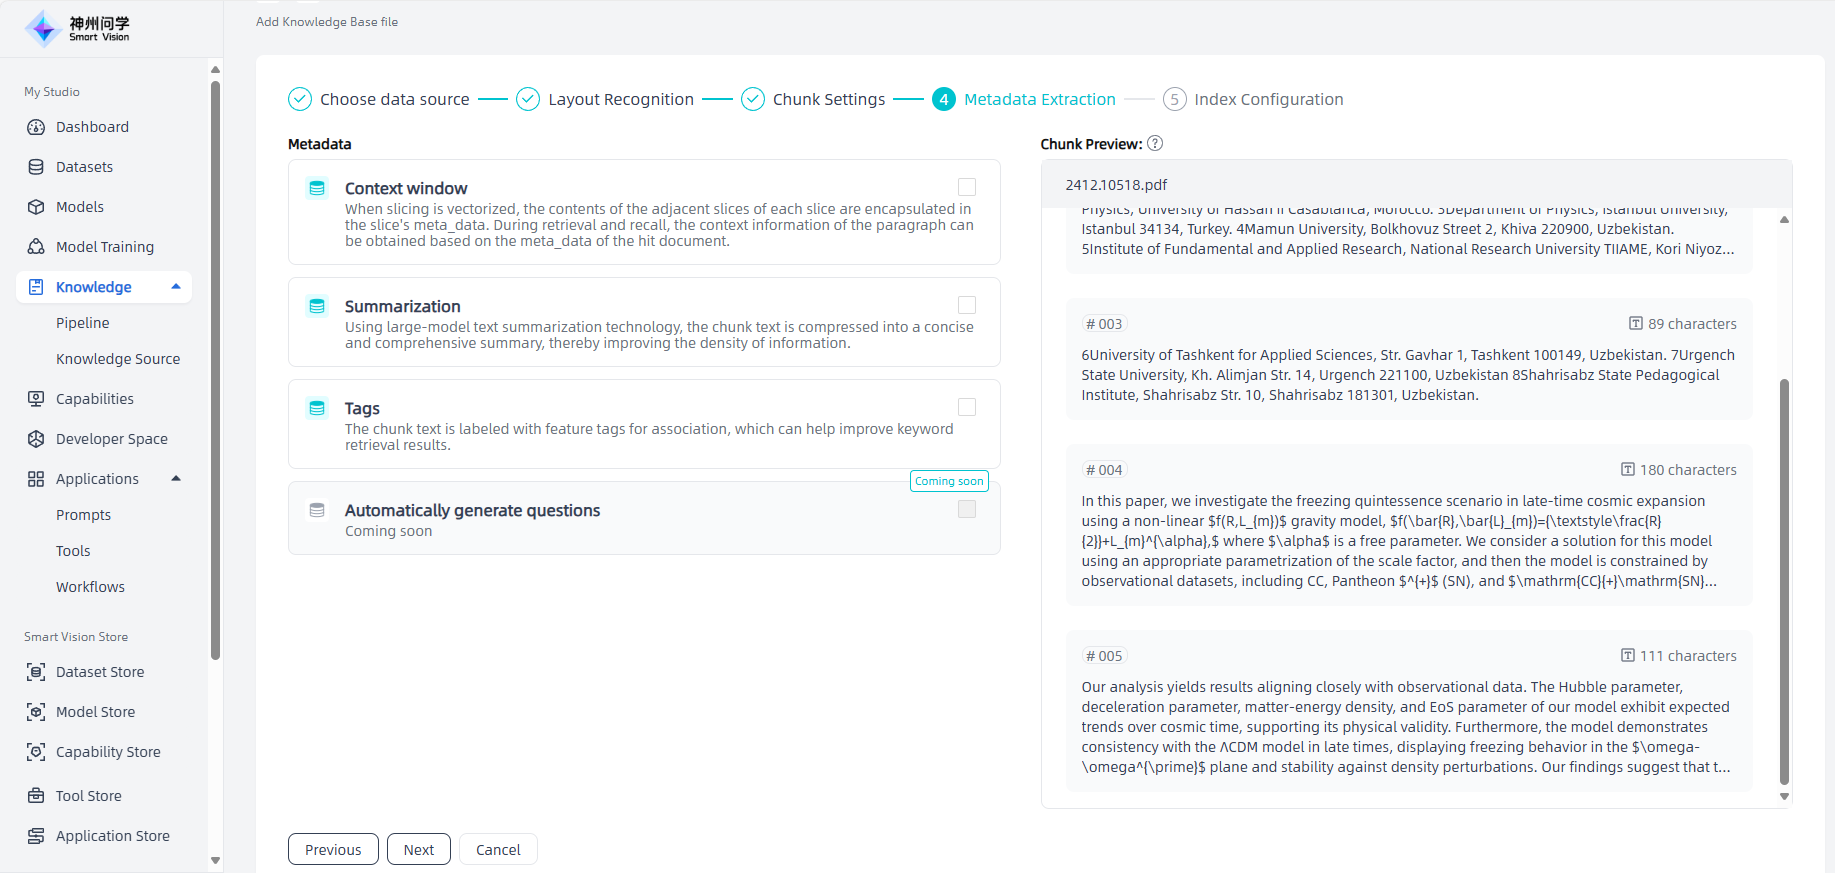
Metadata Extraction:Optional, you can select it as needed.
- Context window: When slicing is vectorized, the contents of the adjacent slices of each slice are encapsulated in the slice's meta_data. During retrieval and recall, the context information of the paragraph can be obtained based on the meta_data of the hit document.
- Summarization: Using large-model text summarization technology, the chunk text is compressed into a concise and comprehensive summary, thereby improving the density of information.
- Tags: The chunk text is labeled with feature tags for association, which can help improve keyword retrieval results.
- Automatically generate questions: Automatically generate questions related to the text content.
Index Configuration:
- Index mode: The embedding process is to encode unstructured data into vectors, converting the knowledge and information of the enterprise into a vector form that can be understood by computers, just like encoding the contents of a book into library index cards so that the information can be Quickly retrieved.
- High-quality: Calling the embedded interface of Azure-GPT-3.5 for processing (you need to deploy the Azure-GPT-3.5 model to use this index mode) to provide higher accuracy when users query.
- Economic: Using offline vector engines/keyword indexes will result in a certain loss of accuracy.
- Vector database: Its main function is to store and process vector data and provide efficient vector retrieval functions.
- Milvus: It covers mainstream third-party index libraries such as Faiss, Annoy, and hnswlib. It has high performance, supports similarity search for massive vector data, supports Kubernetes deployment, and supports expansion on the cloud. For example, if you need a vector database that is easy to expand, stable and efficient, and supports multiple indexing methods, Milvus may be a better choice.
- Faiss: An open source library for dense vector matching, which supports C++ and Python calls, and supports multiple vector retrieval methods, including inner product, Euclidean distance, etc. It also supports precise retrieval and fuzzy search.
- Index mode: The embedding process is to encode unstructured data into vectors, converting the knowledge and information of the enterprise into a vector form that can be understood by computers, just like encoding the contents of a book into library index cards so that the information can be Quickly retrieved.
Operation Guide
Start: In "My Studio - Knowledge", click the "Create Knowledge Base" button in the upper right corner to enter the "Create Enterprise Knowledge Base" page.
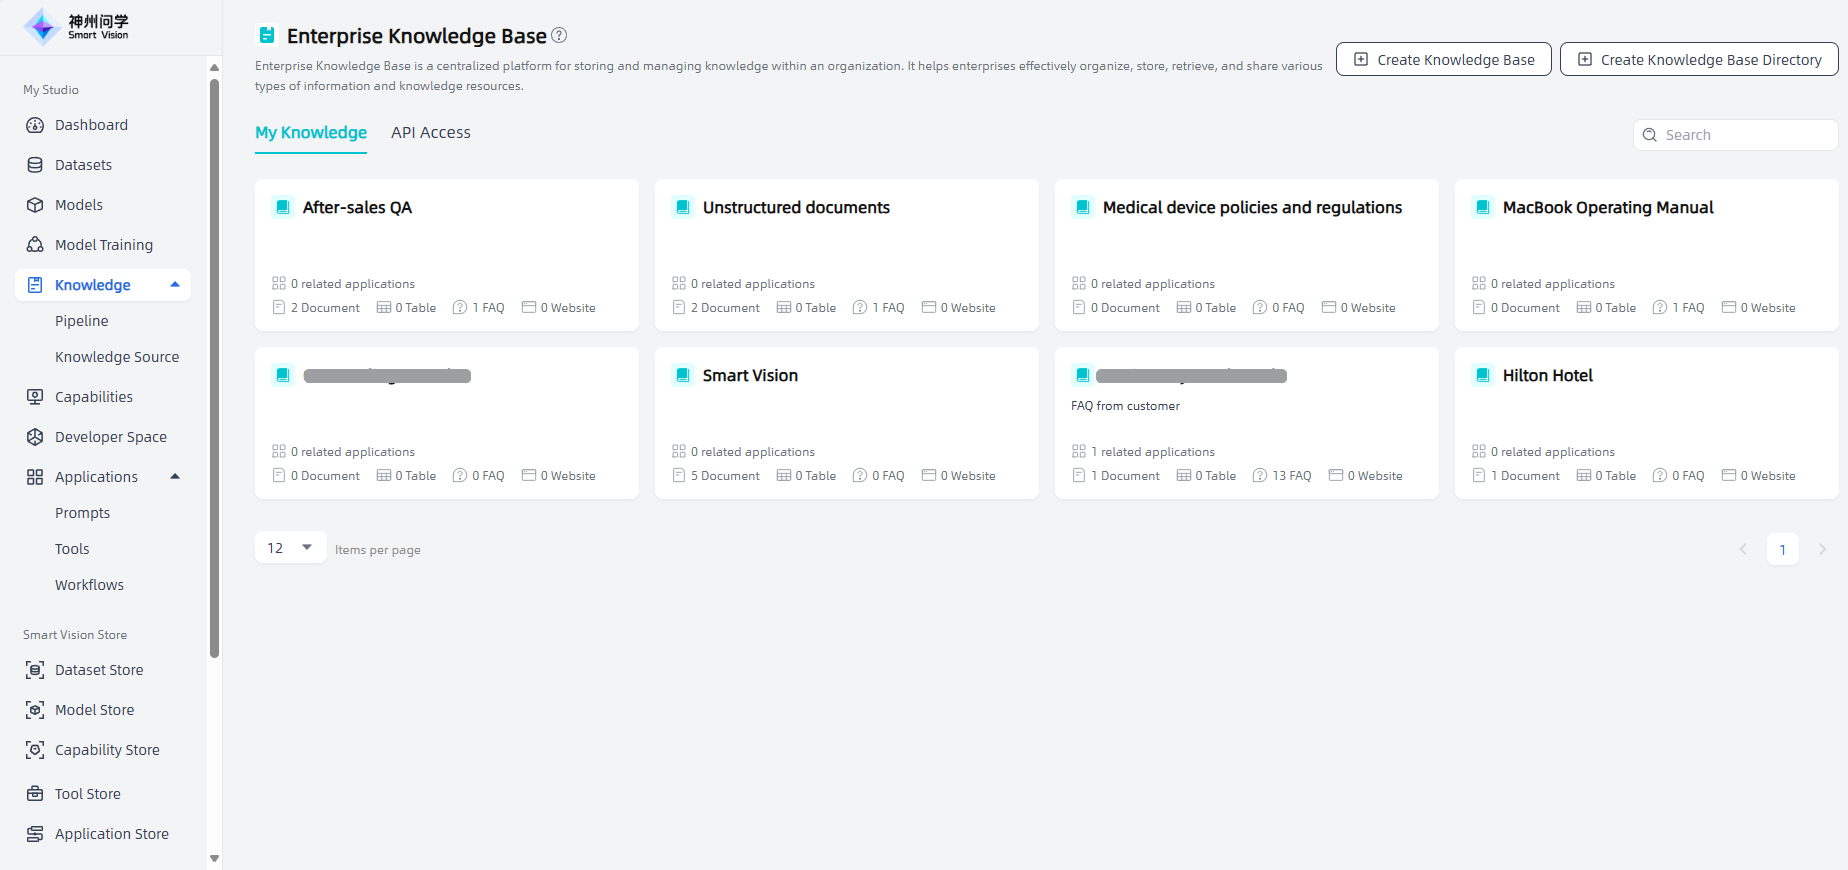
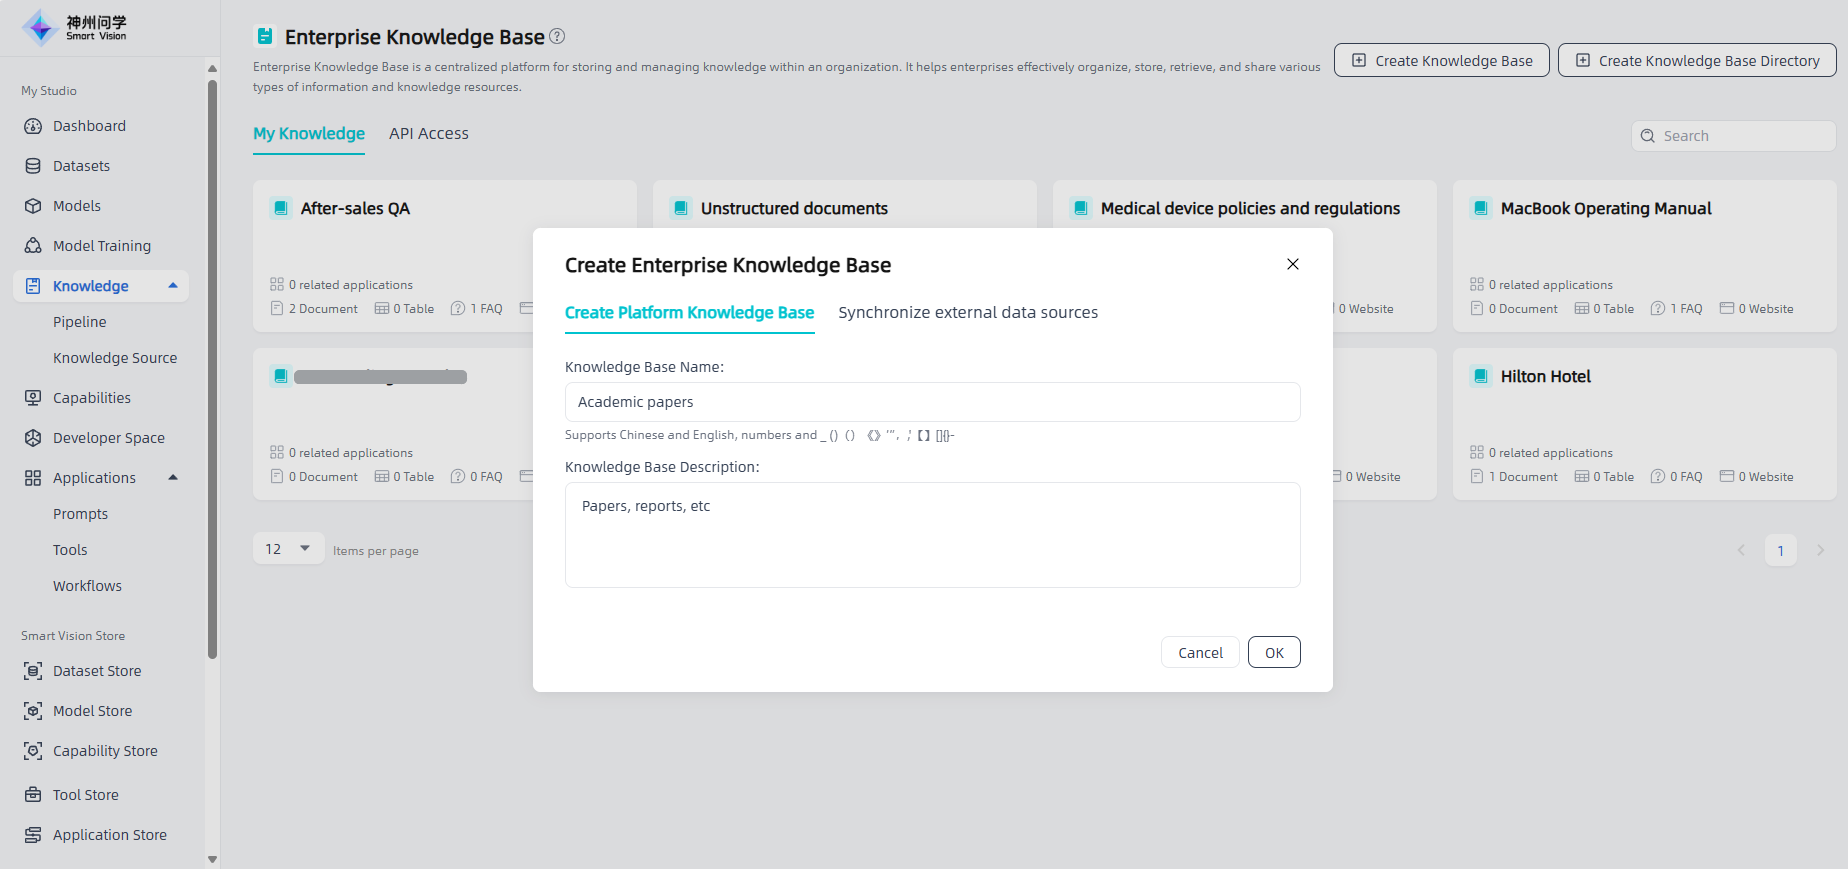
Fill in the enterprise knowledge base information: including the knowledge base name and description, click the "OK" button to start creating the enterprise knowledge base.
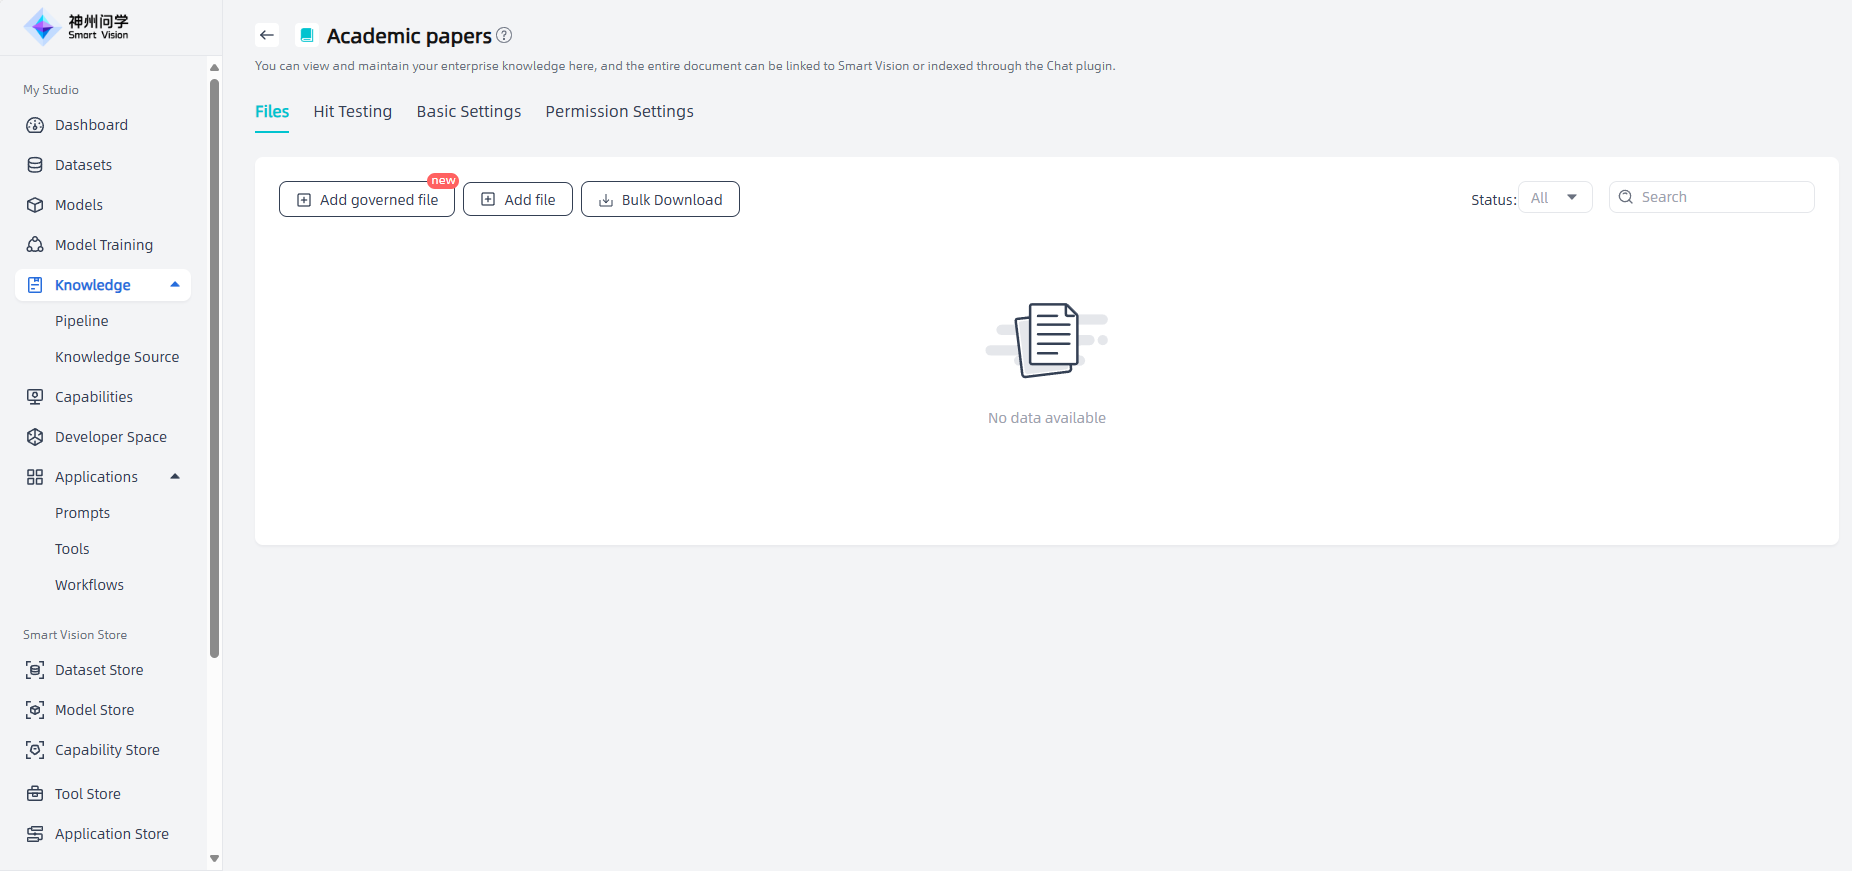
Add governed file: After filling in the enterprise knowledge base information, enter the knowledge base details page, click "Add Governance File" to add files and carry out knowledge governance. (Note: Adding files through the "Add Files" portal only allows for text segmentation and cleaning, and cannot handle knowledge management)
The enterprise knowledge base supports adding four types of files: local unstructured documents, local tables, local FAQ, and synchronize from Website.
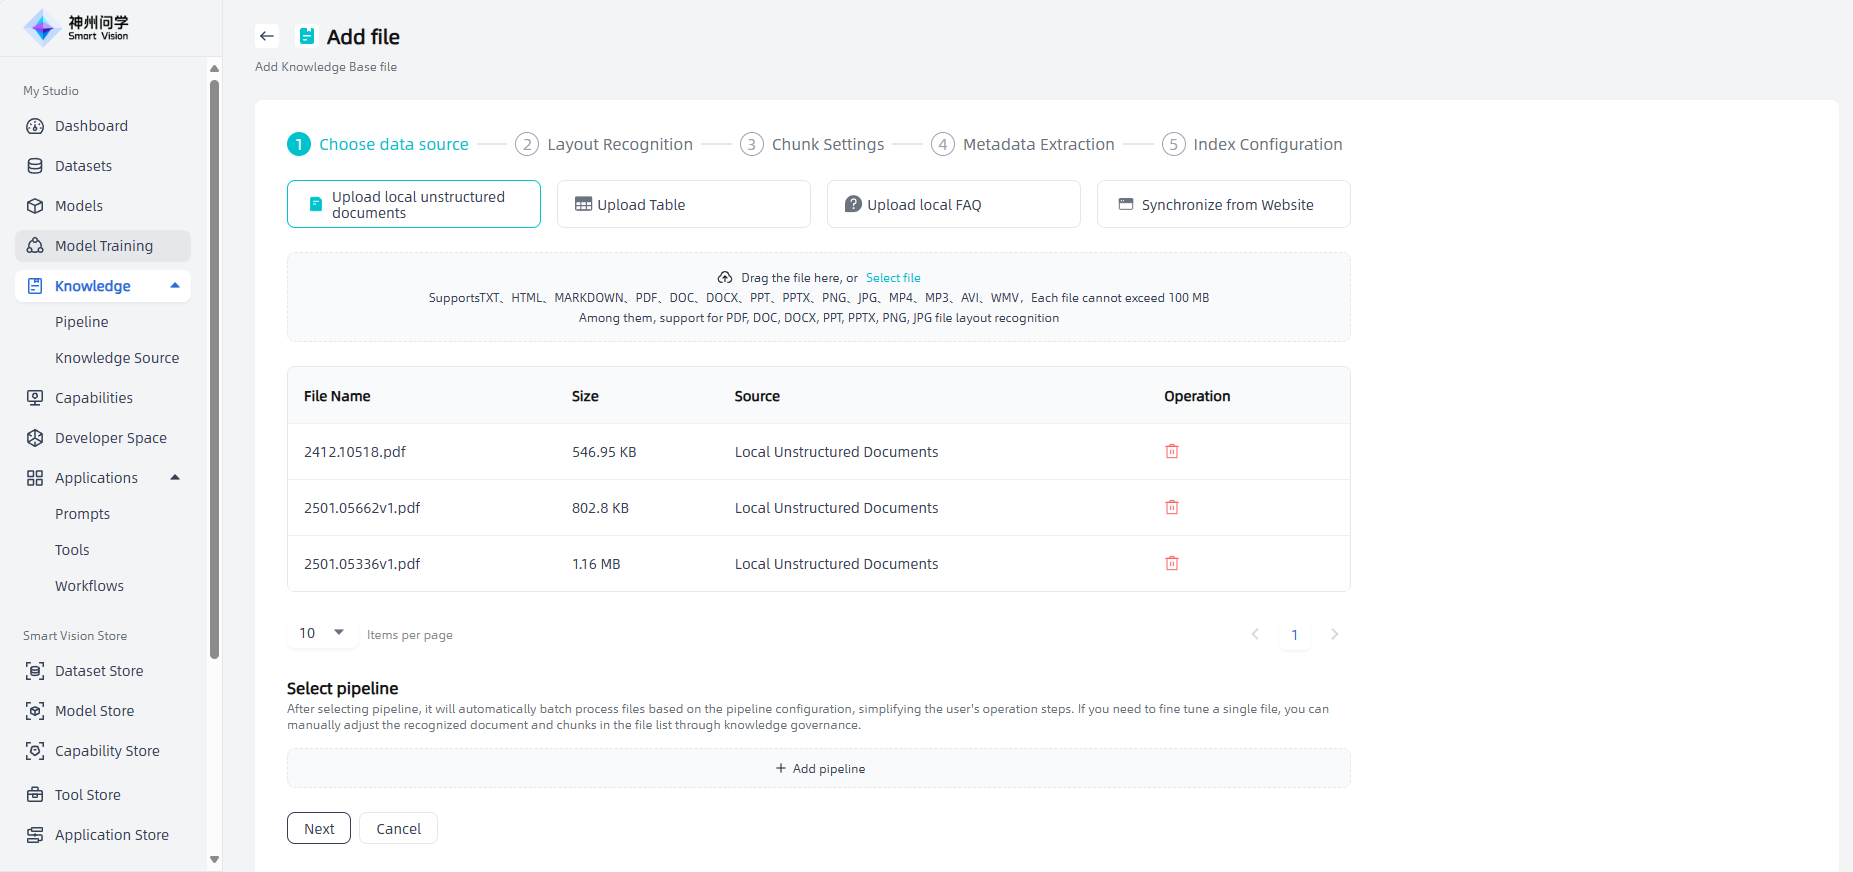
Upload local unstructured documents: Upload knowledge base files that meets the required format and size by dragging and dropping the file or selecting the file.
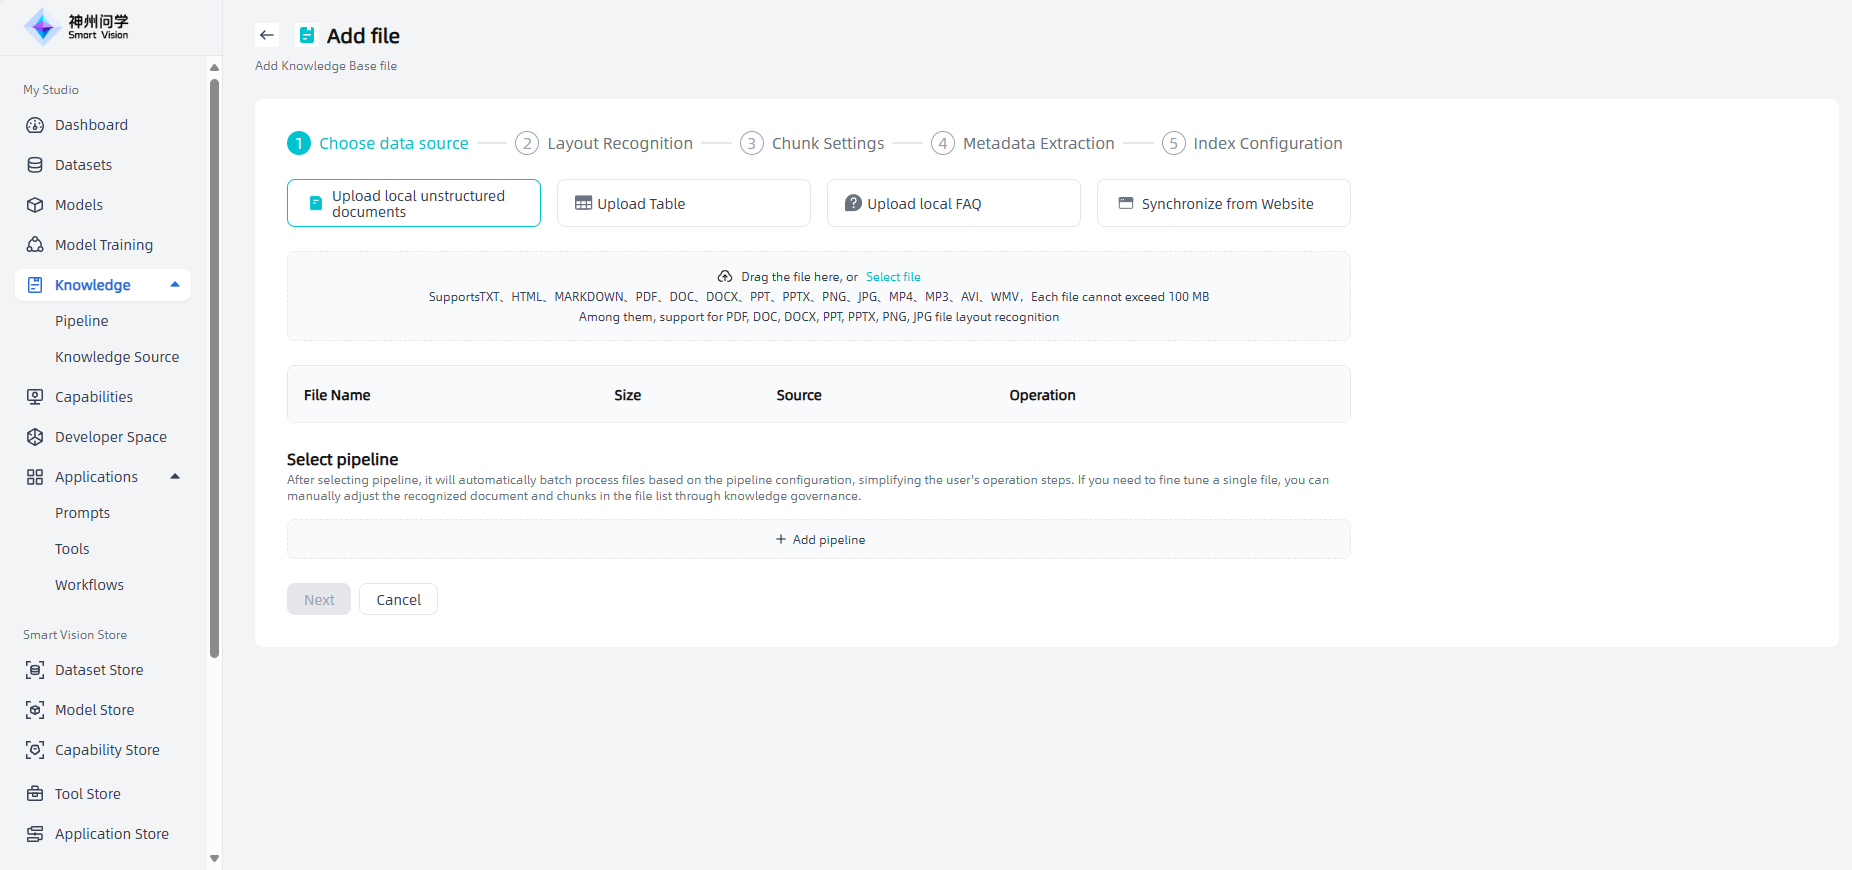
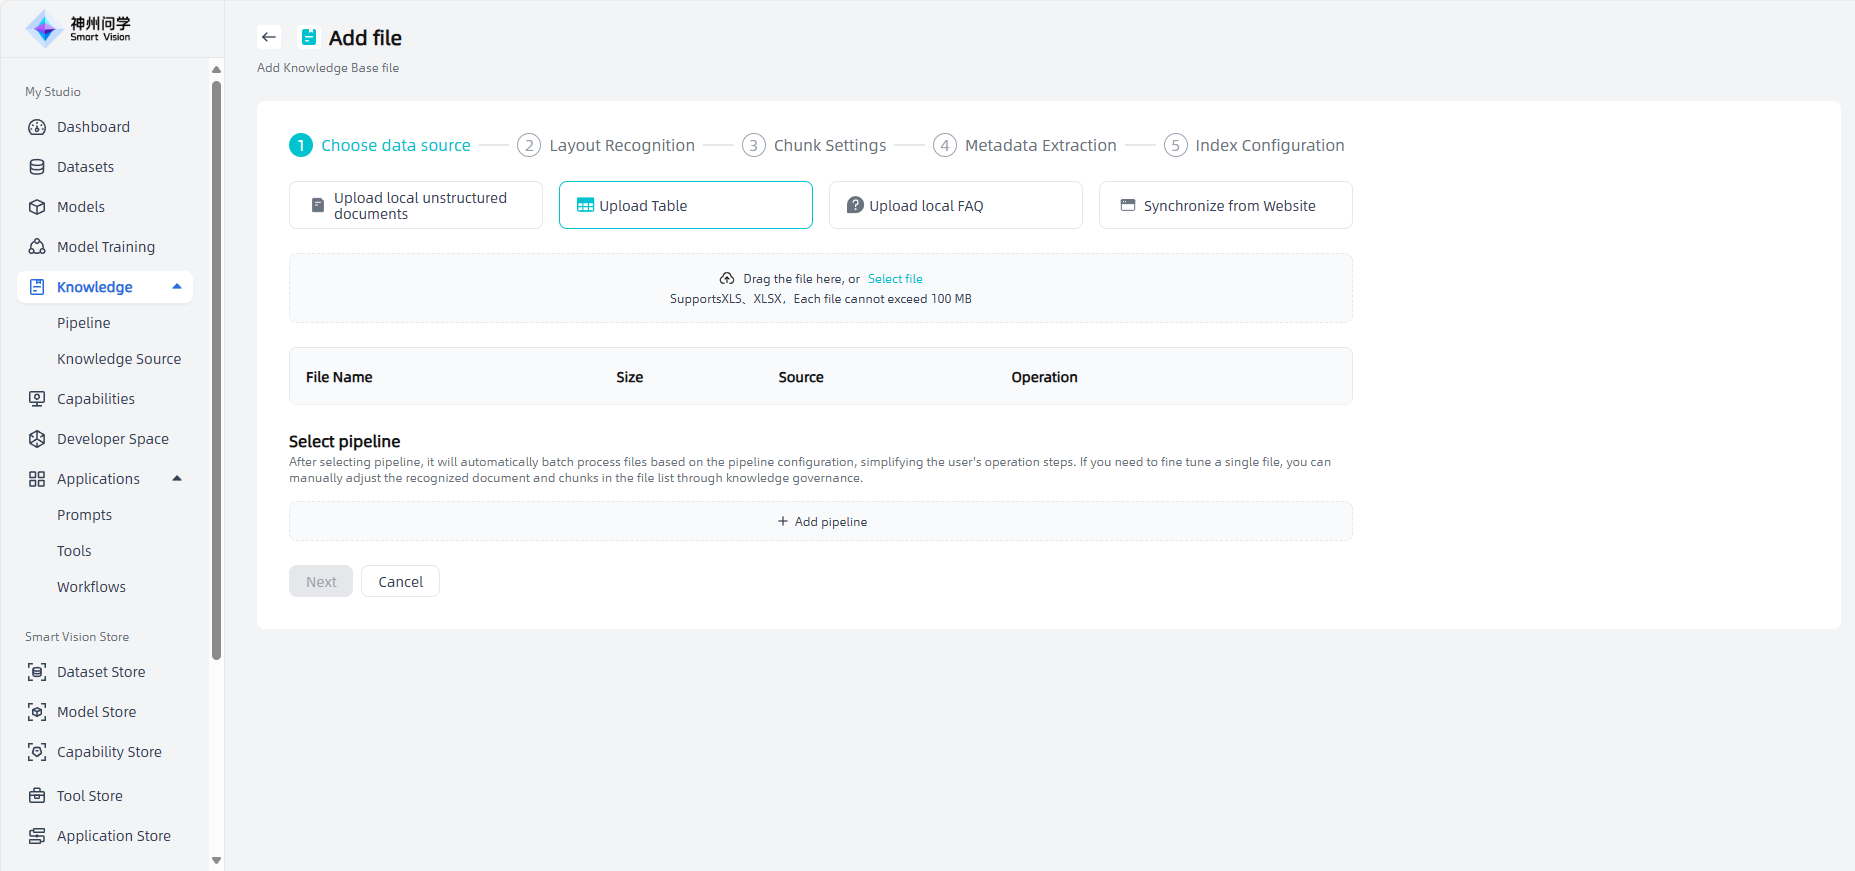
Upload Table: Upload knowledge base files that meets the required format and size by dragging and dropping the file or selecting the file.
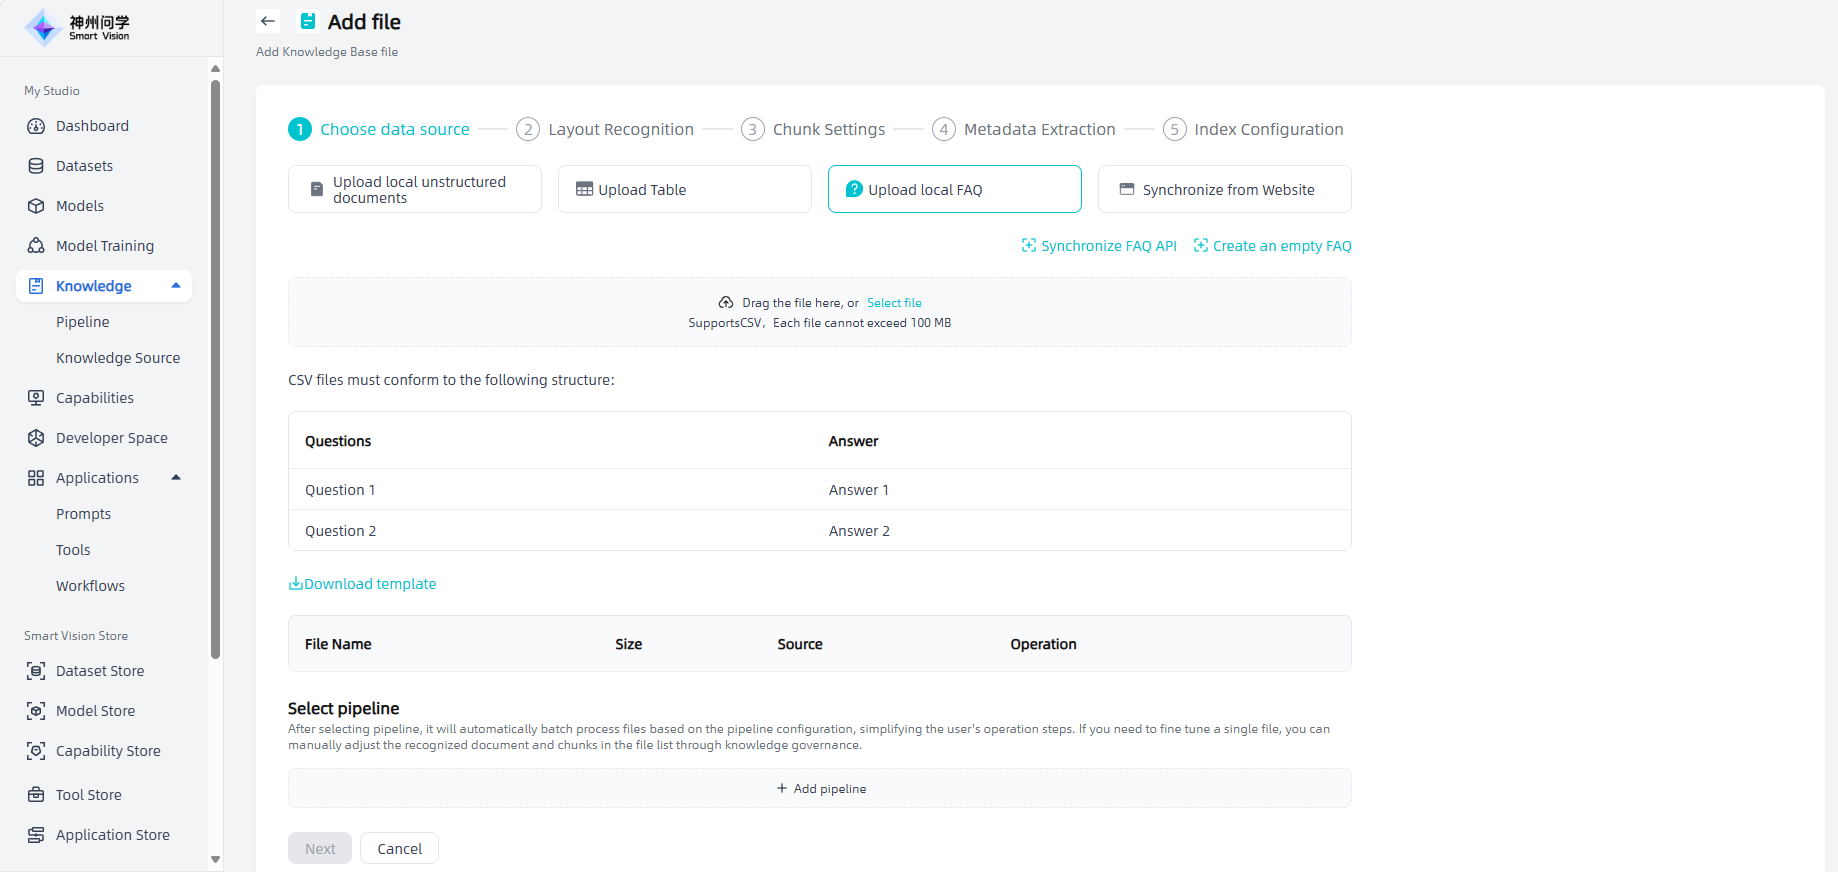
Upload local FAQ: Upload knowledge base files that meets the required format and size by dragging and dropping the file or selecting the file. You can download the template, edit it according to the template and then upload it. You can also click "Synchronize FAQ API" to import it through API synchronization. You can also directly click "Create an empty FAQ", so that you can add chunk information directly to the empty FAQ later.
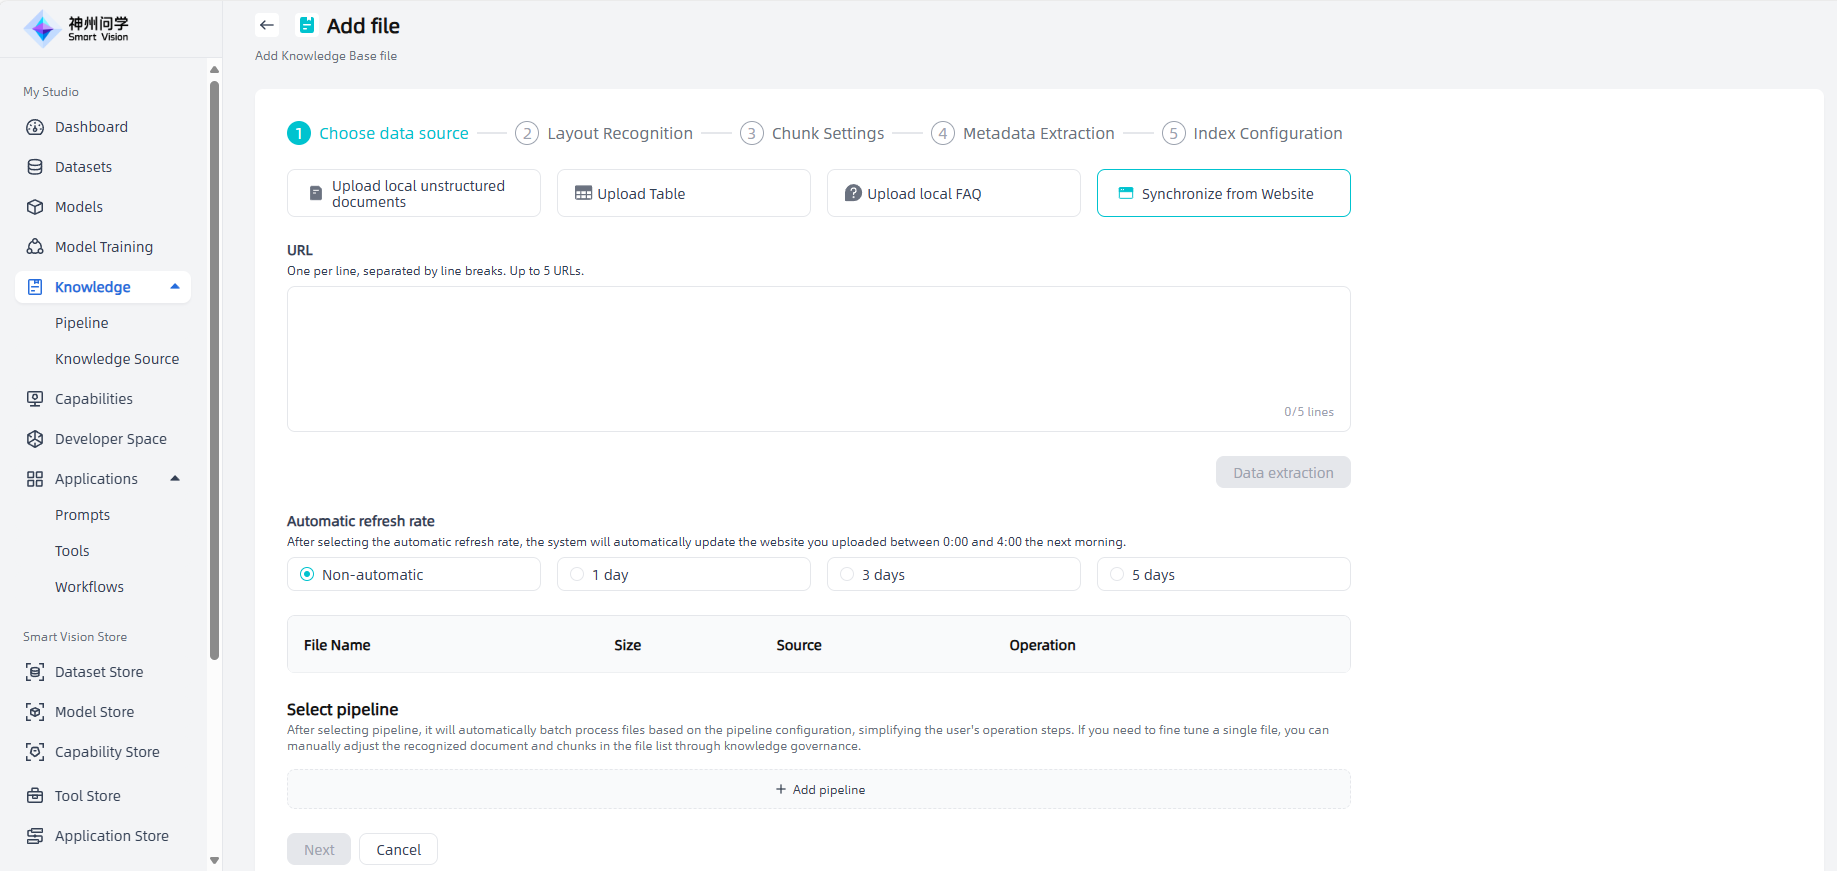
Synchronize from Website: You need to fill in the web link, set the automatic refresh frequency, and extract data to complete this type of file addition.
Knowledge governance: The added files will be displayed in the "Add Files" list. You can choose: ① Click "Next" to gradually complete the knowledge governance related settings; ② Click on "Add pipeline" and select the knowledge governance template to achieve automated batch processing.
Gradually set knowledge governance
①Layout Recognition: After adding the file, click "Next" to enter the layout recognition page. The left side of the page displays the original documents uploaded by the user (PDF, DOC, DOCX, PPT, PPTX, PNG, JPG), and the right side displays various layout elements recognized through models/tools (titles, text, images, tables, formulas, etc., which are formatted and converted into multimodal Markdown format). When users add files in bulk, only the recognized documents are previewed and loaded. Users can switch files to view the layout of different files and recognize the original and recognized documents. If there are no PDF, DOC, DOCX, PPT, PPTX, PNG, JPG files in the files uploaded by the user at a time, the layout recognition step will be skipped and the chunk settings will be entered directly. Users can switch and select the appropriate layout recognition model as needed.
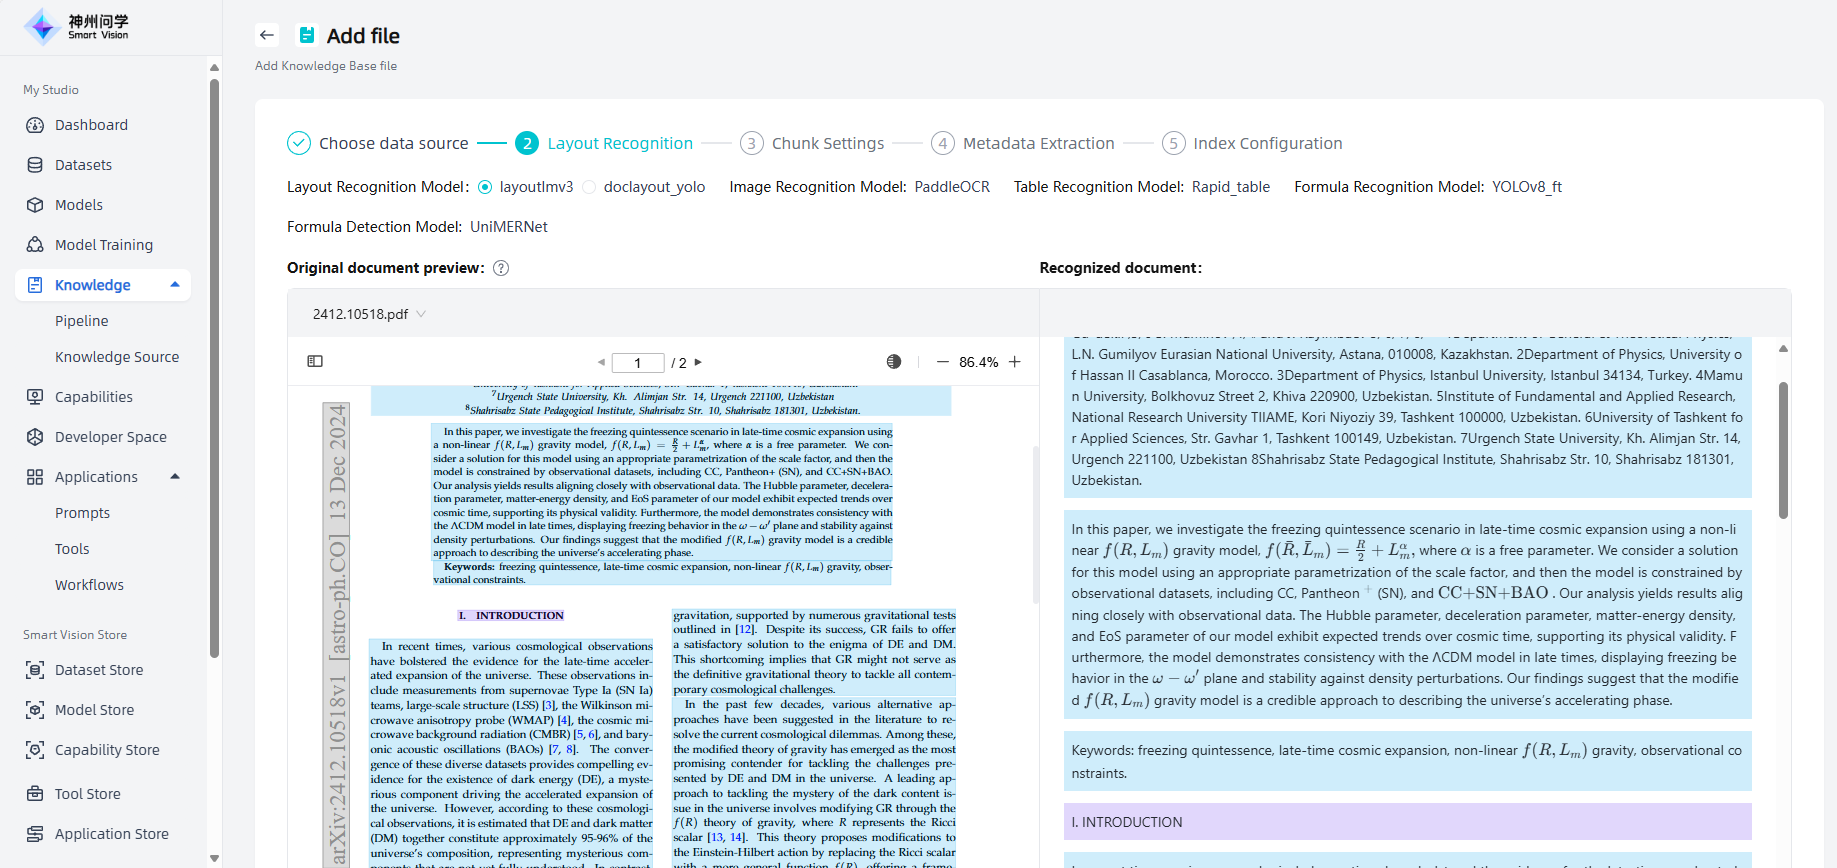
②Chunk Settings: After layout recognition, click "Next" to enter the chunk settings page. The left side of the page displays the chunk settings rules for different types of documents (unstructured document, table, FAQ). Users can choose the appropriate splitter as needed and preview the MD file sliced in chunks in the right workspace.
③Metadata Extraction: After chunk settings, click "Next" to enter the metadata extraction page. The left side of the page supports users to select metadata extraction information as needed, and the chunks and metadata preview are displayed on the right side.
④Index Configuration: After extracting metadata, click "Next" to enter the index configuration page, where users can choose the index method and vector database as needed.
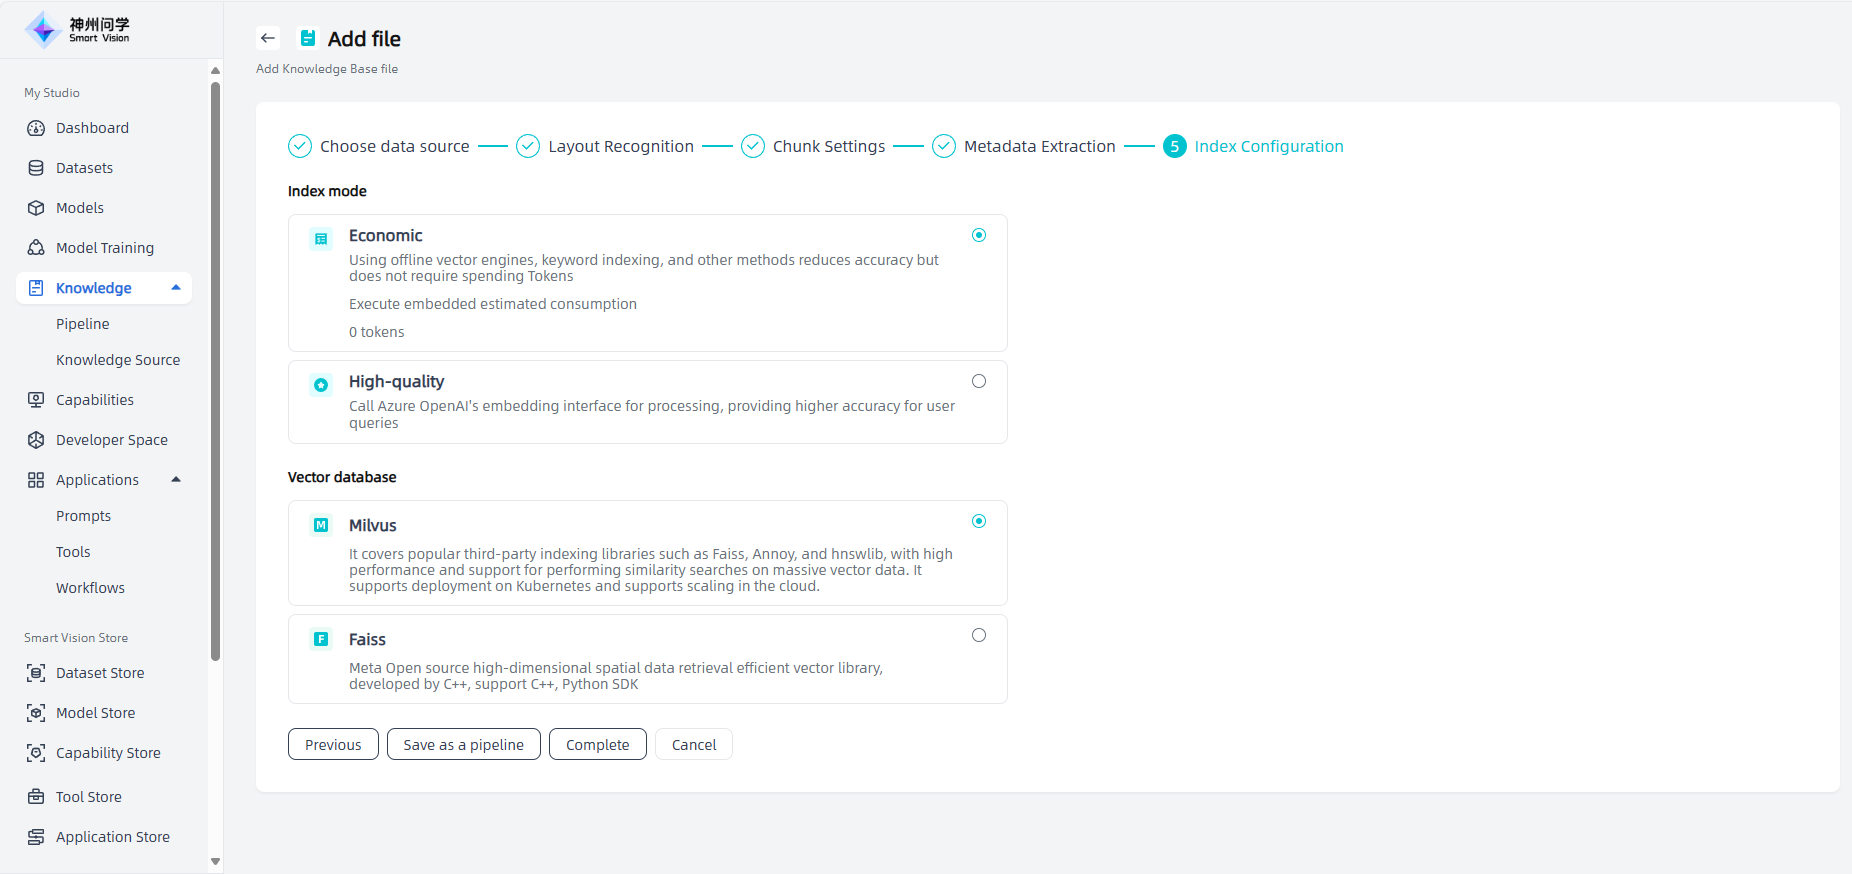
After completing the index configuration, click "Complete" directly, and the added files will appear in the knowledge base file list and begin embedding processing.
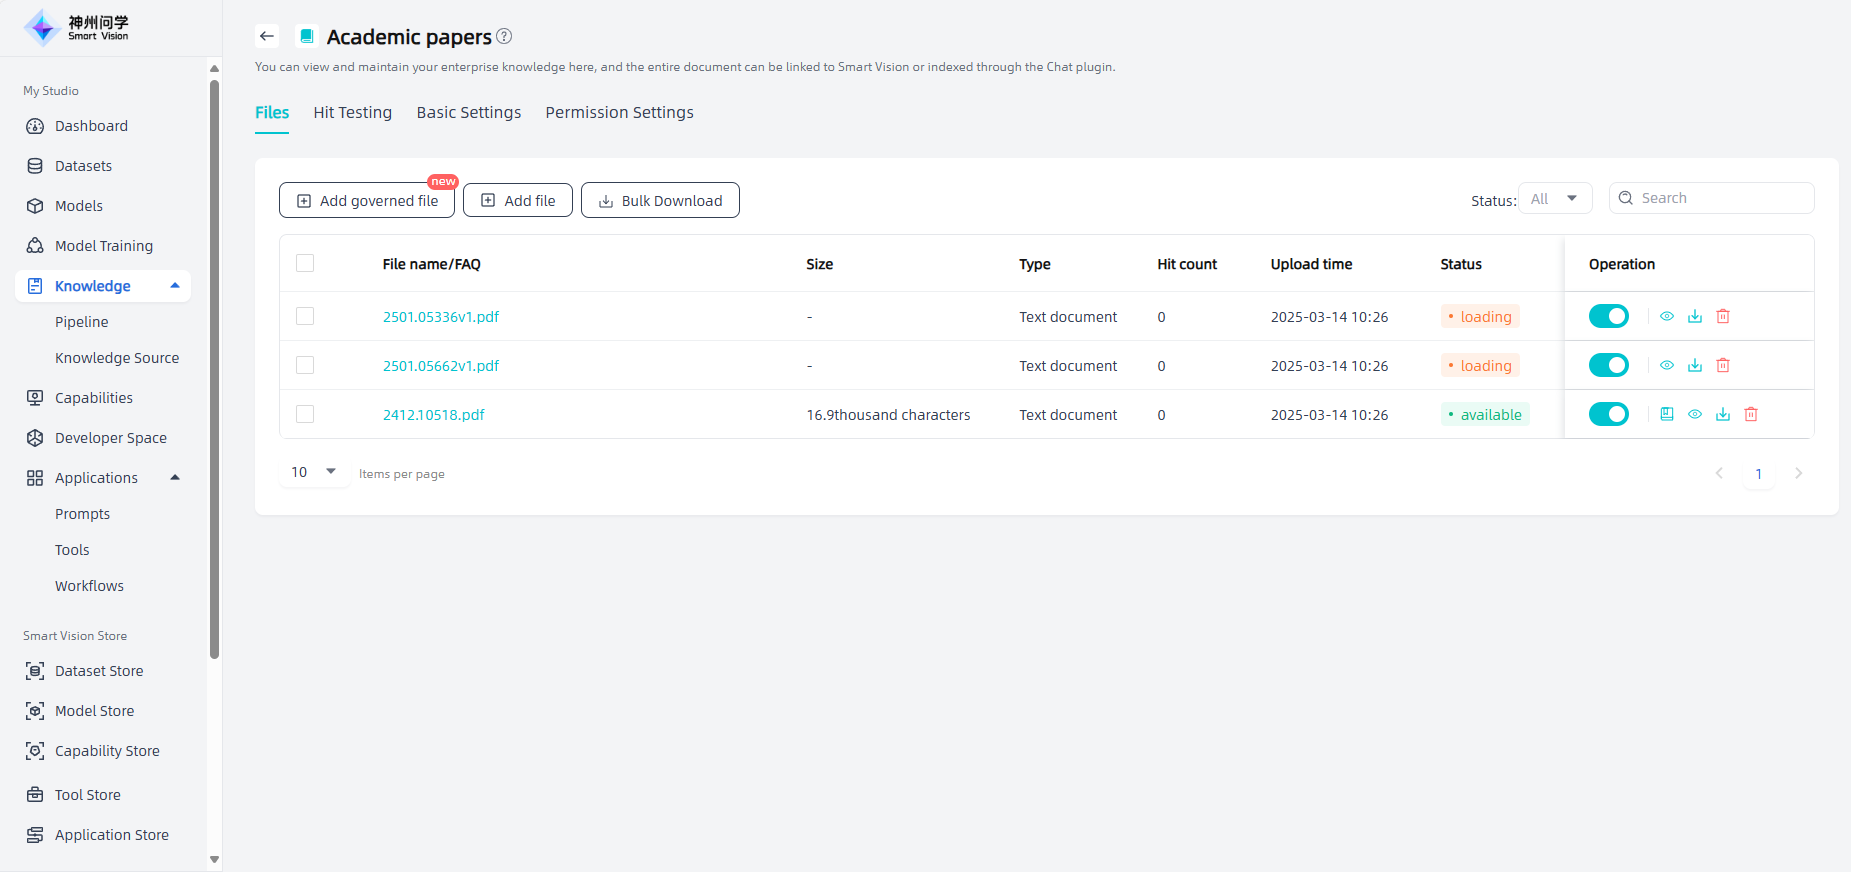
The relevant knowledge governance settings during this process support one click saving as a pipeline. Click the "Save as a pipeline" button to save this configuration operation and create a set of knowledge governance templates. After saving, they will be displayed synchronously in Knowledge - Pipeline.
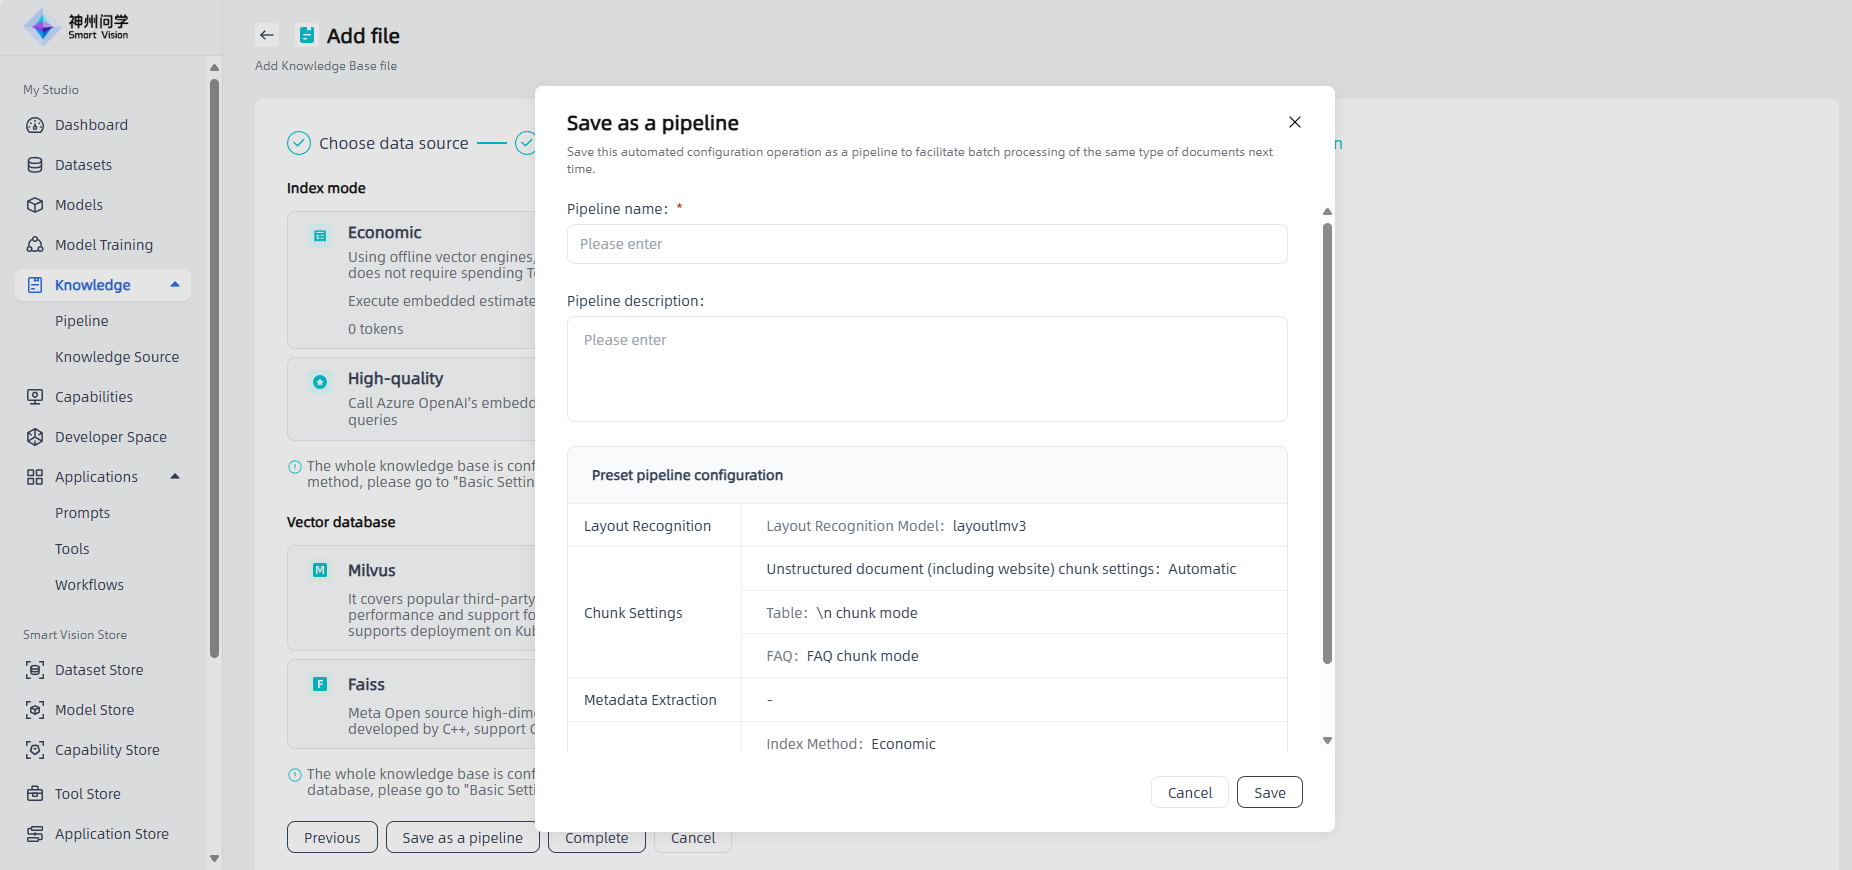
Add pipeline
After adding files, click "Add pipeline", and users can select the appropriate pipeline (within the scope of Knowledge Pipeline and not conflicting with the basic settings of the knowledge base). After selecting the pipeline, click "Finish", and these files will appear in the list of knowledge base files and be automatically processed according to the pipeline.
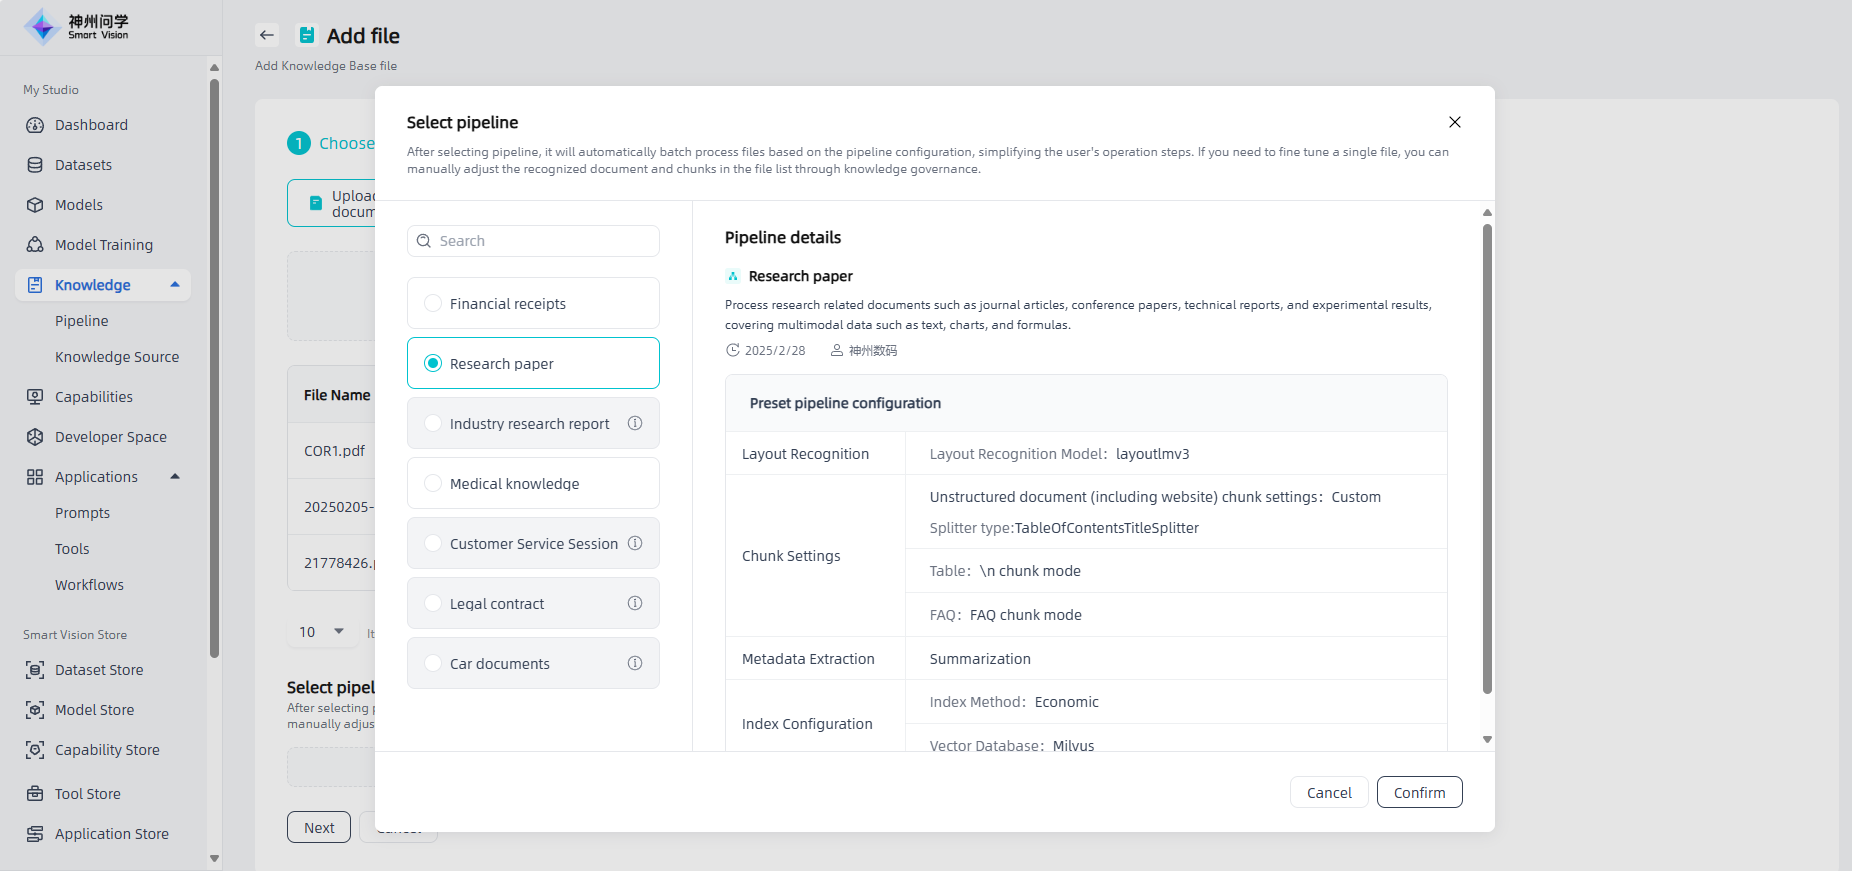
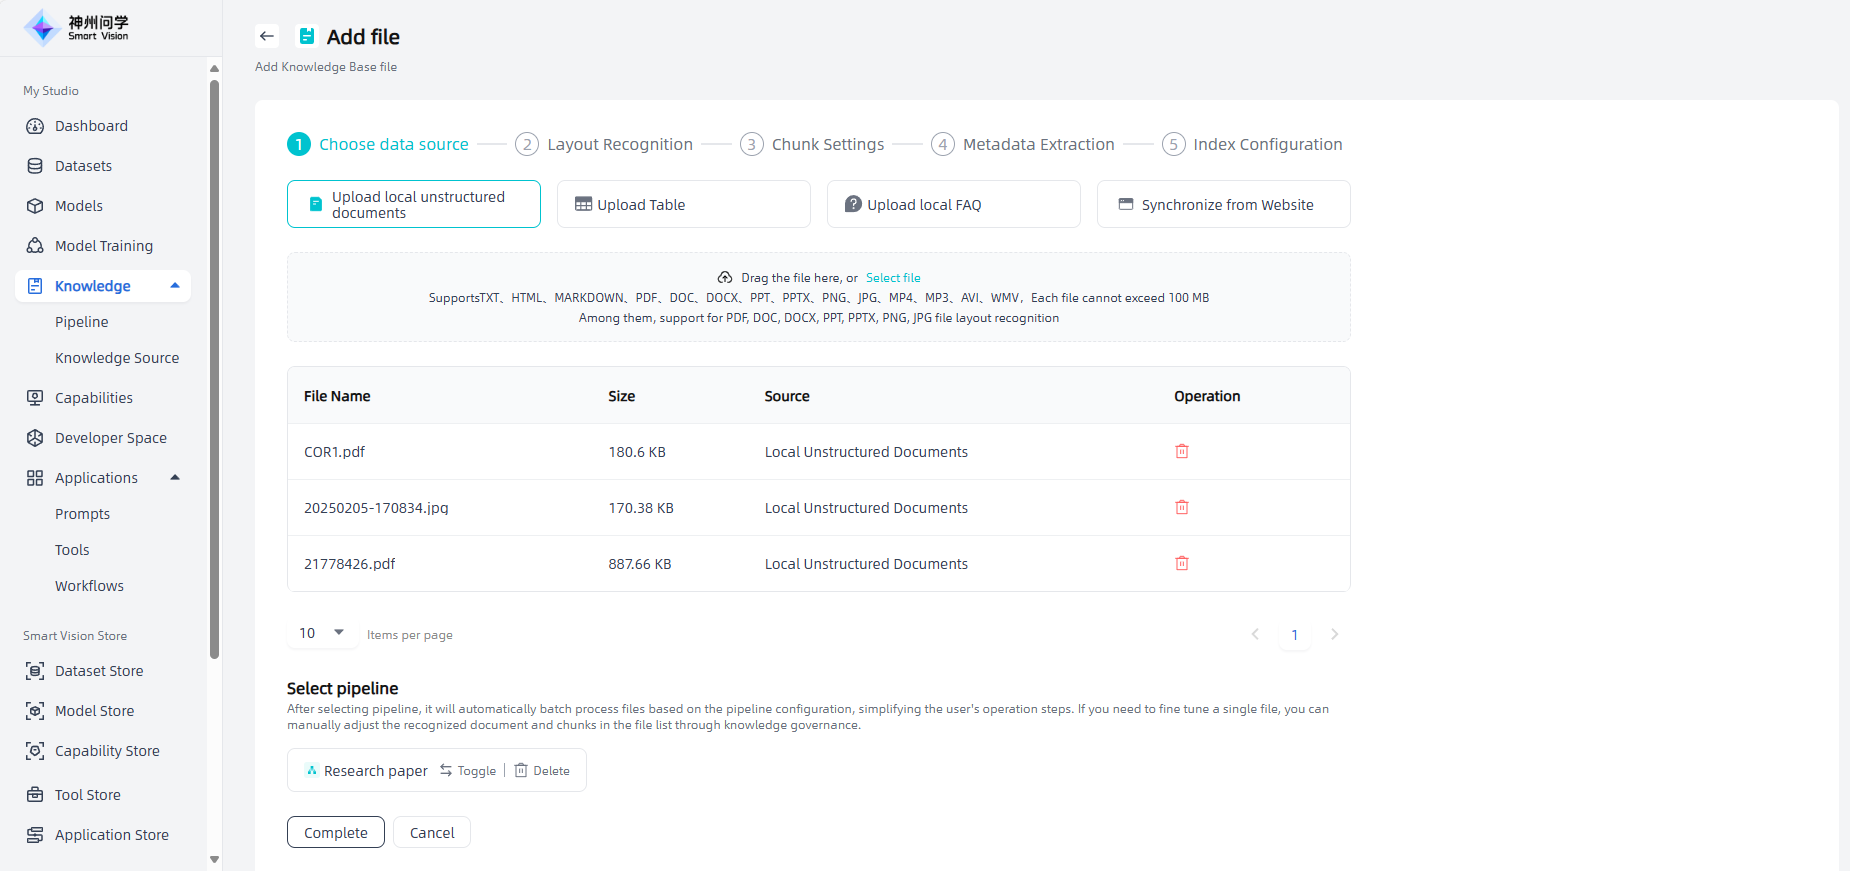
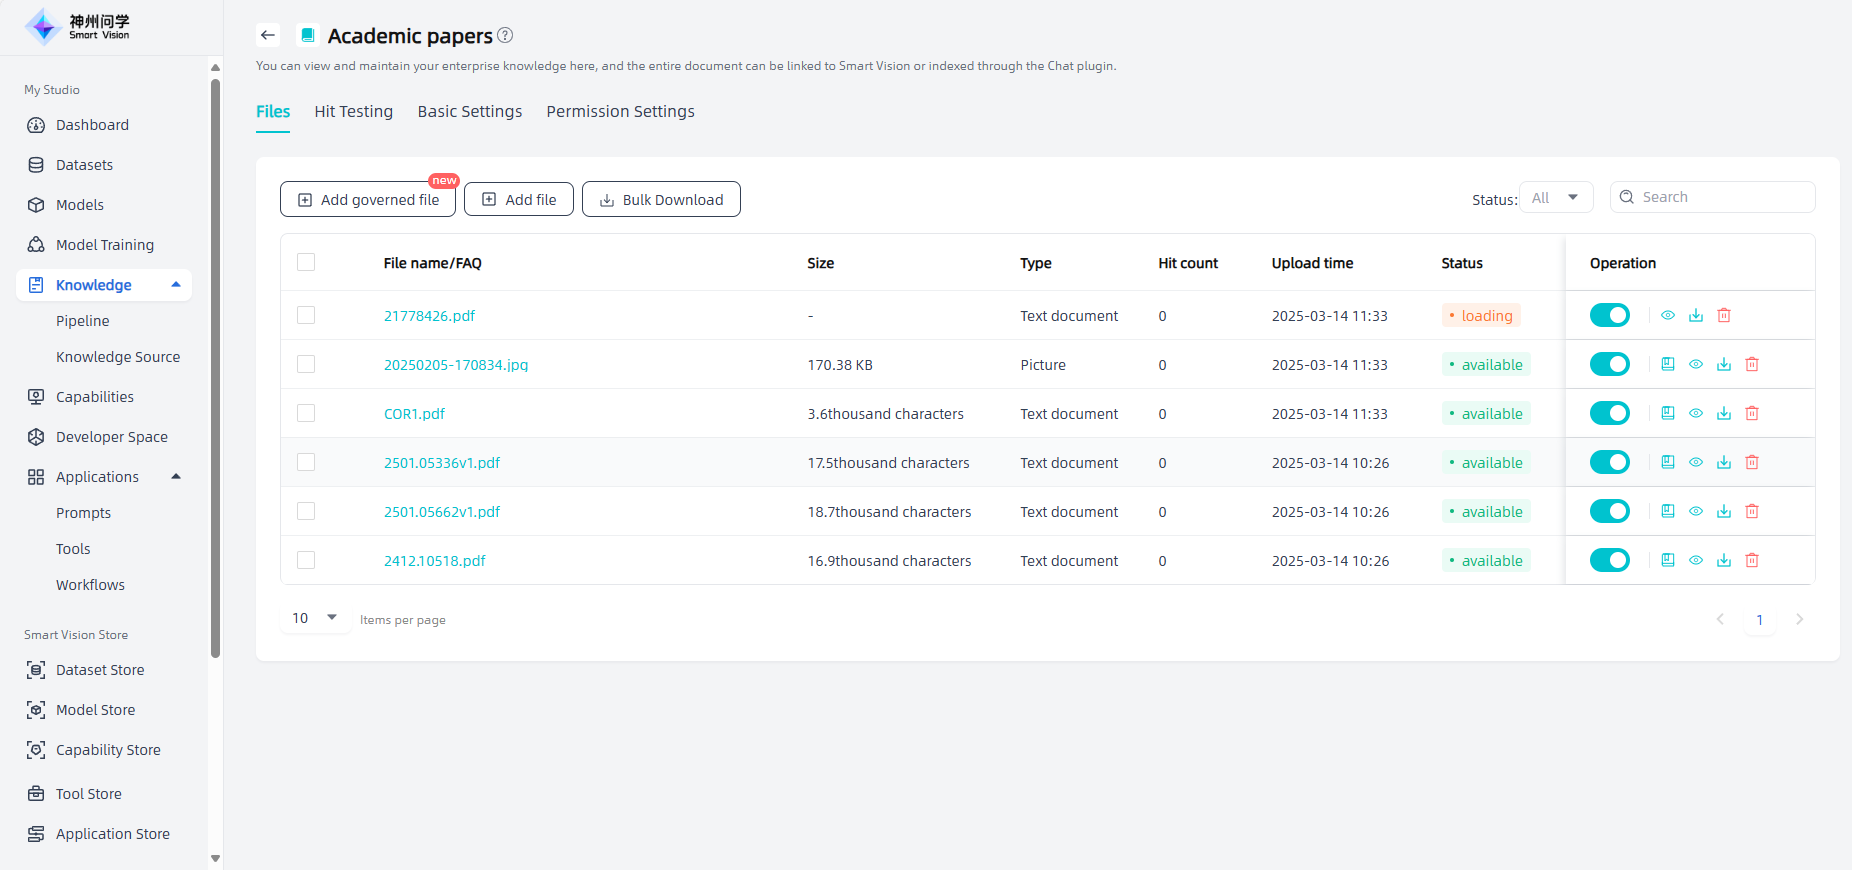
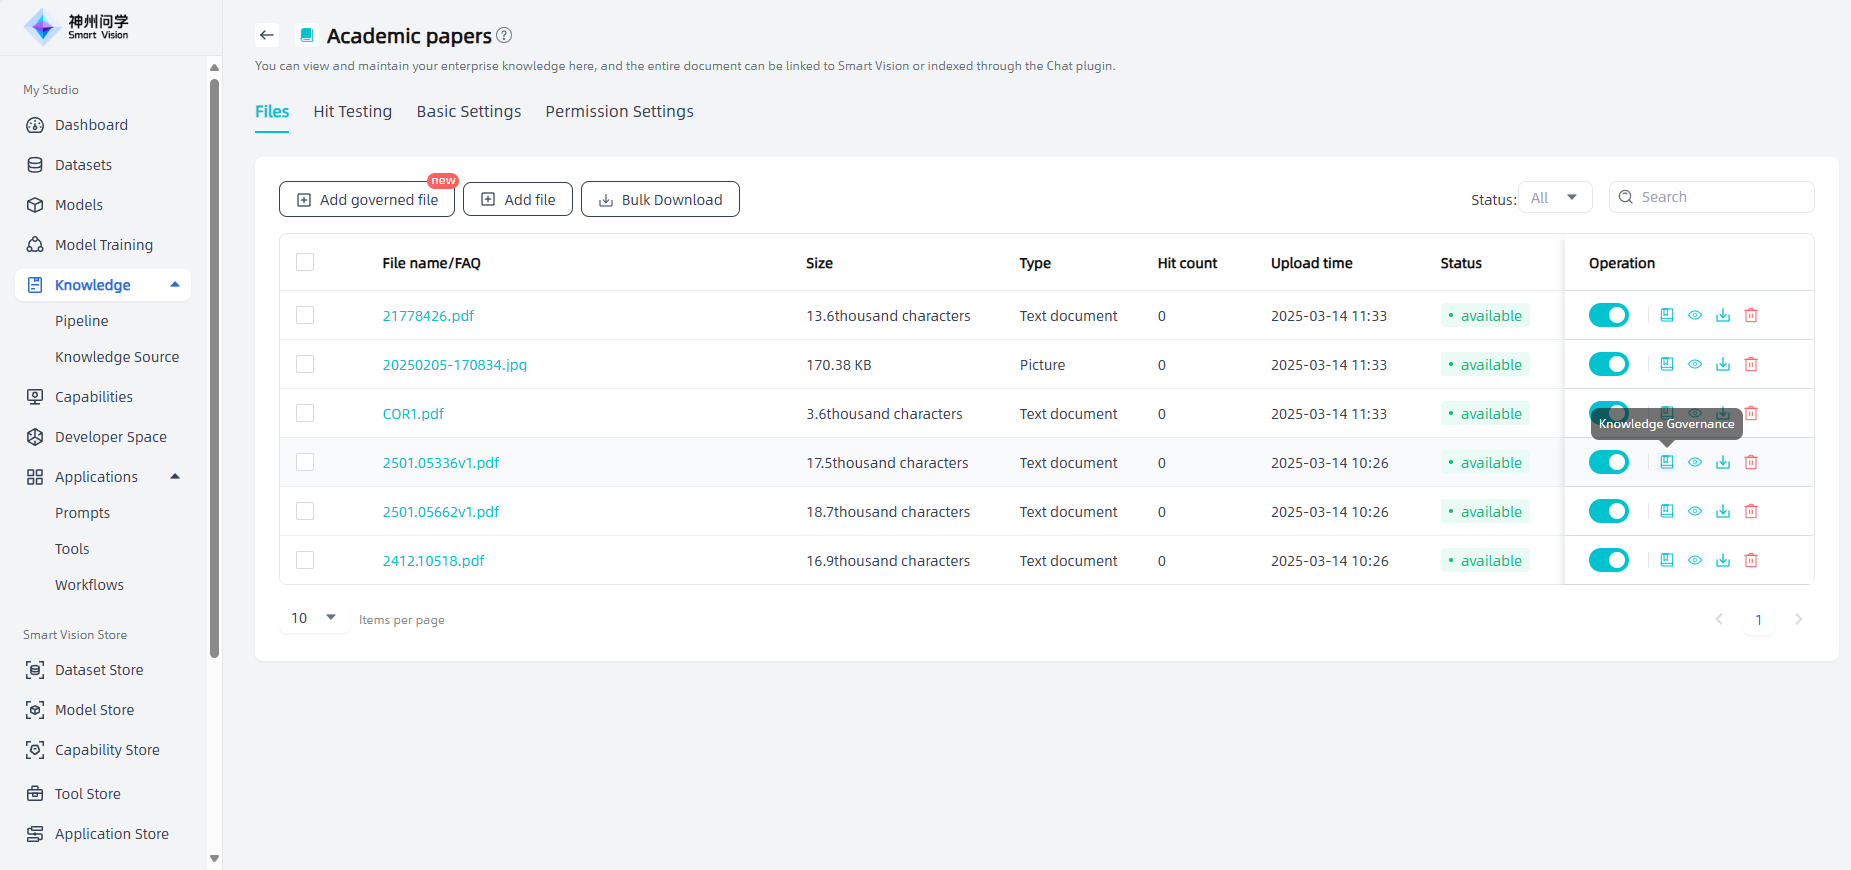
Manual governance: For files added through "Add Governance Files" in the knowledge base file list, unstructured documents other than tables and Q&A sets have a "Knowledge Governance" button. Clicking the "Knowledge Governance" button supports users to manually adjust the effect of layout recognition and chunk settings (PDF, DOC, DOCX, PPT, PPTX, PNG, JPG files). Knowledge governance includes layout recognition and chunk settings; TXT, HTML, MARKDOWN, MP4, MP3, AVI, WMV file knowledge governance can only adjust chunk settings.
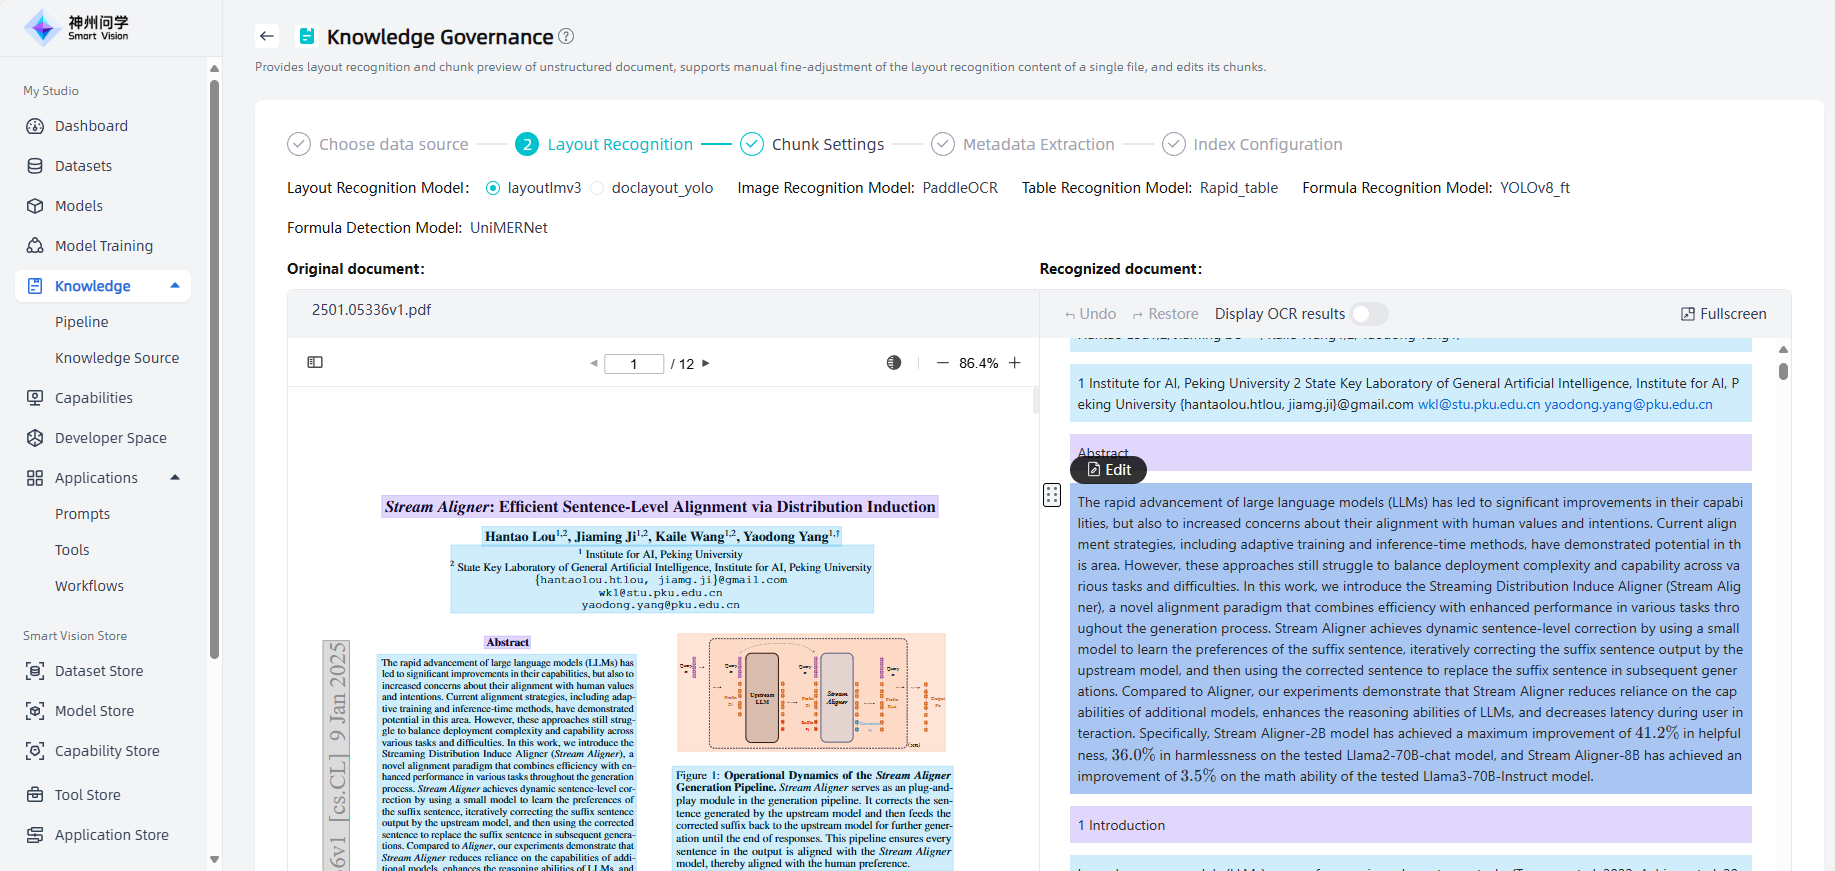
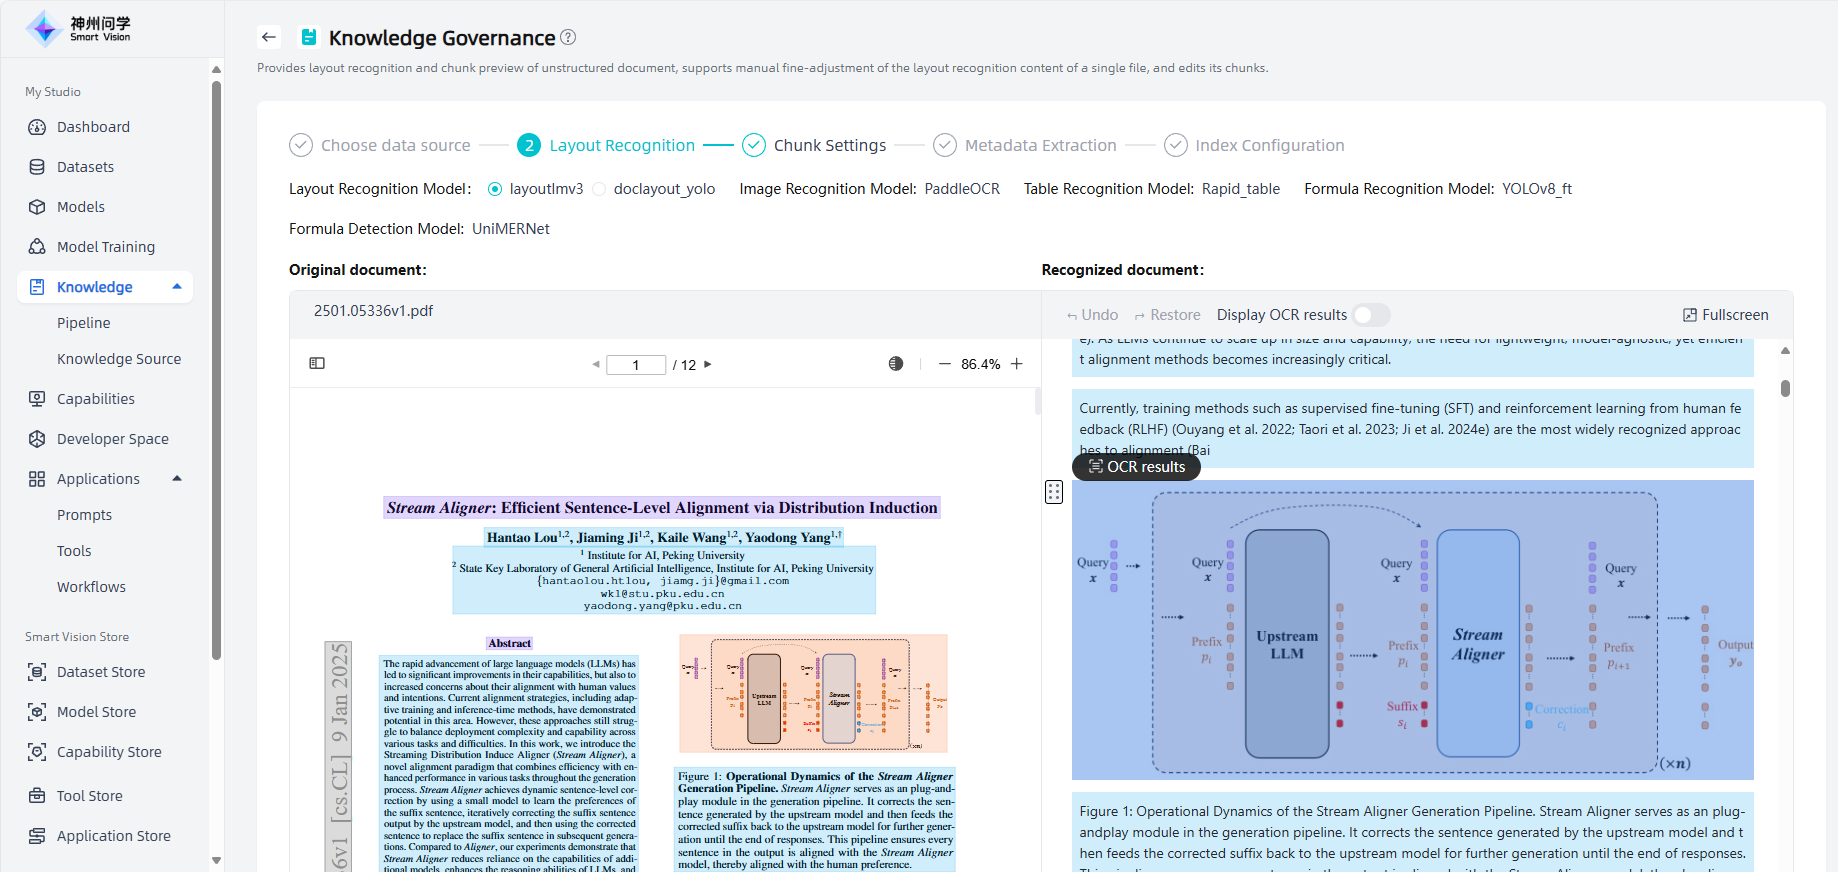
① Layout recognition: PDF, DOC, DOCX, PPT, PPTX, PNG, JPG files added through "Add Governance File" support manual adjustment of layout recognition results. Click the "Knowledge Governance" button to adjust the layout recognition results. The left workspace is the corresponding original file, and the right workspace is the recognized document. Users can adjust the order by selecting the parsed color blocks and dragging them, or click "Edit" to modify the content. After editing, clicking outside the box will save (if the system recognizes that the user has modified a lot of content, it will prompt). For images, tables, and formulas, the workspace on the right defaults to displaying their original styles. You can click "Display OCR results" to display the OCR text of all images/tables/formulas, or hover over a certain image/table/formula and click "OCR results" to display its OCR text, and support editing and modification.
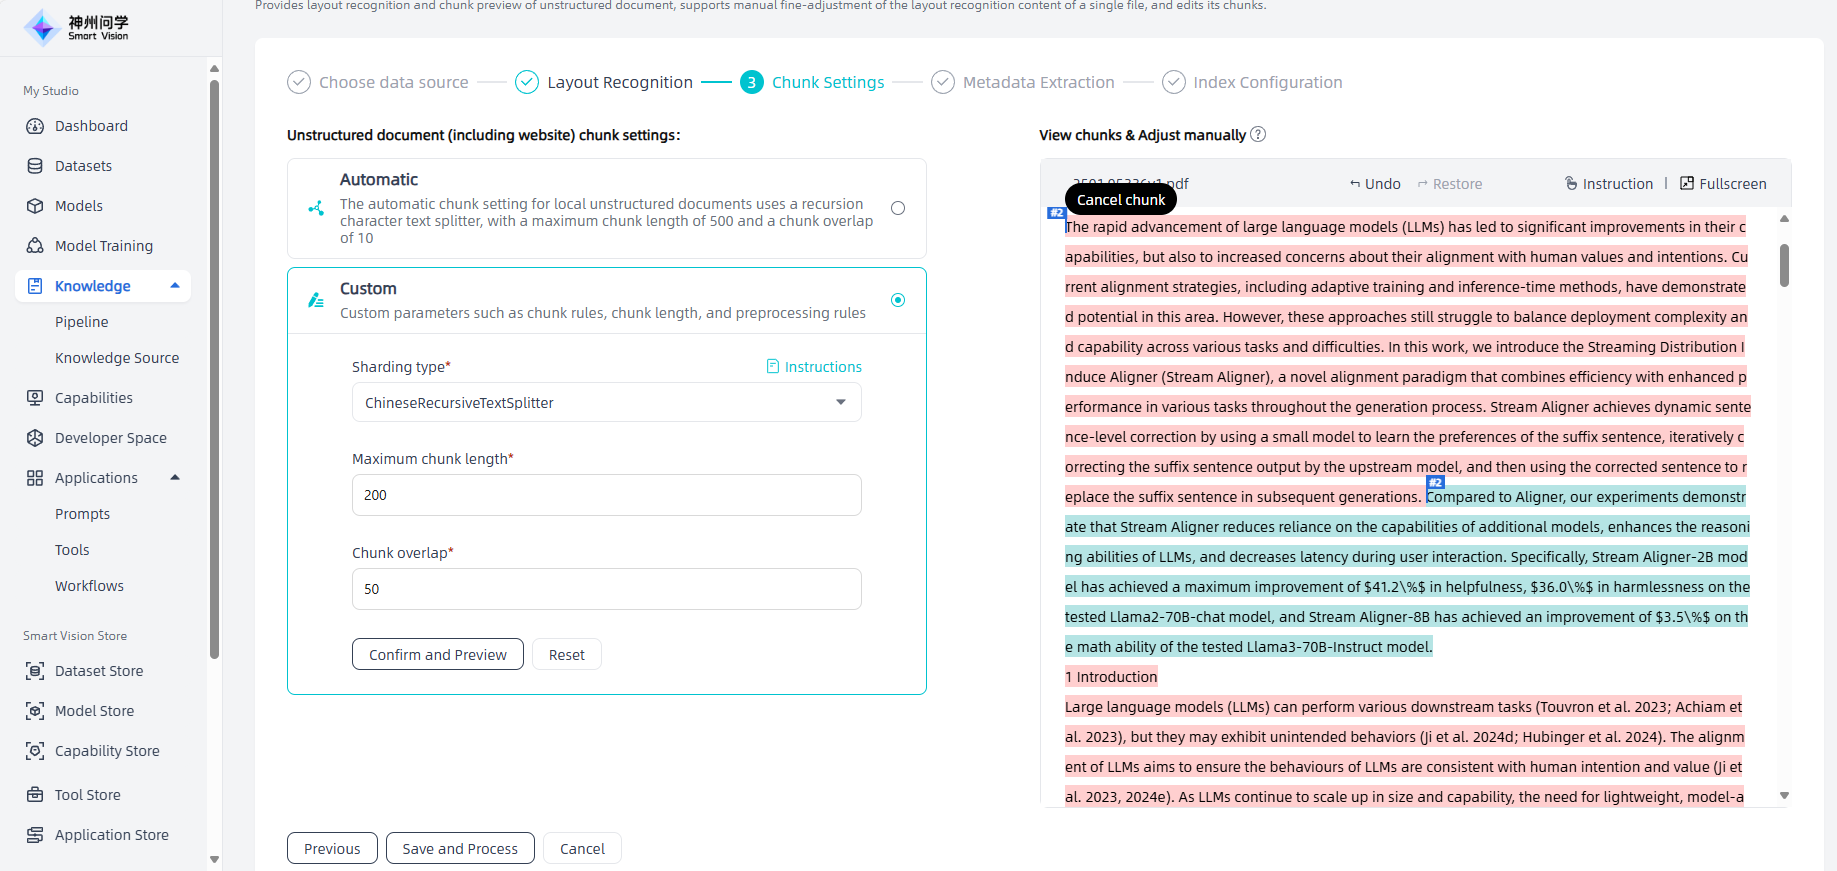
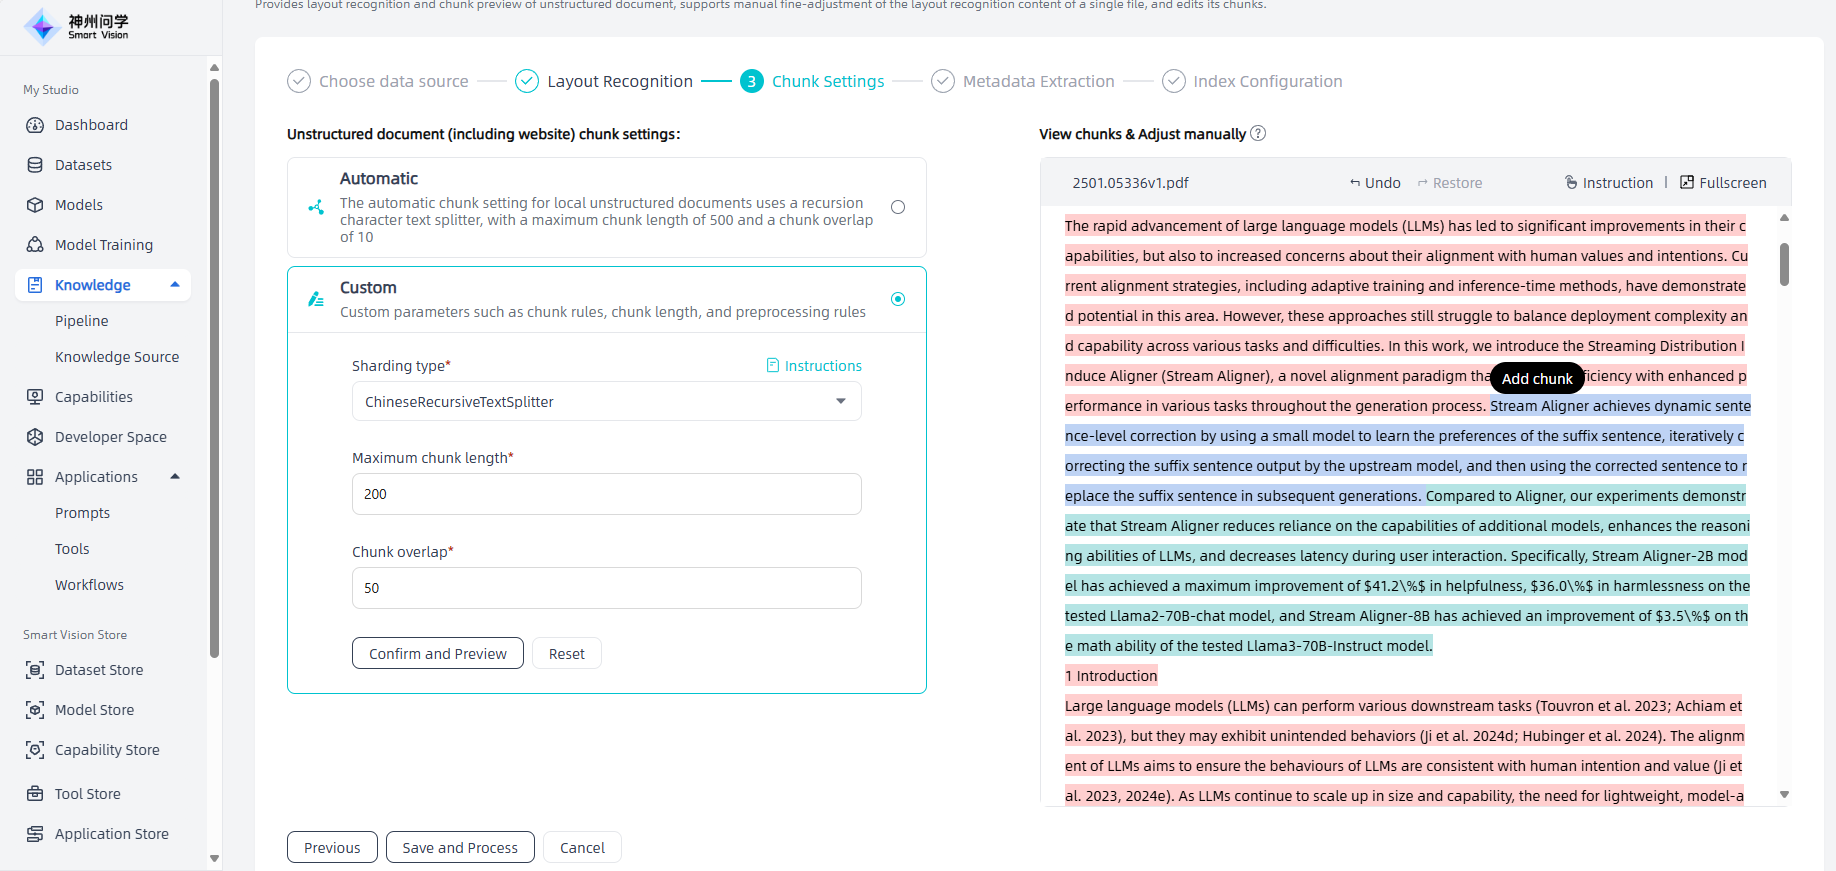
② Chunk settings: For PDF DOC、DOCX、PPT、PPTX、PNG、JPG, By clicking the "Knowledge Governance" button, you can manually adjust the chunk settings by clicking "Next" on the layout recognition interface. For TXT HTML、MARKDOWN、MP4、MP3、AVI、WMV, By clicking on the 'Knowledge Governance' button, you can directly enter the chunk settings. On the left side, only the chunk setting data of the corresponding document is displayed, and users can modify the chunk settings. On the right side, the workspace displays MD files sliced in the corresponding chunk method. When the user hovers over a chunk, the "Cancel chunk" button and "Text Selection cursor" appear. Clicking the "Cancel chunk" button can cancel this individual chunk, or dragging the text selection cursor left/right can adjust the chunk. When the user clicks on the unhighlighted document content, the "Add chunk" button appears. Clicking the "Add chunk" button indicates that the chunk has been successfully added. After adjusting the chunk settings, click "Save and Process" to complete manual management.
Edit and modify: You can modify, delete, set, and perform other operations on the knowledge base on knowledge base details.
To add more files to the knowledge base, click on "Add governed file" on the knowledge base details page to perform the relevant operations. You can perform file preview, available/disabled settings, knowledge governance/text segmentation and cleaning settings, segmented viewing, file download, file deletion, and other operations on files in the knowledge base.
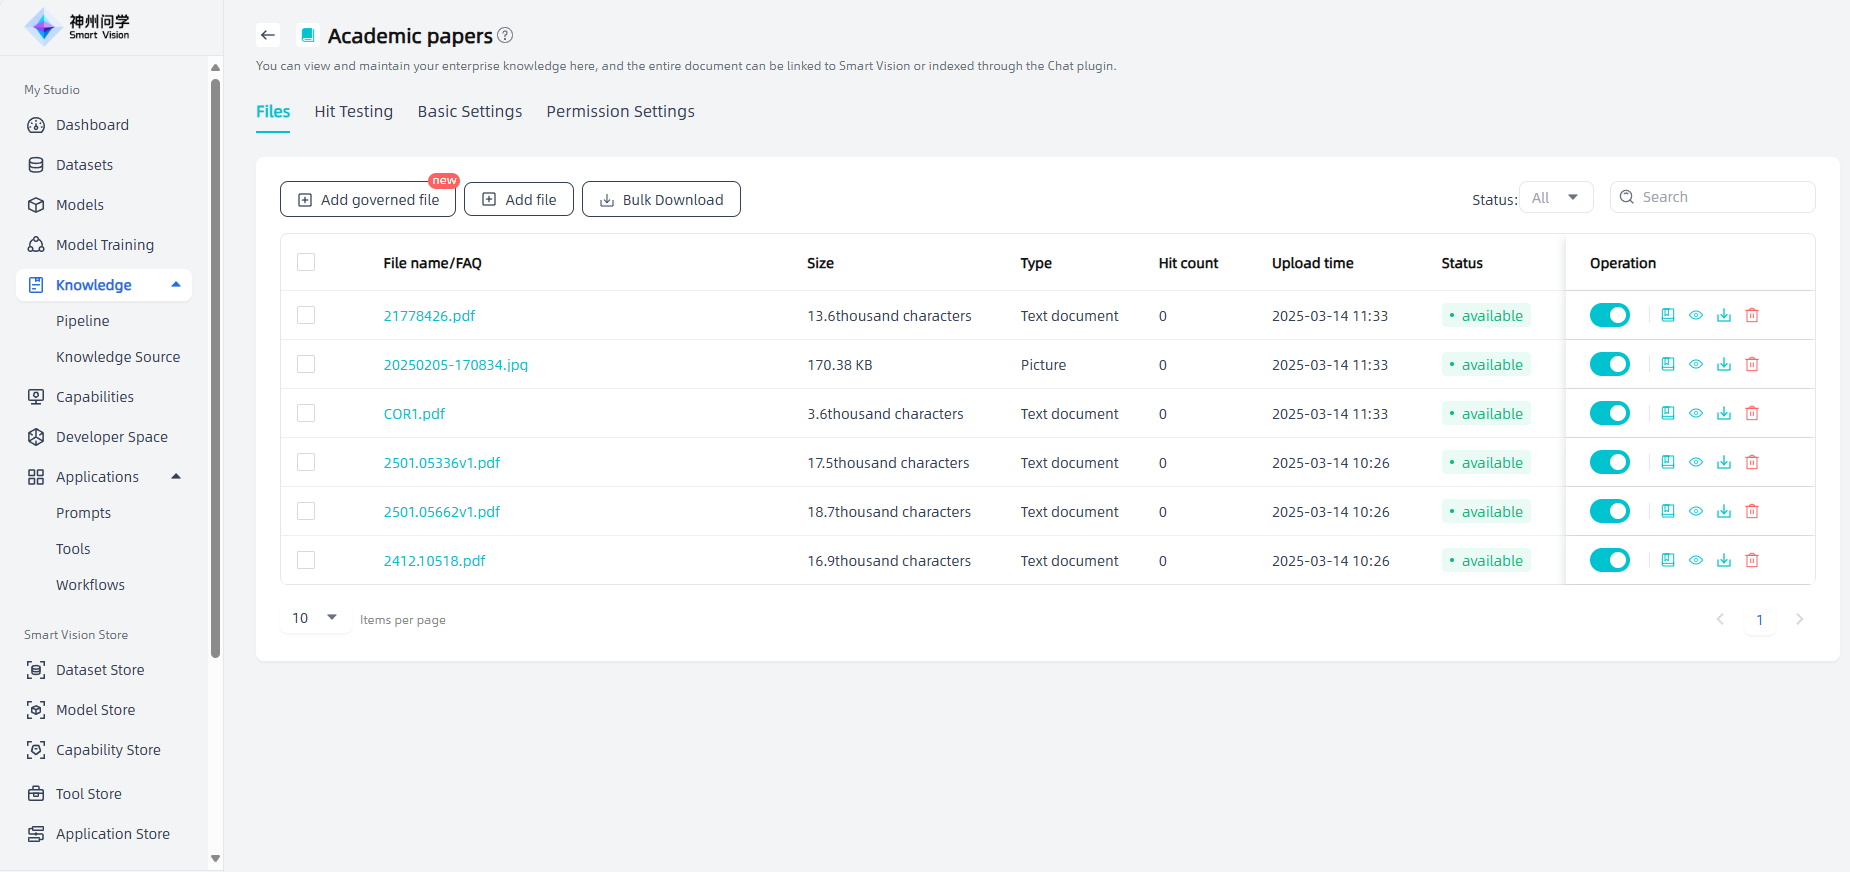
Among them, for FAQ files (including empty FAQs), click the "View chunkts" icon to enter the Chunk information page, click "Add chunk" to add chunks, and support adding rich text information such as images and videos in ANSWER. For added chunks, operations such as chunk editing, enabling/disabling settings, chunk movement, and chunk deletion are supported.
Synchronize external data sources
Start: In "My Studio - Knowledge", click the "Create Knowledge Base" button in the upper right corner to enter the "Create Enterprise Knowledge Base" page.
Select knowledge source: Select an existing knowledge source, or click "Add knowledge source" to bind a new knowledge source.
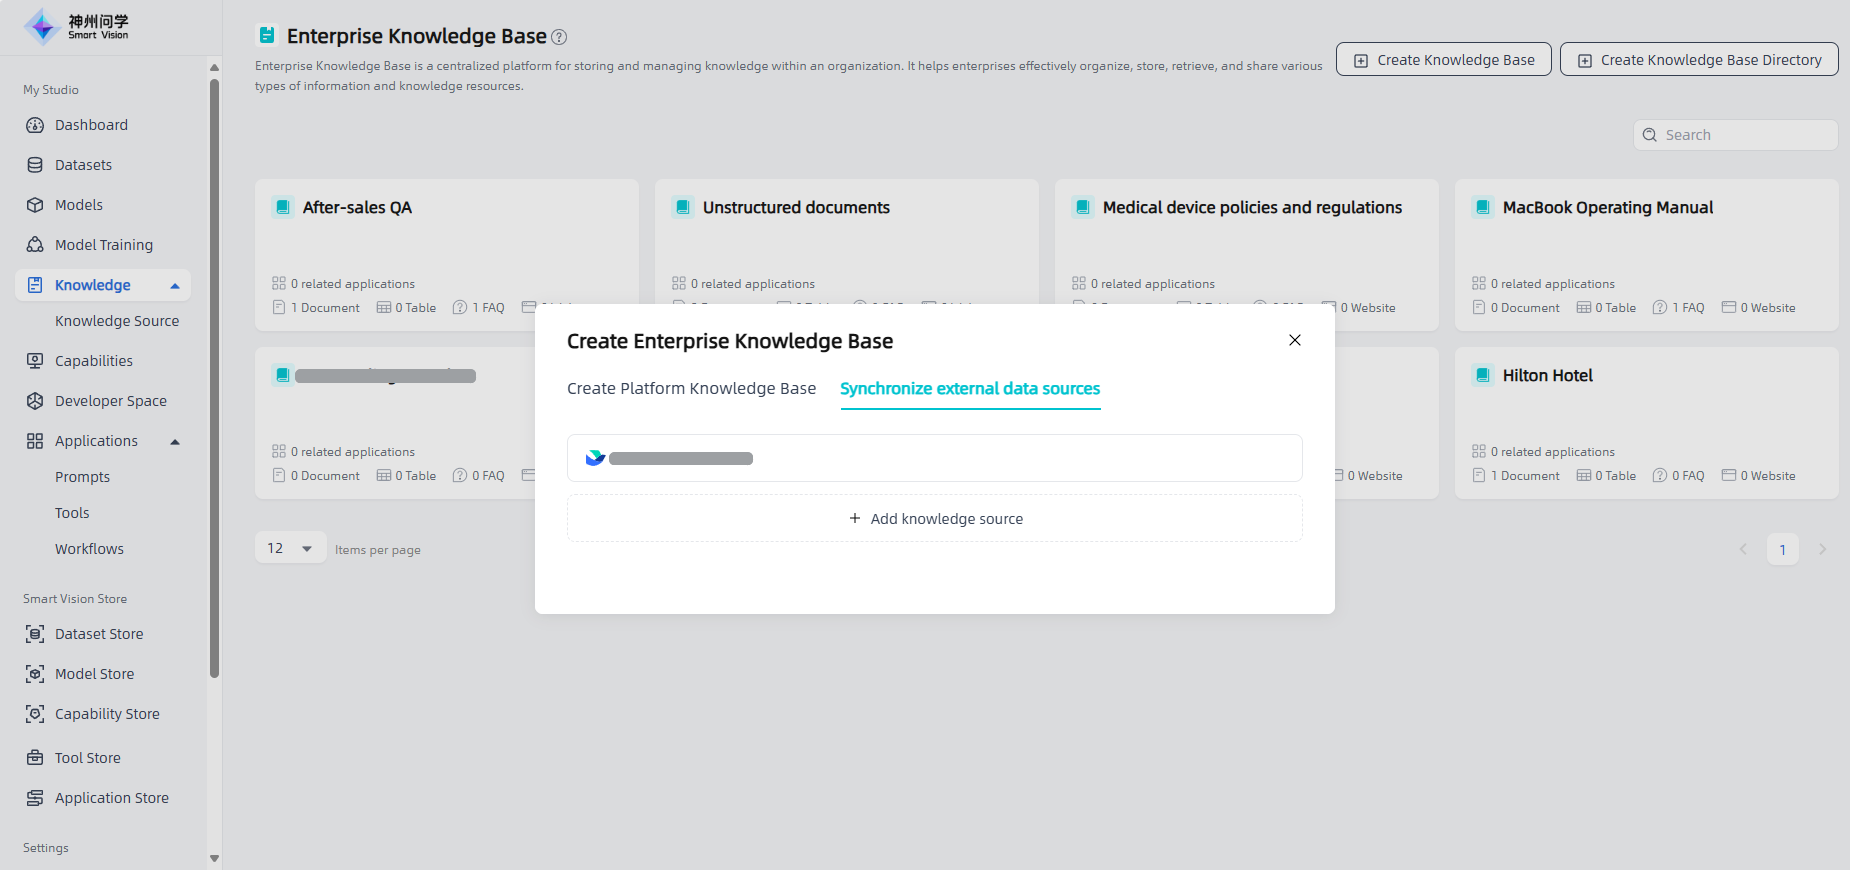
Select knowledge base & settings: Select the knowledge base to be added and set up the knowledge base. Click "Confirm" to complete the synchronization of the external data source and display it in the enterprise knowledge base list.
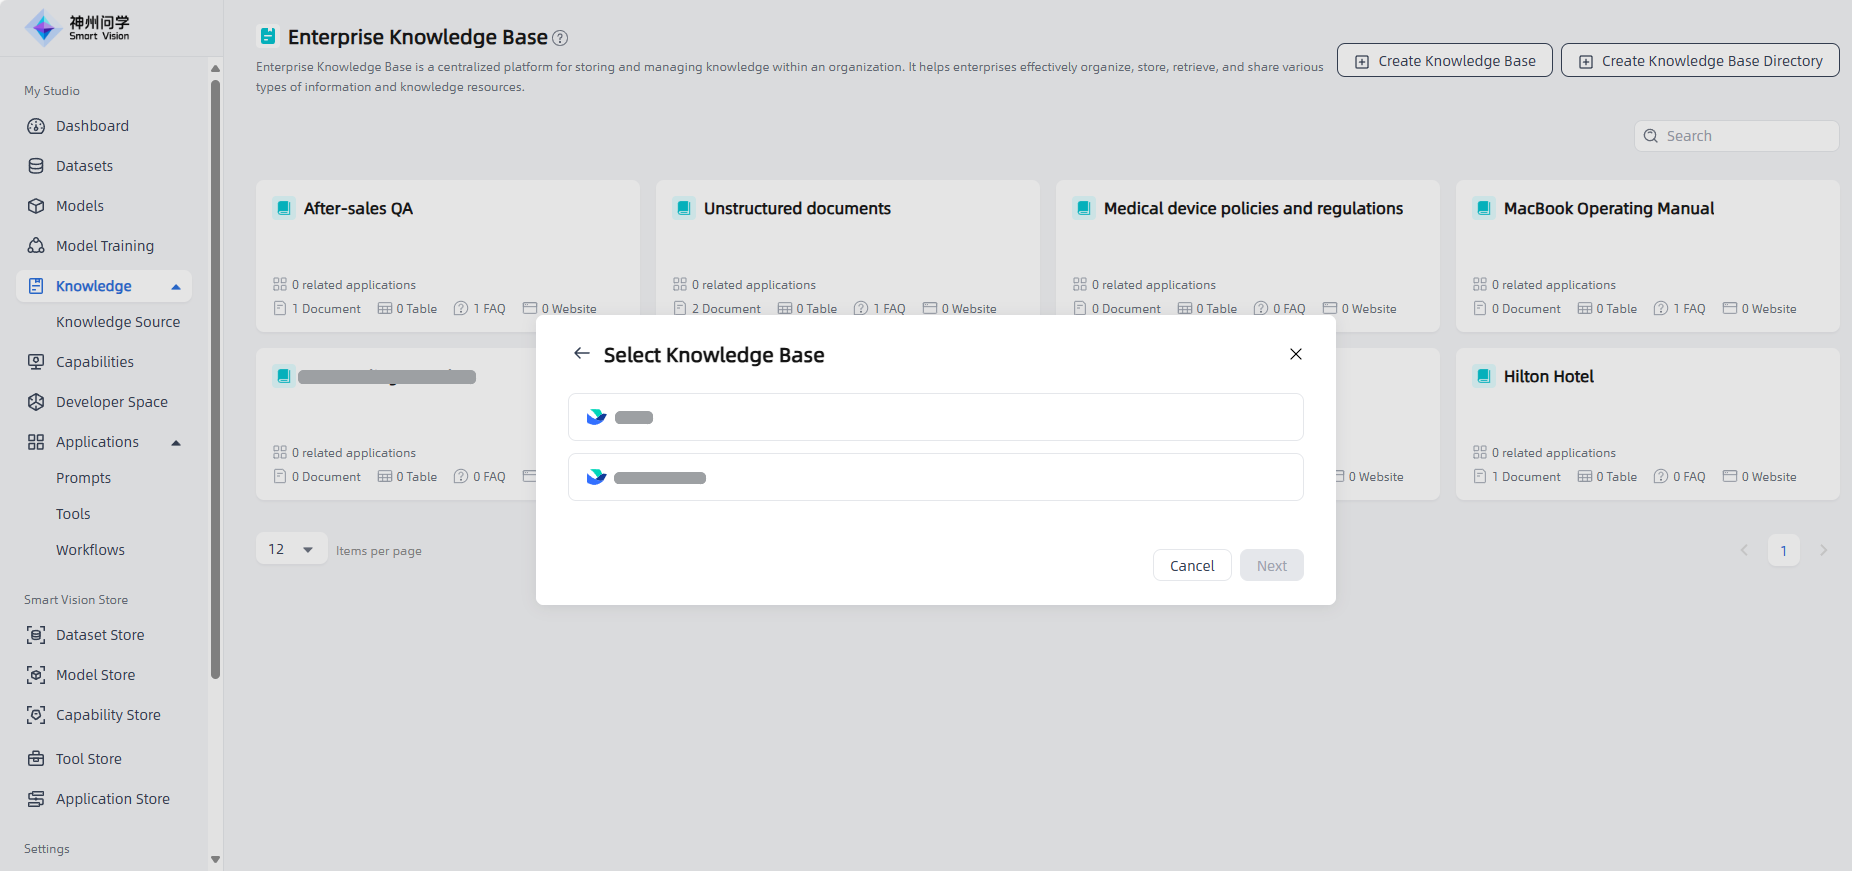
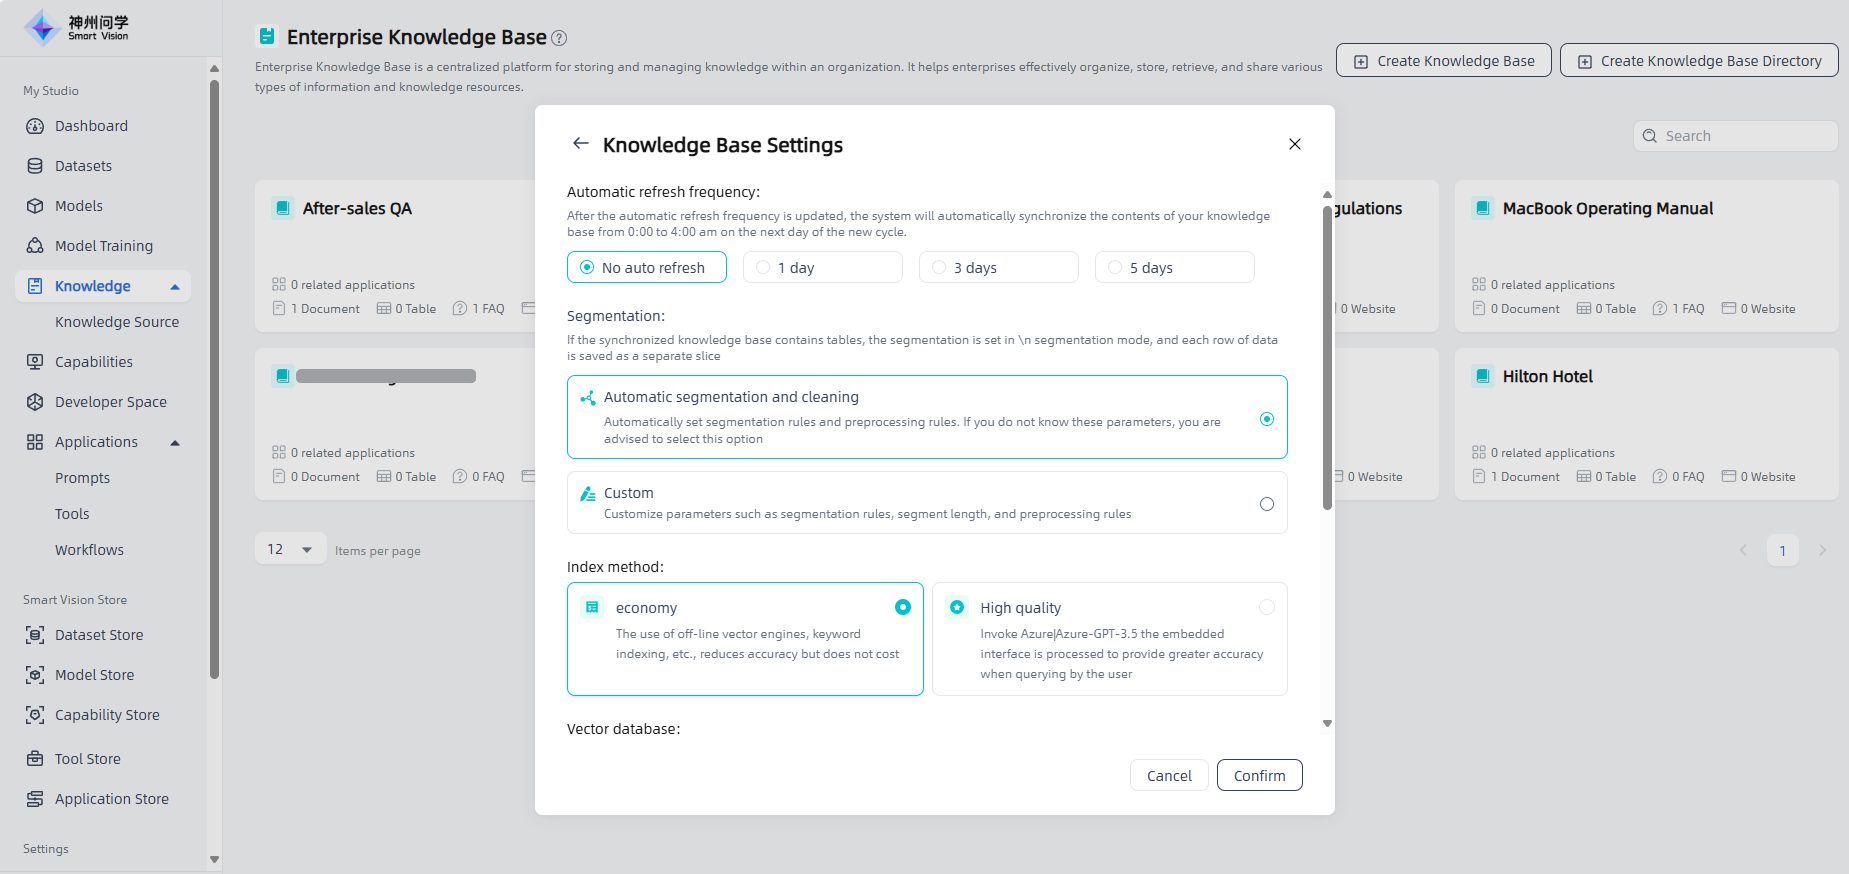
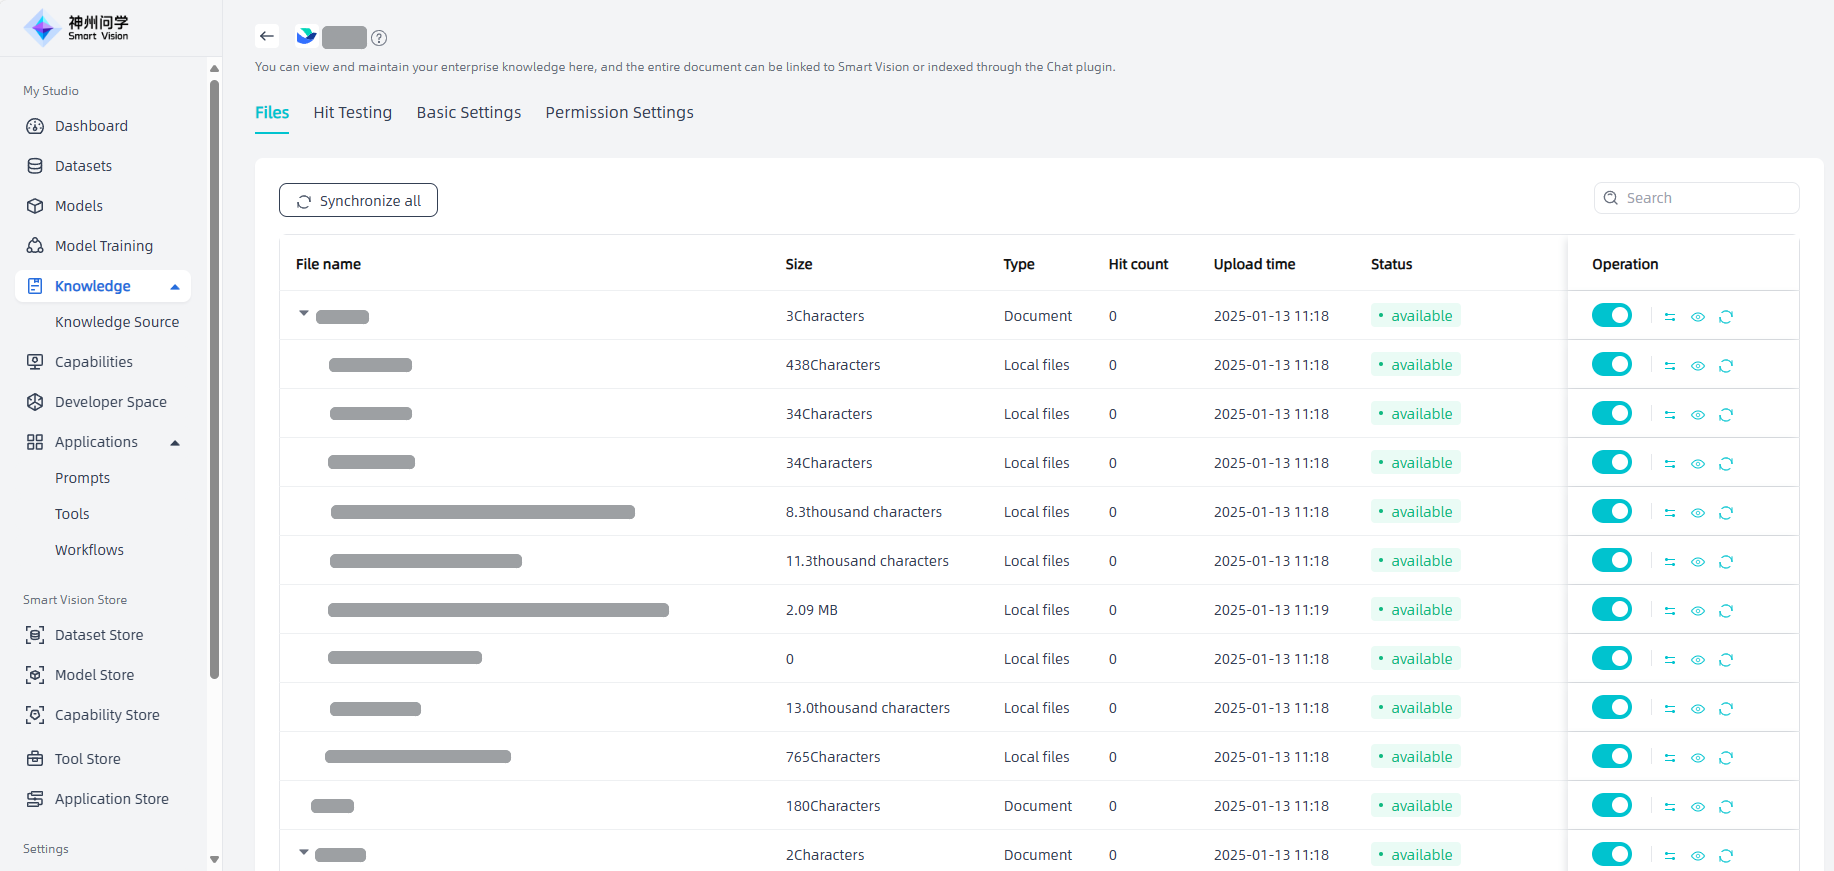
Edit and modify: Click on the knowledge base added through "Synchronize external data sources" to view the files in the knowledge base and support operations such as enabling/disabling/segmented modification. In addition to supporting synchronization of a single file, you can also synchronize all to synchronize the entire database.
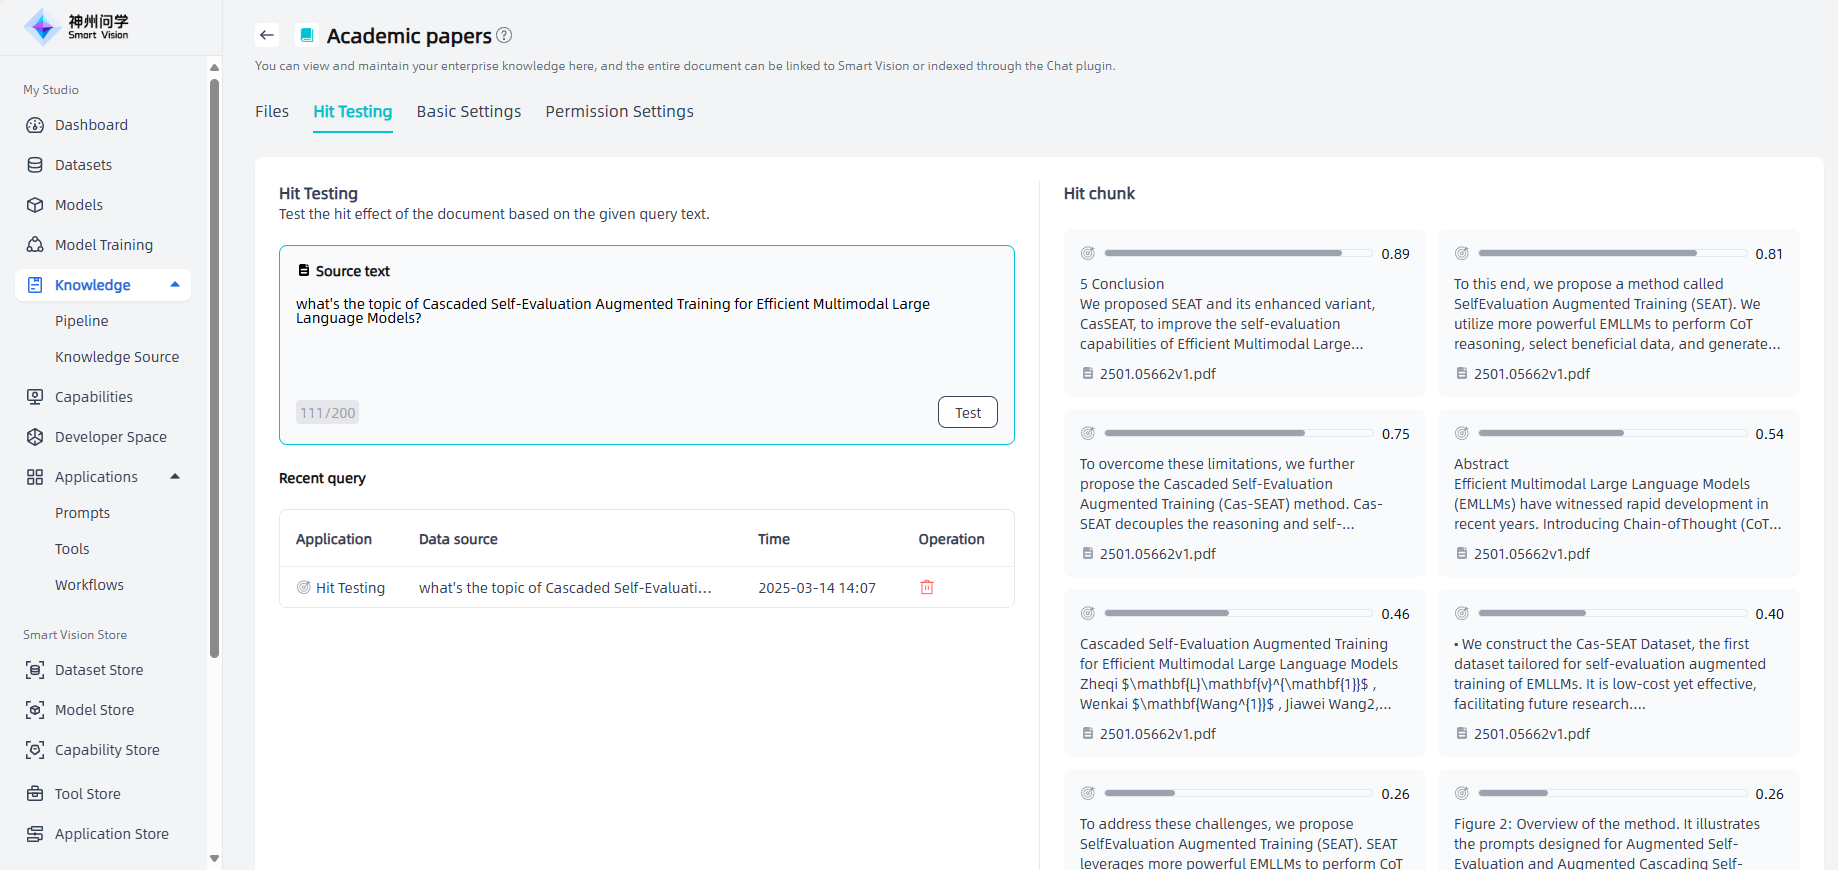
Hit Testing
In the Knowledge Base Details - Hit Testing, you can input query text for hit effect testing. You can click on a hit chunk to view its details.
Basic Settings
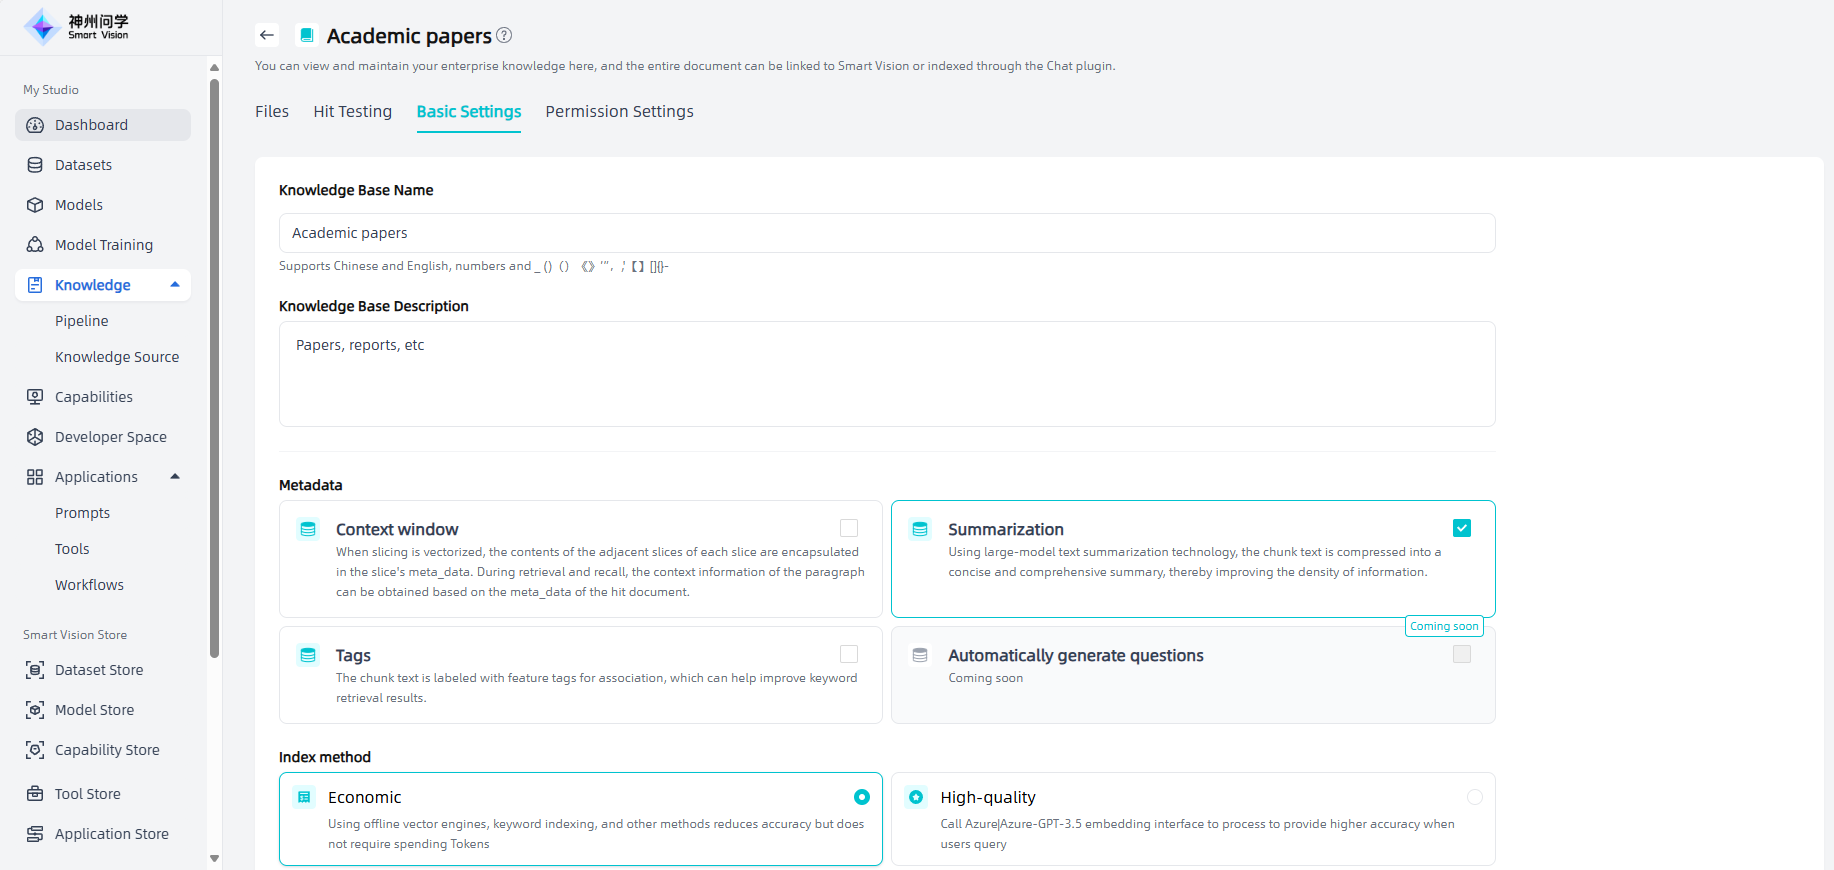
You can modify the knowledge base name, knowledge base description, metadata, index mode, and vector database in the Knowledge Base Details - Basic Settings. After modification, all files of the knowledge base will be executed according to this setting.
Permission Settings
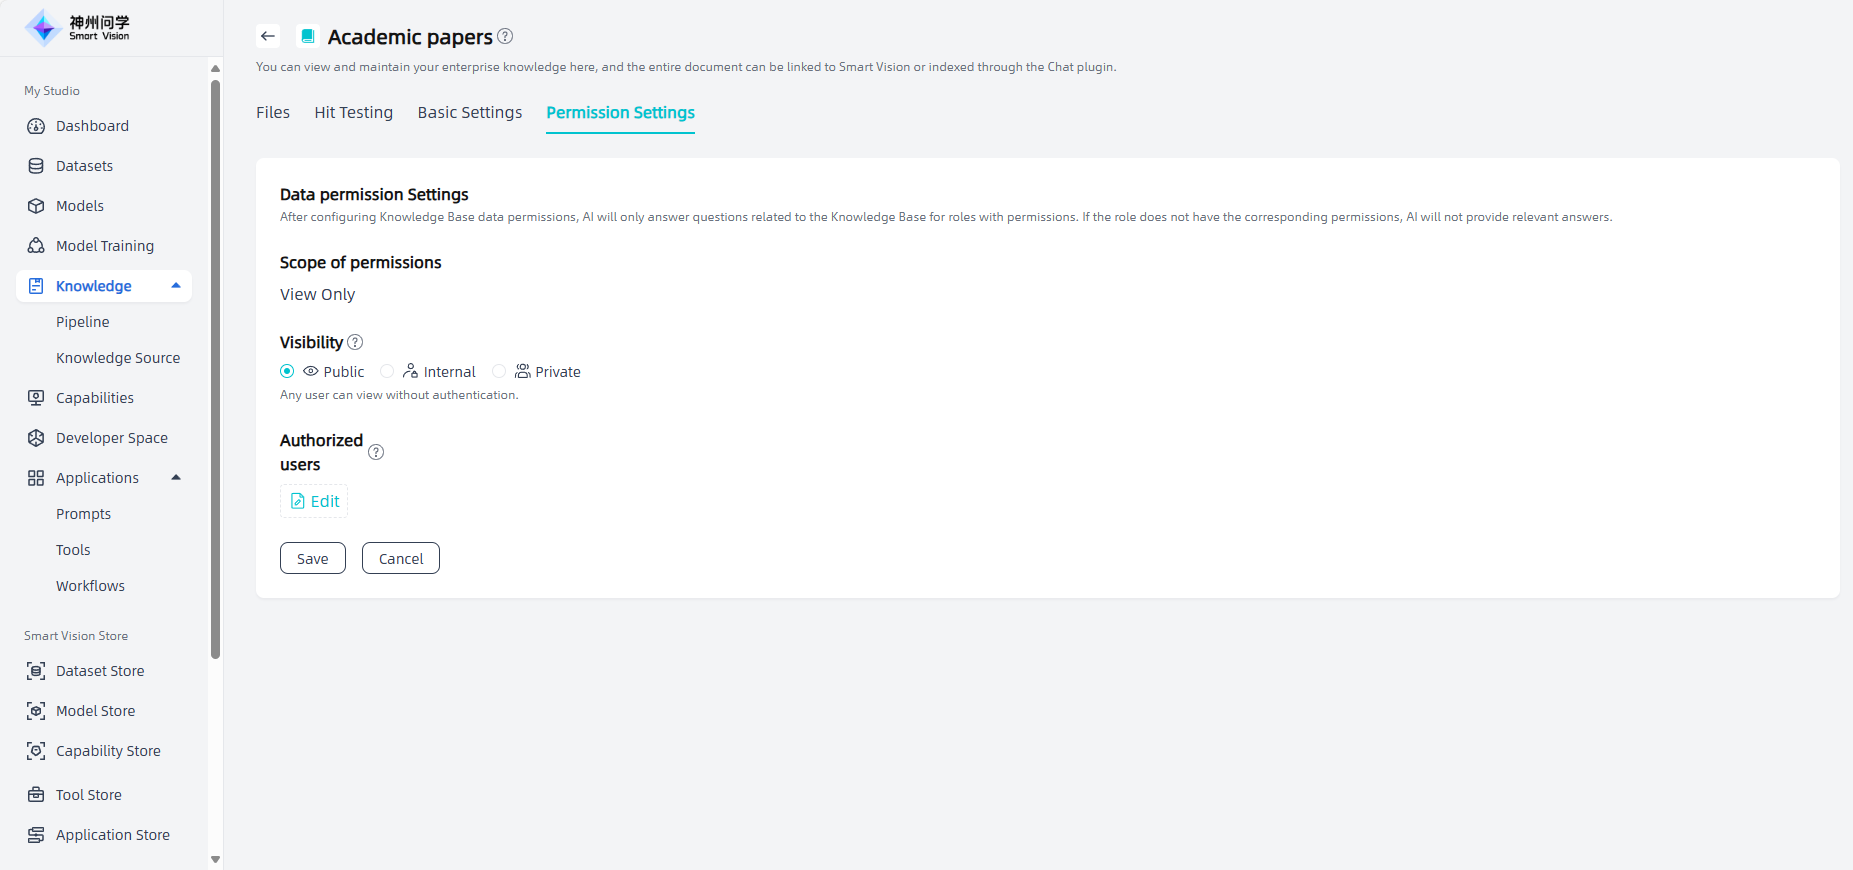
You can set usage permissions in the Knowledge Base Details - Permission Settings, which supports setting three types of permissions: public, internal, and private. After configuring the knowledge base permissions, AI will only answer questions related to the knowledge base for roles with permissions. If the role does not obtain the corresponding permissions, AI will not provide relevant answers.
Create Knowledge Base Directory
The Knowledge Base Directory is a collection of enterprise knowledge bases and a structured way of organizing knowledge. It organizes and categorizes knowledge according to specific topics or categories, allowing users to more conveniently find and obtain the required knowledge resources through the knowledge directory.
If you have many knowledge resources or they cover multiple topics, you can first create a knowledge directory in My Studio - Knowledge, and then create a knowledge base under this knowledge directory. A successfully created knowledge directory will be displayed in My Studio - Knowledge.
Operation Guide
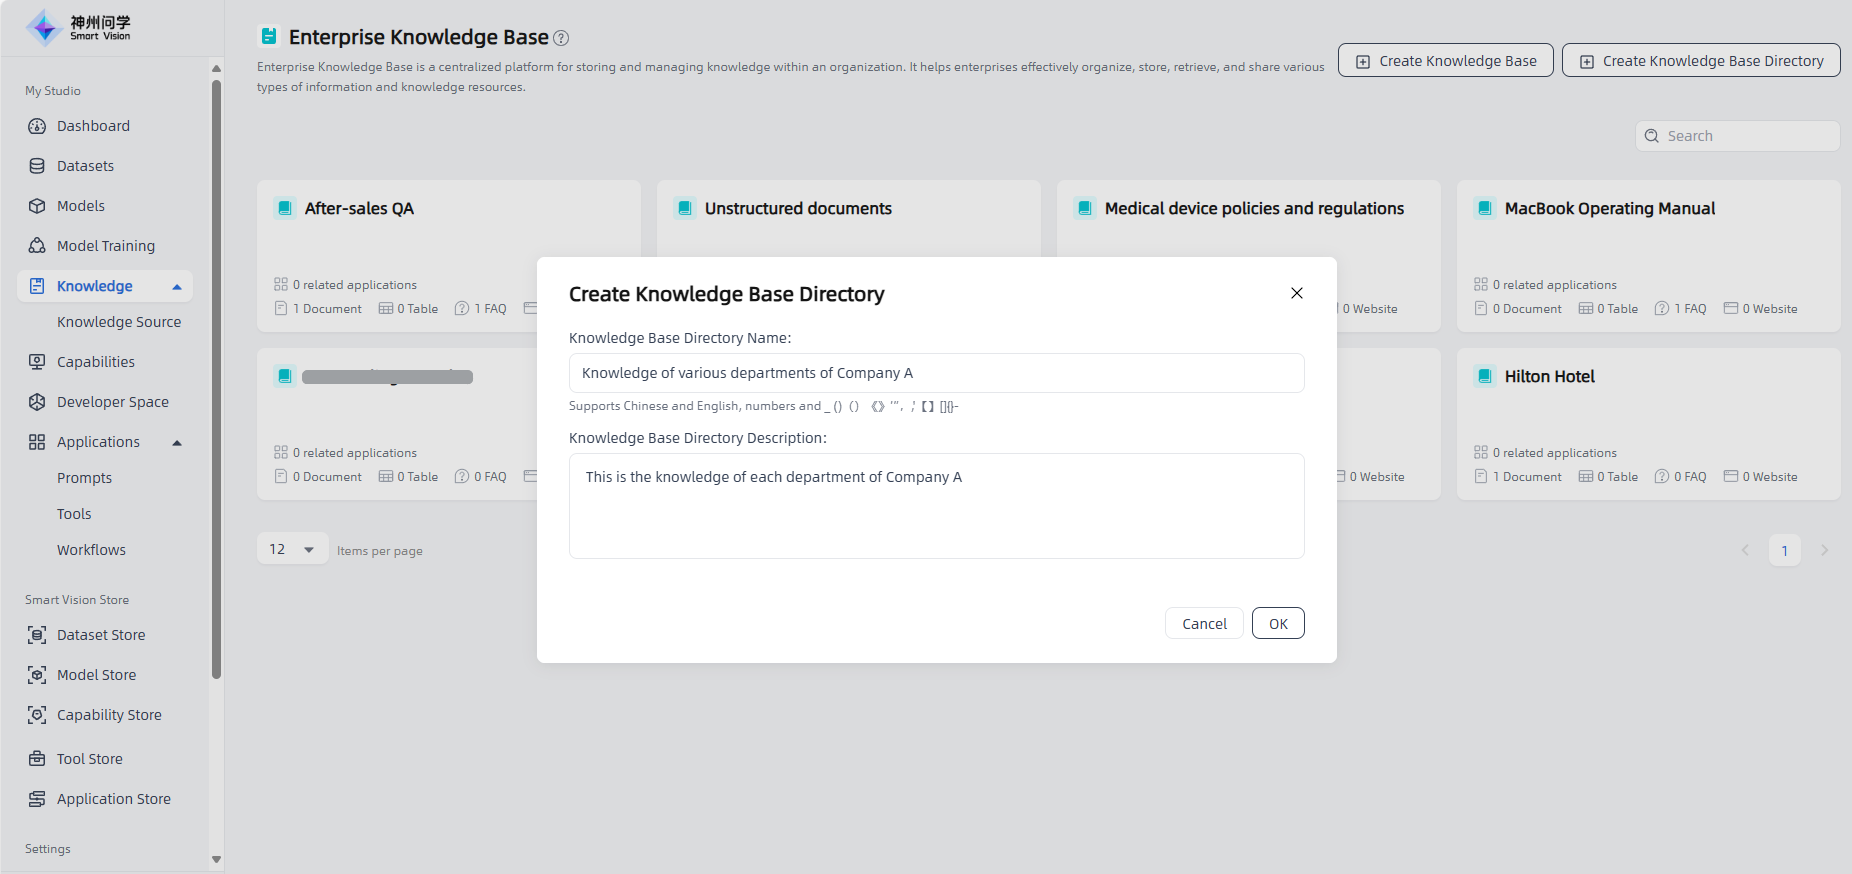
Start: Go to "My Studio - Knowledge, click the "Create Knowledge Base Directory" button in the upper right corner to enter the "Create Knowledge Base Directory" page.
Fill in the Knowledge Base Directory information: fill in the Knowledge Base Directory name and description to start creating the Knowledge Base Directory.
Create enterprise knowledge base: After filling in the knowledge base directory information, enter the knowledge base directory details page and click "Create enterprise knowledge base" (the operation process is the same as directly creating knowledge base).
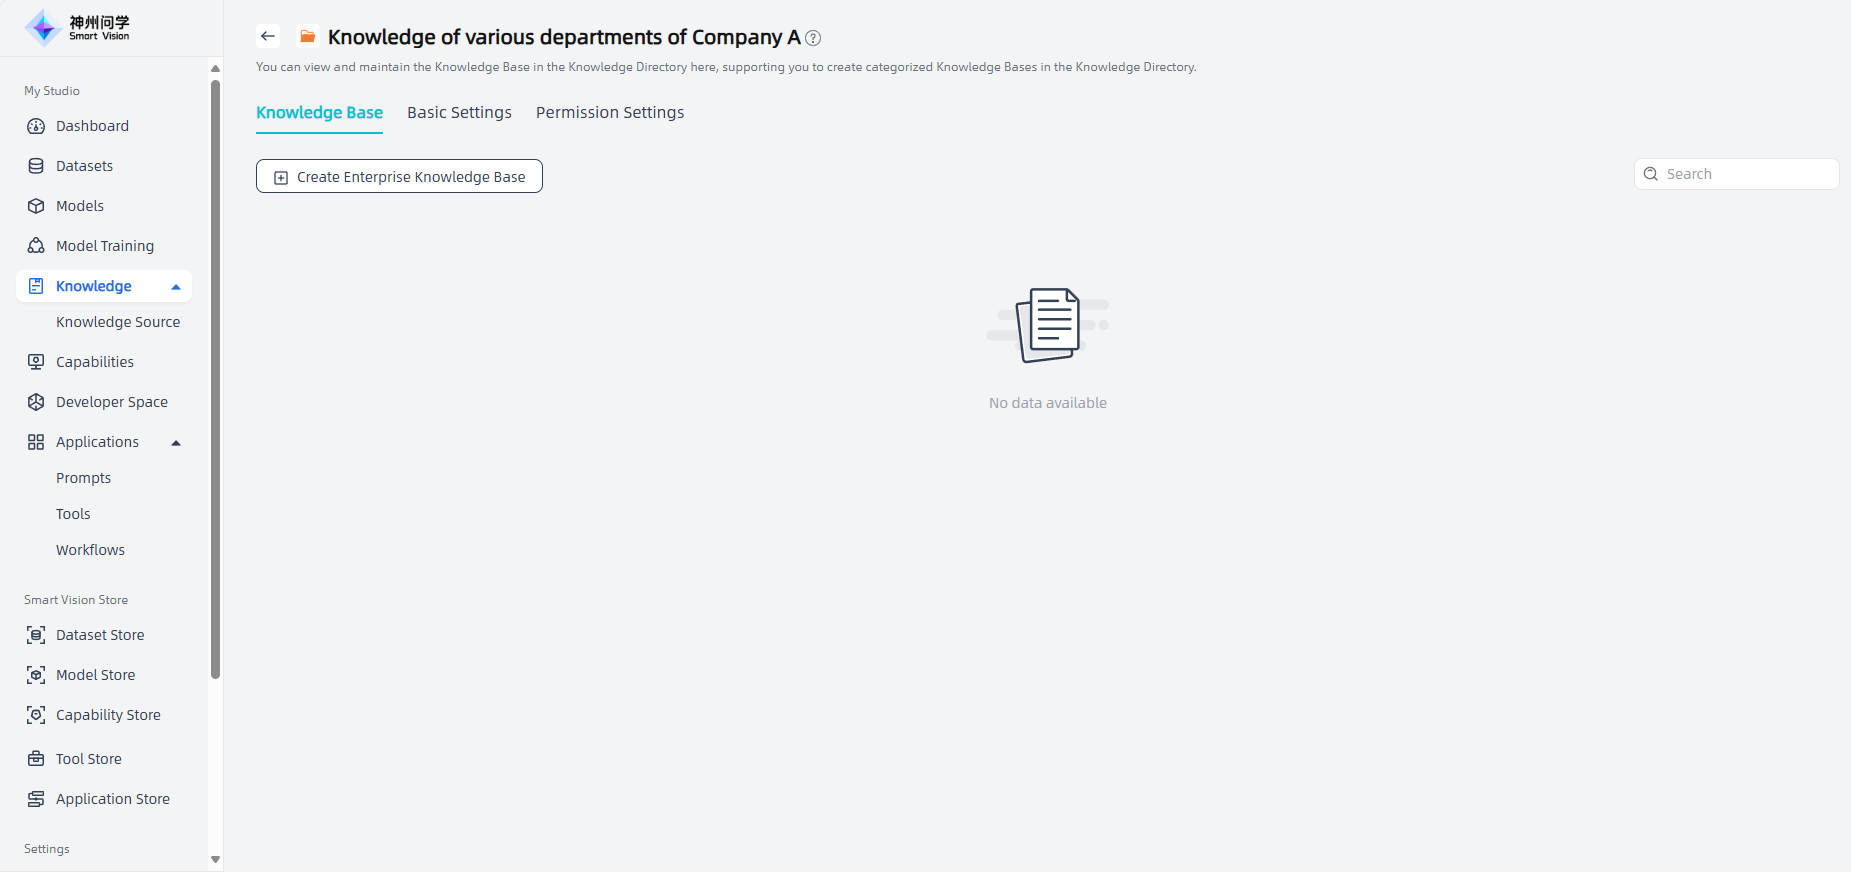
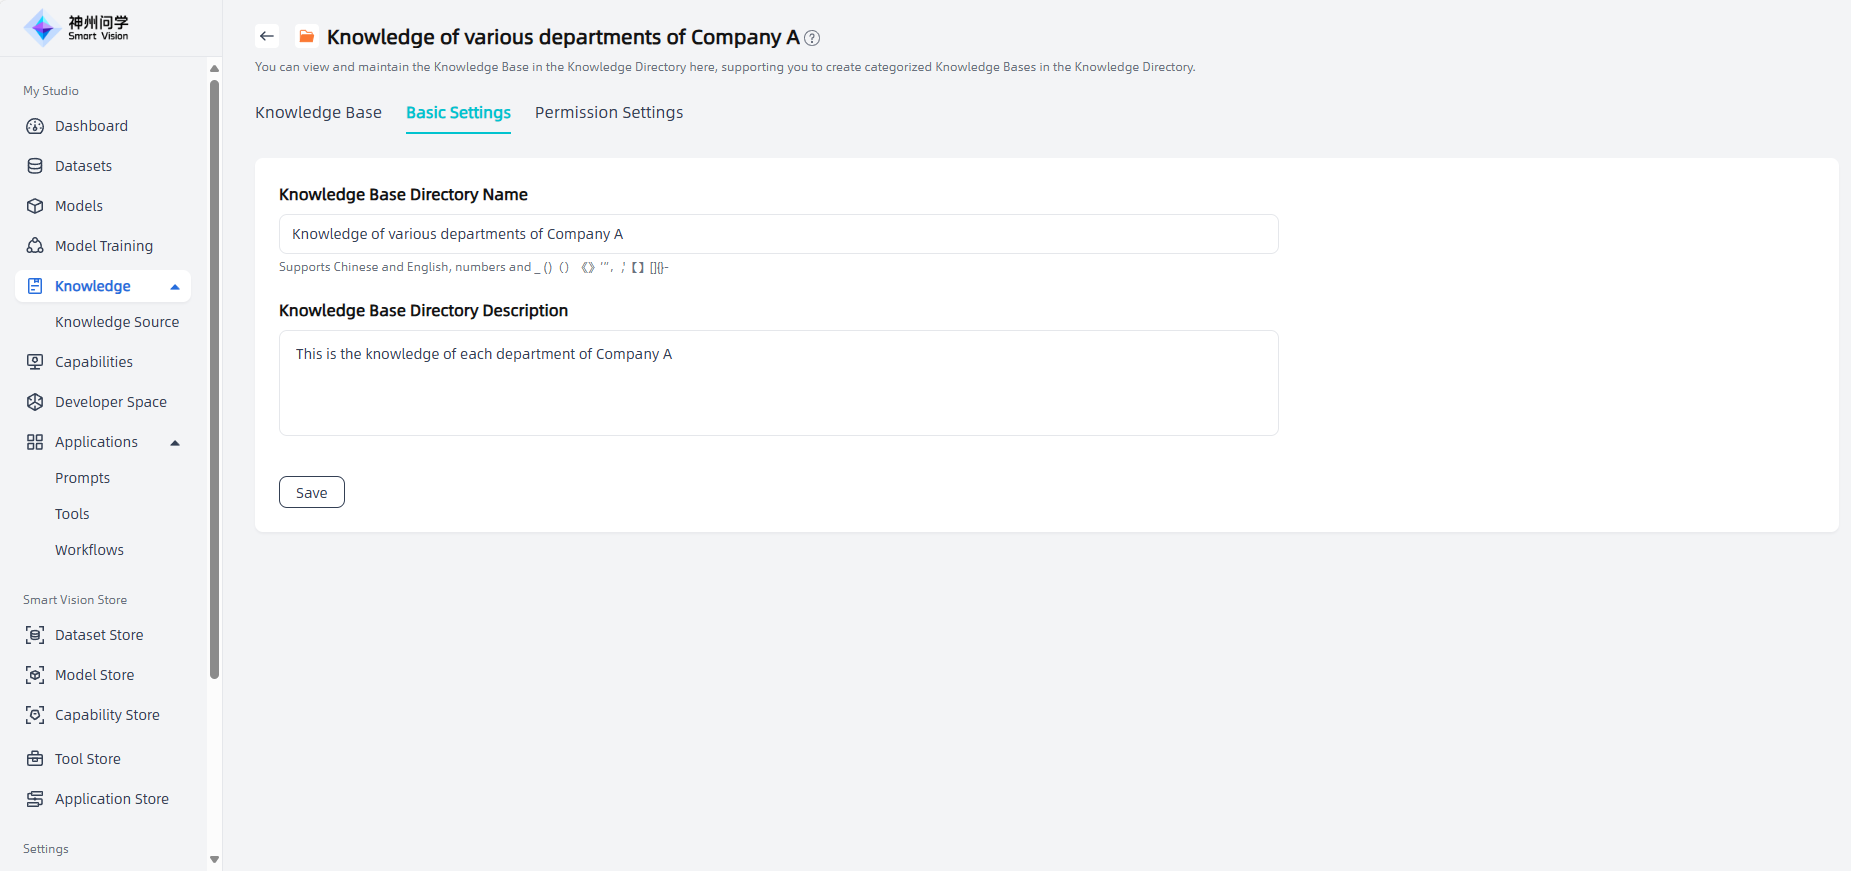
Basic Settings: On the knowledge base directory details page, you can click "Basic Settings" to modify the name and description of the knowledge base directory.
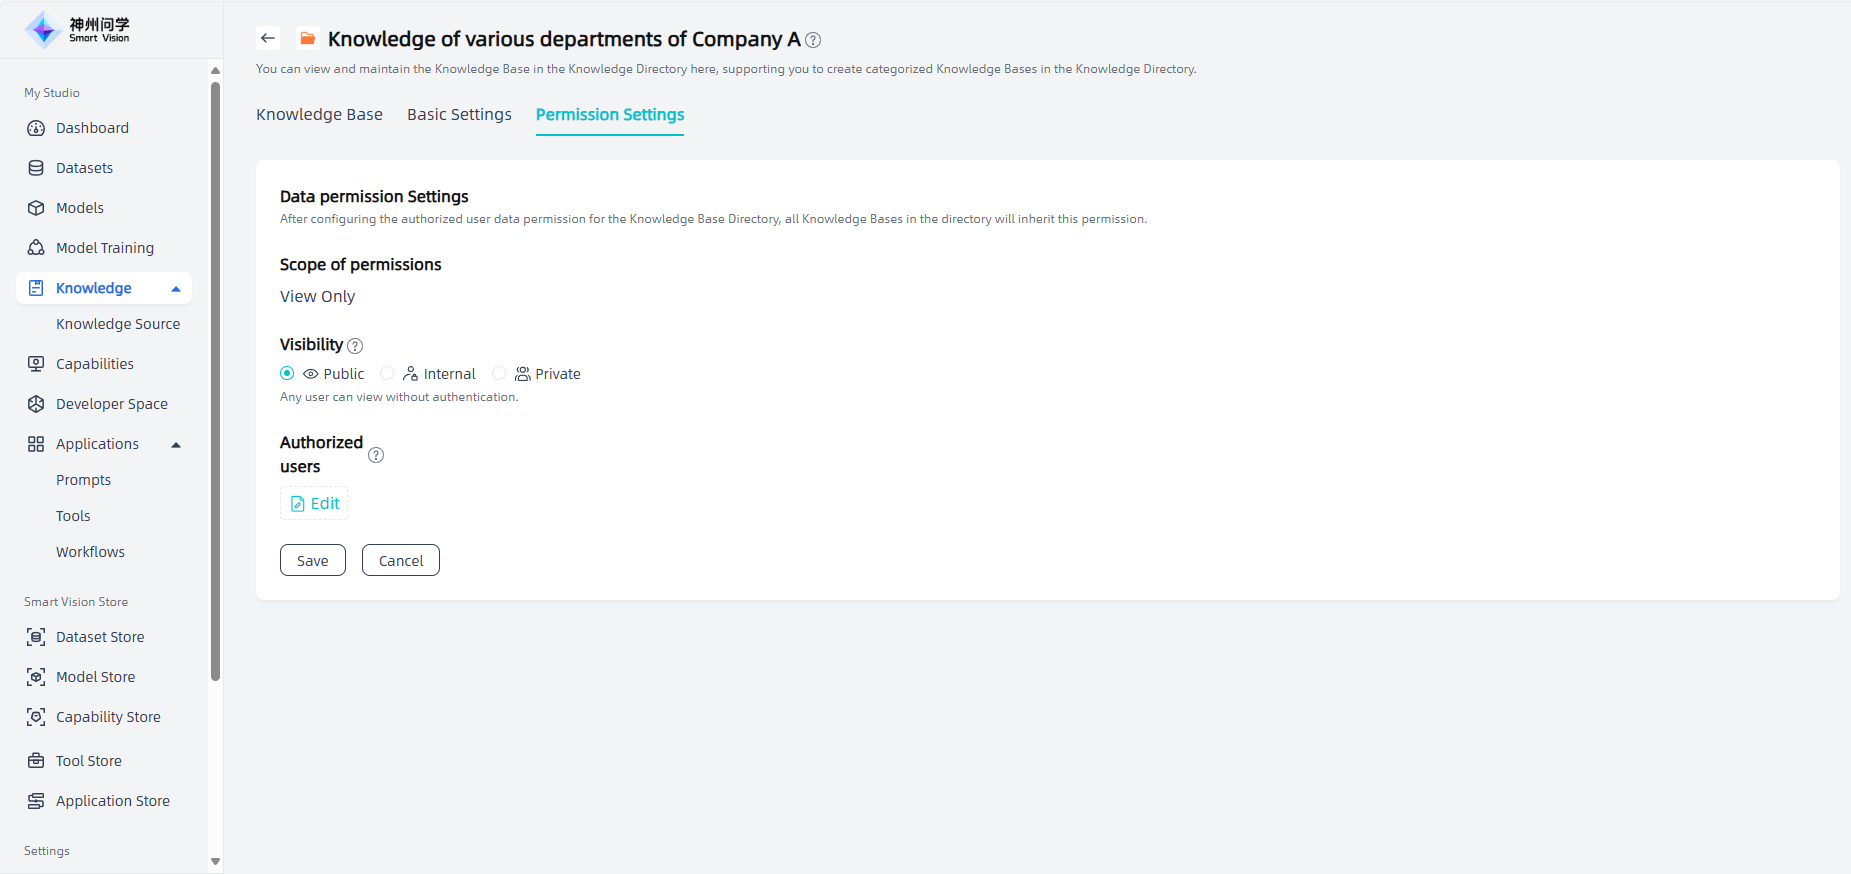
Permission Settings: You can set usage permissions in the Knowledge Base Directory Details - Permission Settings. You can set public, internal, and private permissions and authorize users who can access the knowledge base as needed. After configuring permissions, AI will only answer questions related to the knowledge base directory for roles that have permissions. If the role does not have the corresponding permissions, AI will not provide relevant answers.
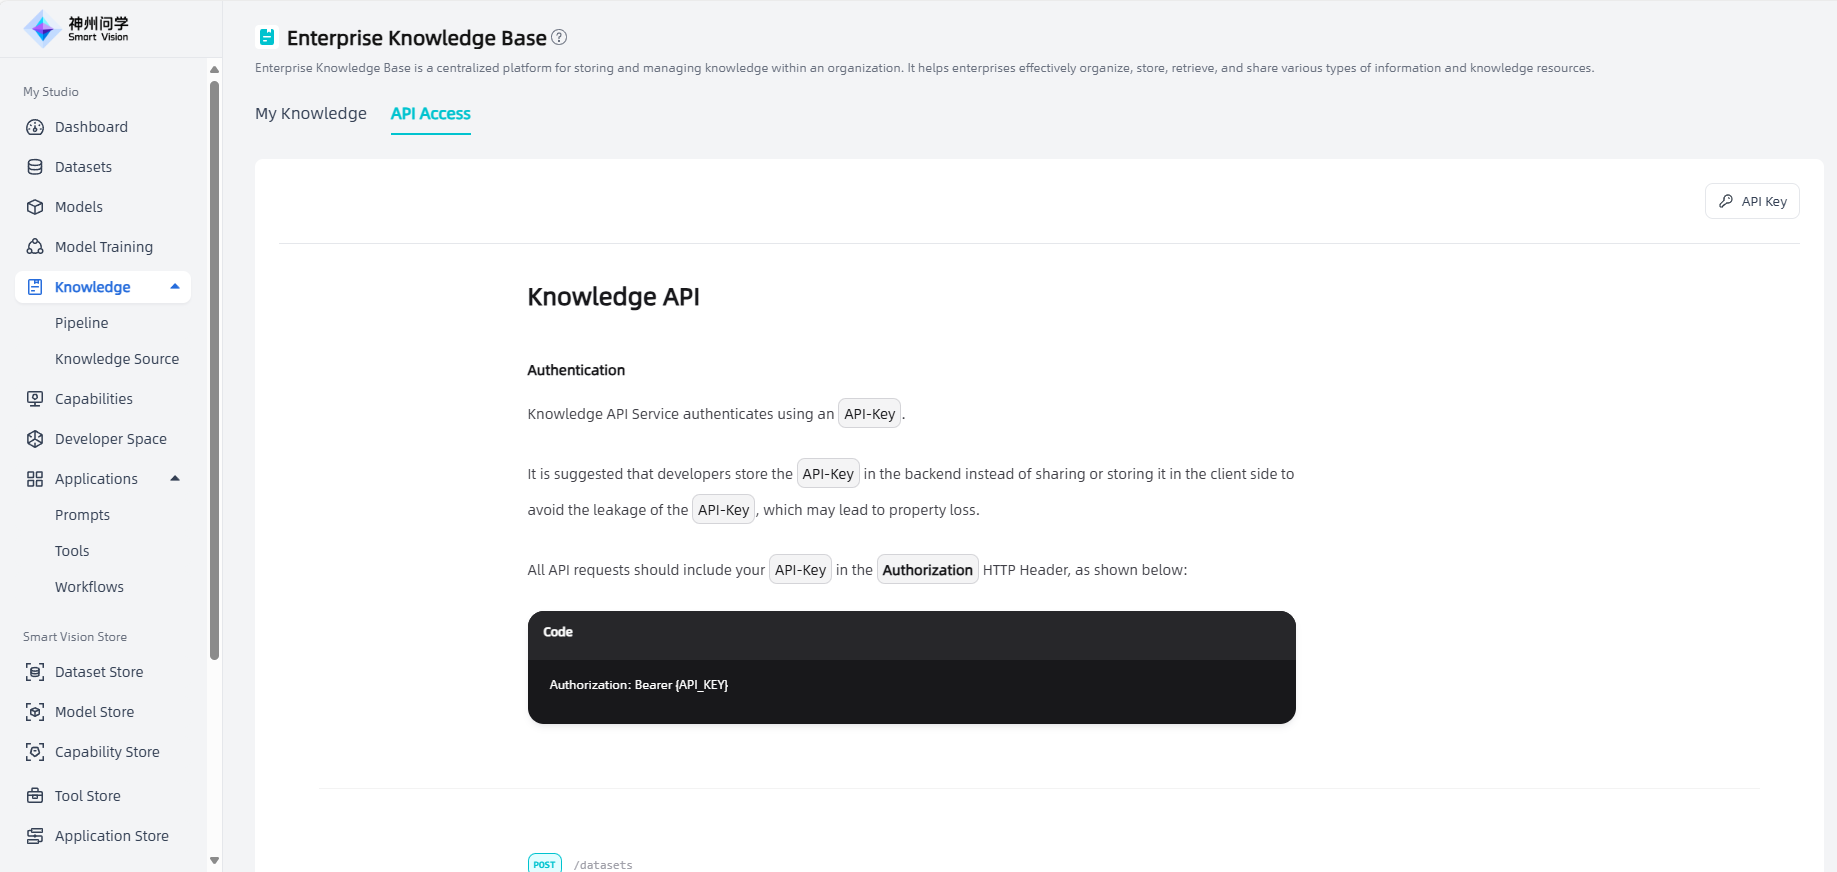
API Access
In my Studio - Knowledge, click on the "Access API" tab to view the API access methods for the enterprise knowledge base. The enterprise knowledge base access API supports authorization key management, and API keys are required to call the API (click the "API Key" button to create an API key).
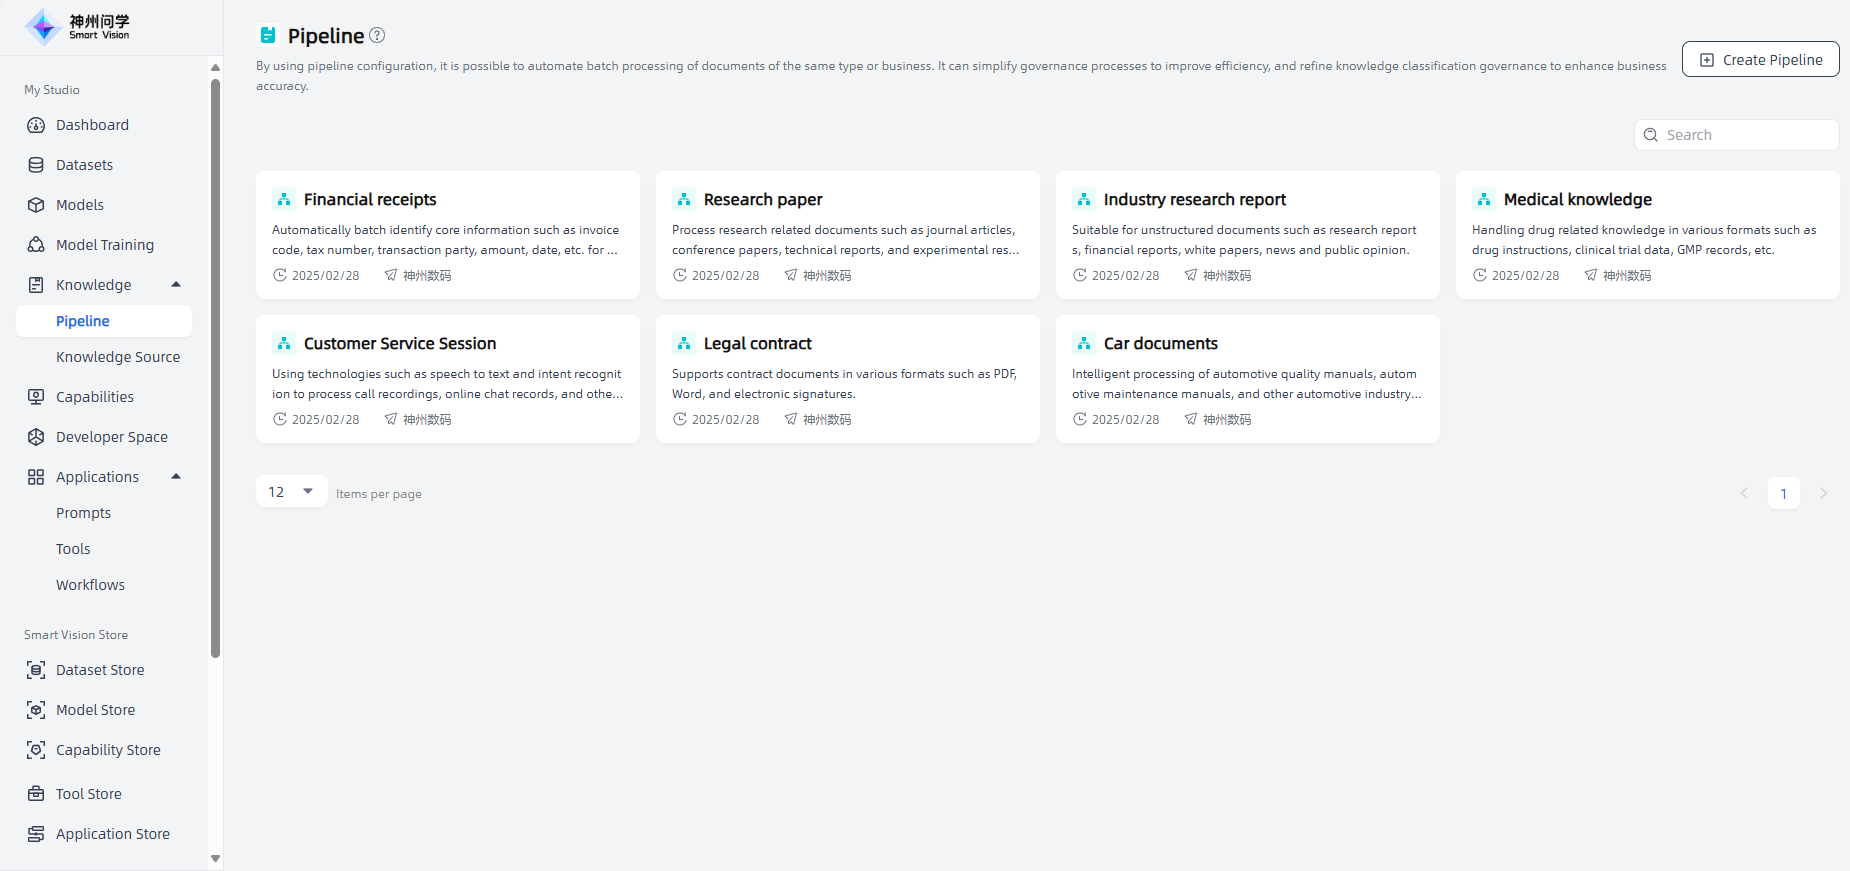
Pipeline
My Studio - Knowledge - Pipeline displays all available knowledge governance templates, including those pre-set on Smart Vision and those created by yourself, for users to use in Create Platform Knowledge Base - Add governed file - Select pipeline.
Clicking on a pipeline allows you to view configuration details, edit and modify as needed, or click "To Experience" to experience the effect of the pipeline. If you modify the configuration during the experience, the system will prompt you to update the pipeline as needed.
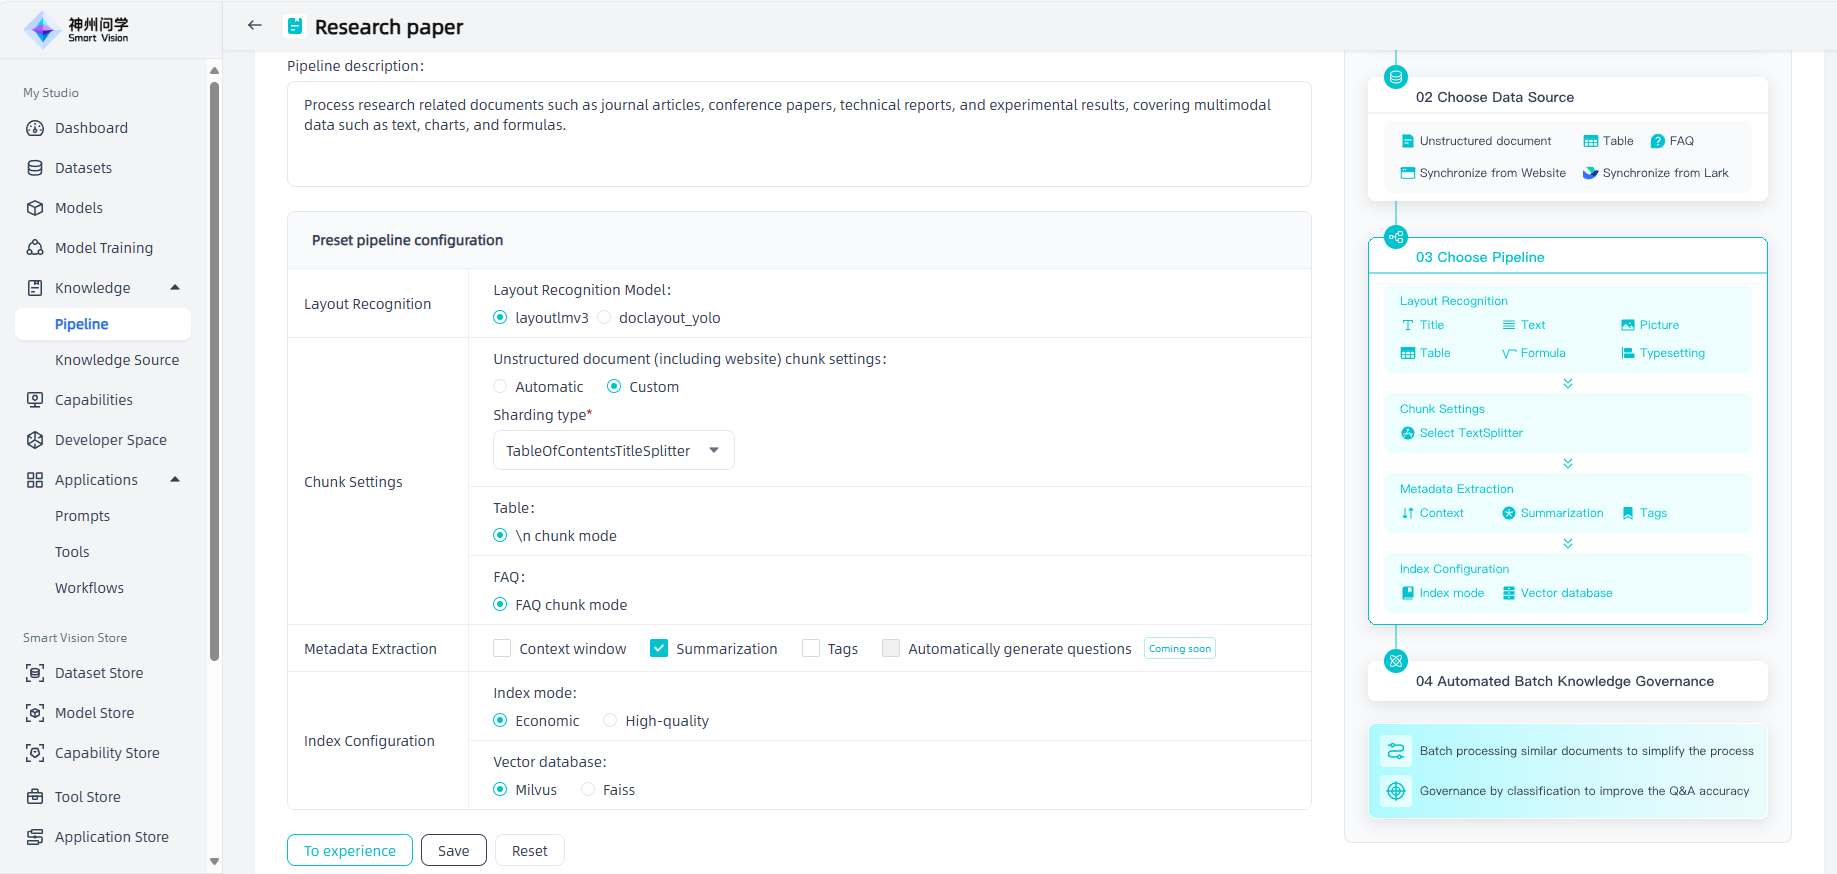
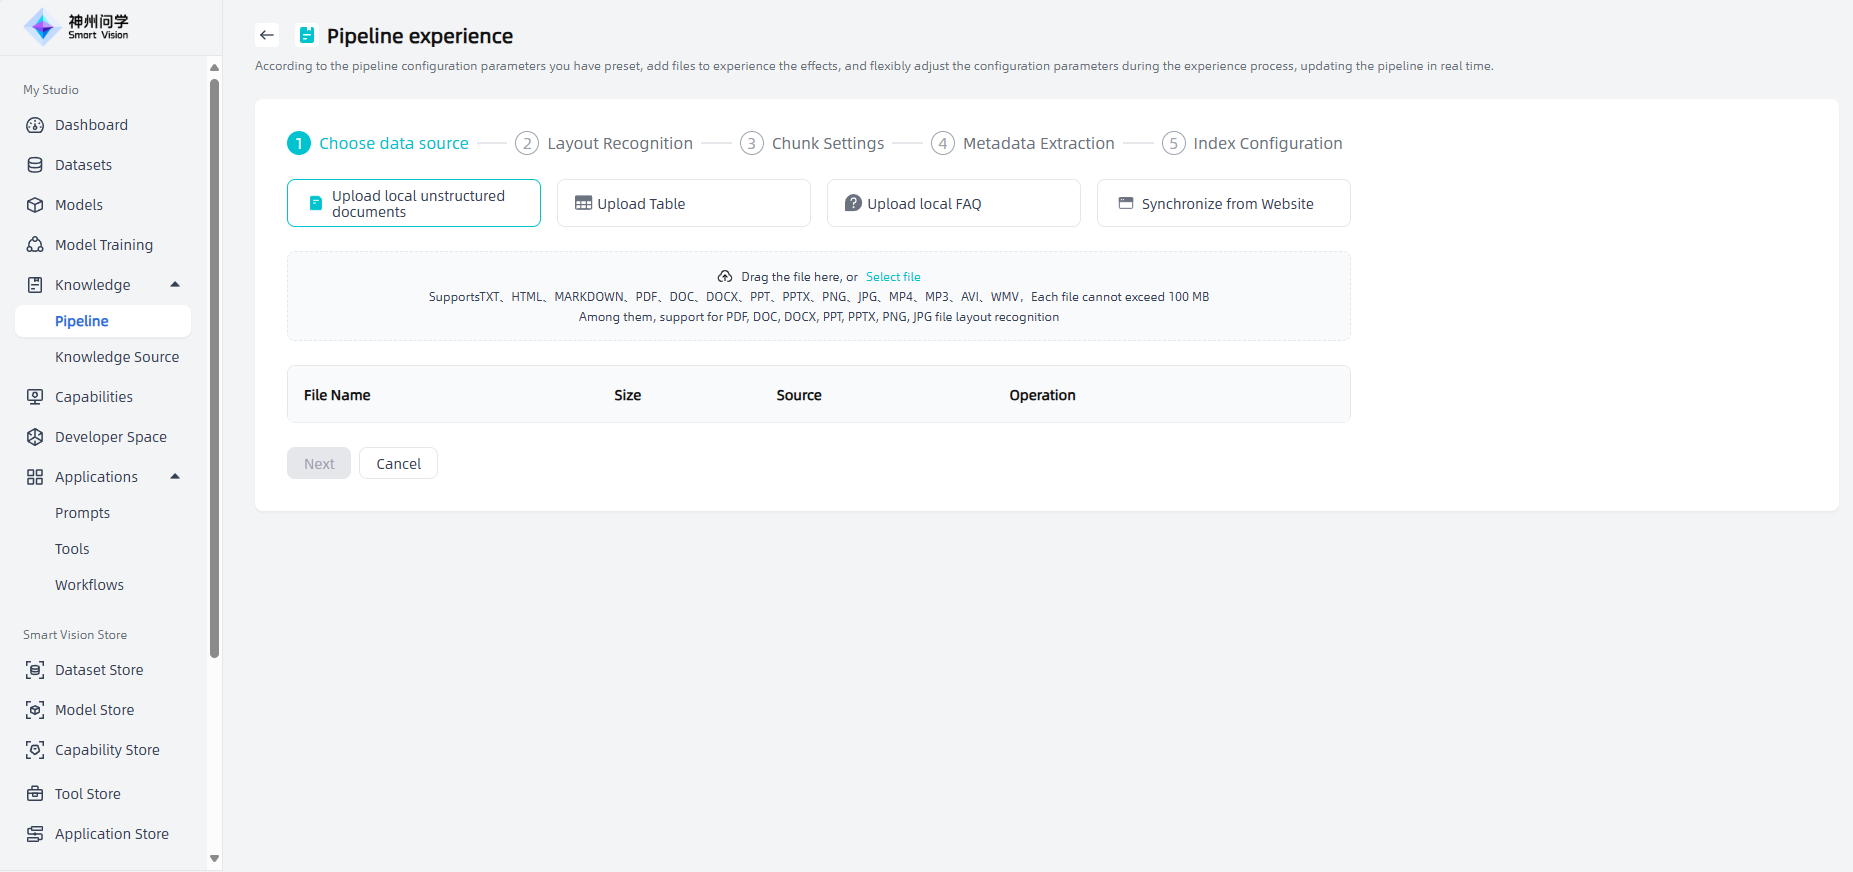
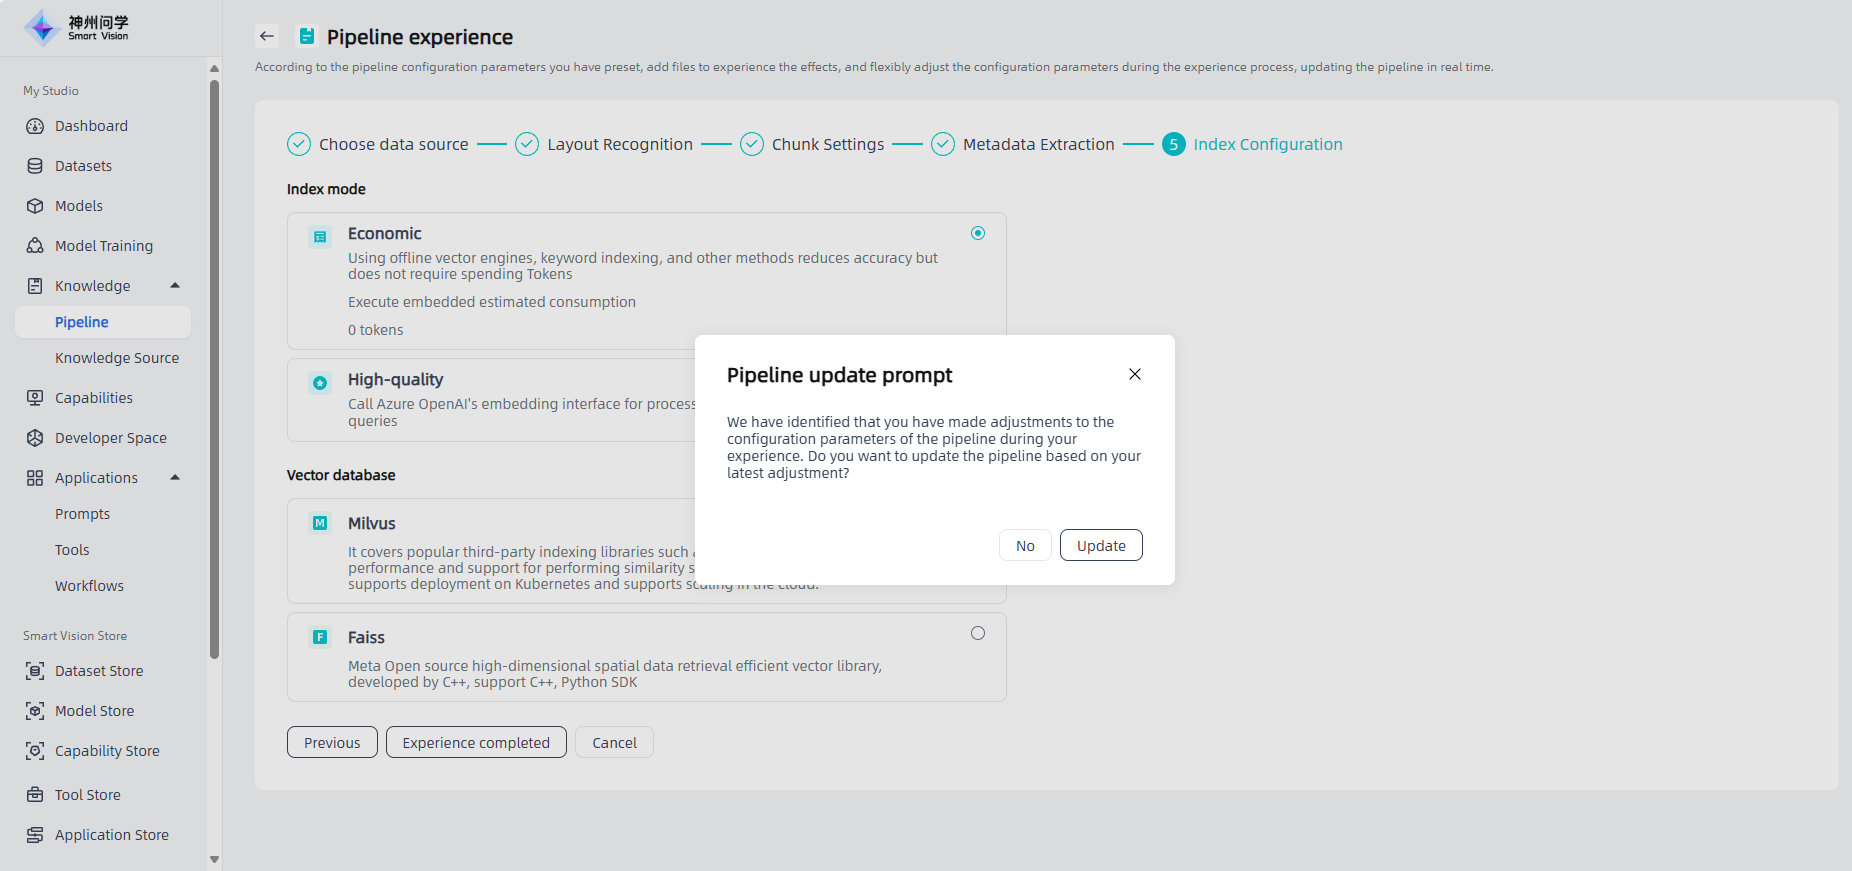
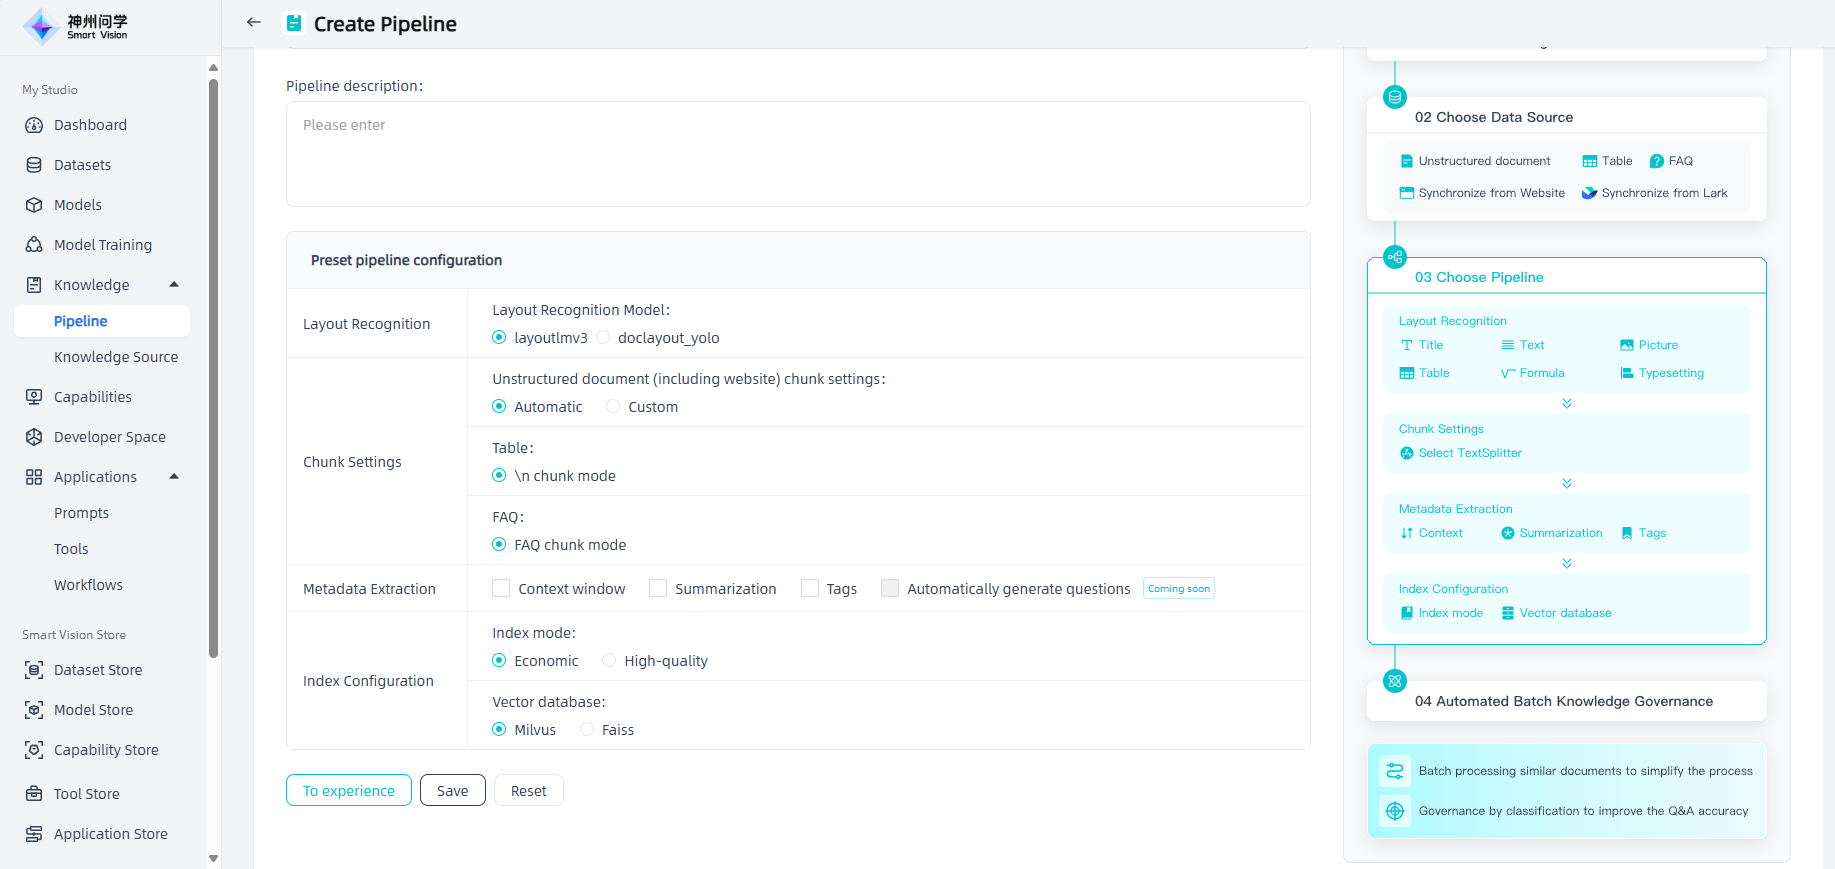
Click the "Create Pipeline" button in the upper right corner to create a pipeline as needed, and click "To Experience" to experience the effect of the newly added pipeline. Click "Save" to complete the pipeline creation.
Knowledge Source
Smart Vision supports accessing and integrating diverse external knowledge data resources to enrich the enterprise knowledge base. Smart Vision currently supports synchronizing knowledge base content from Lark through Lark application credentials.
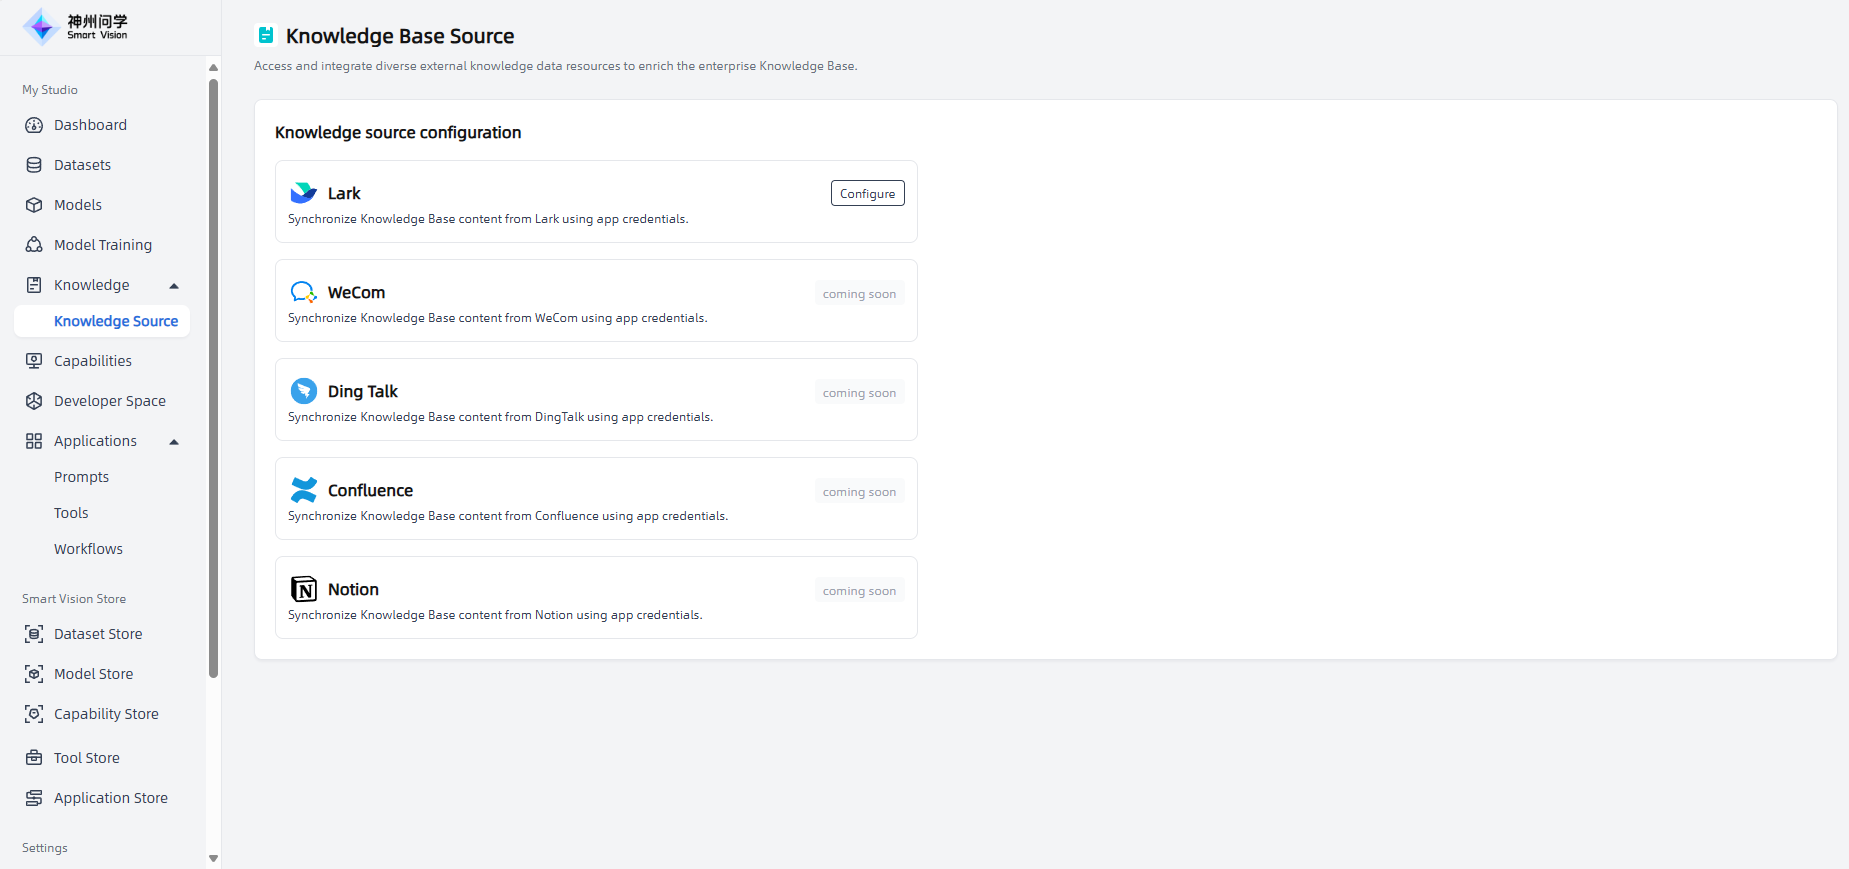
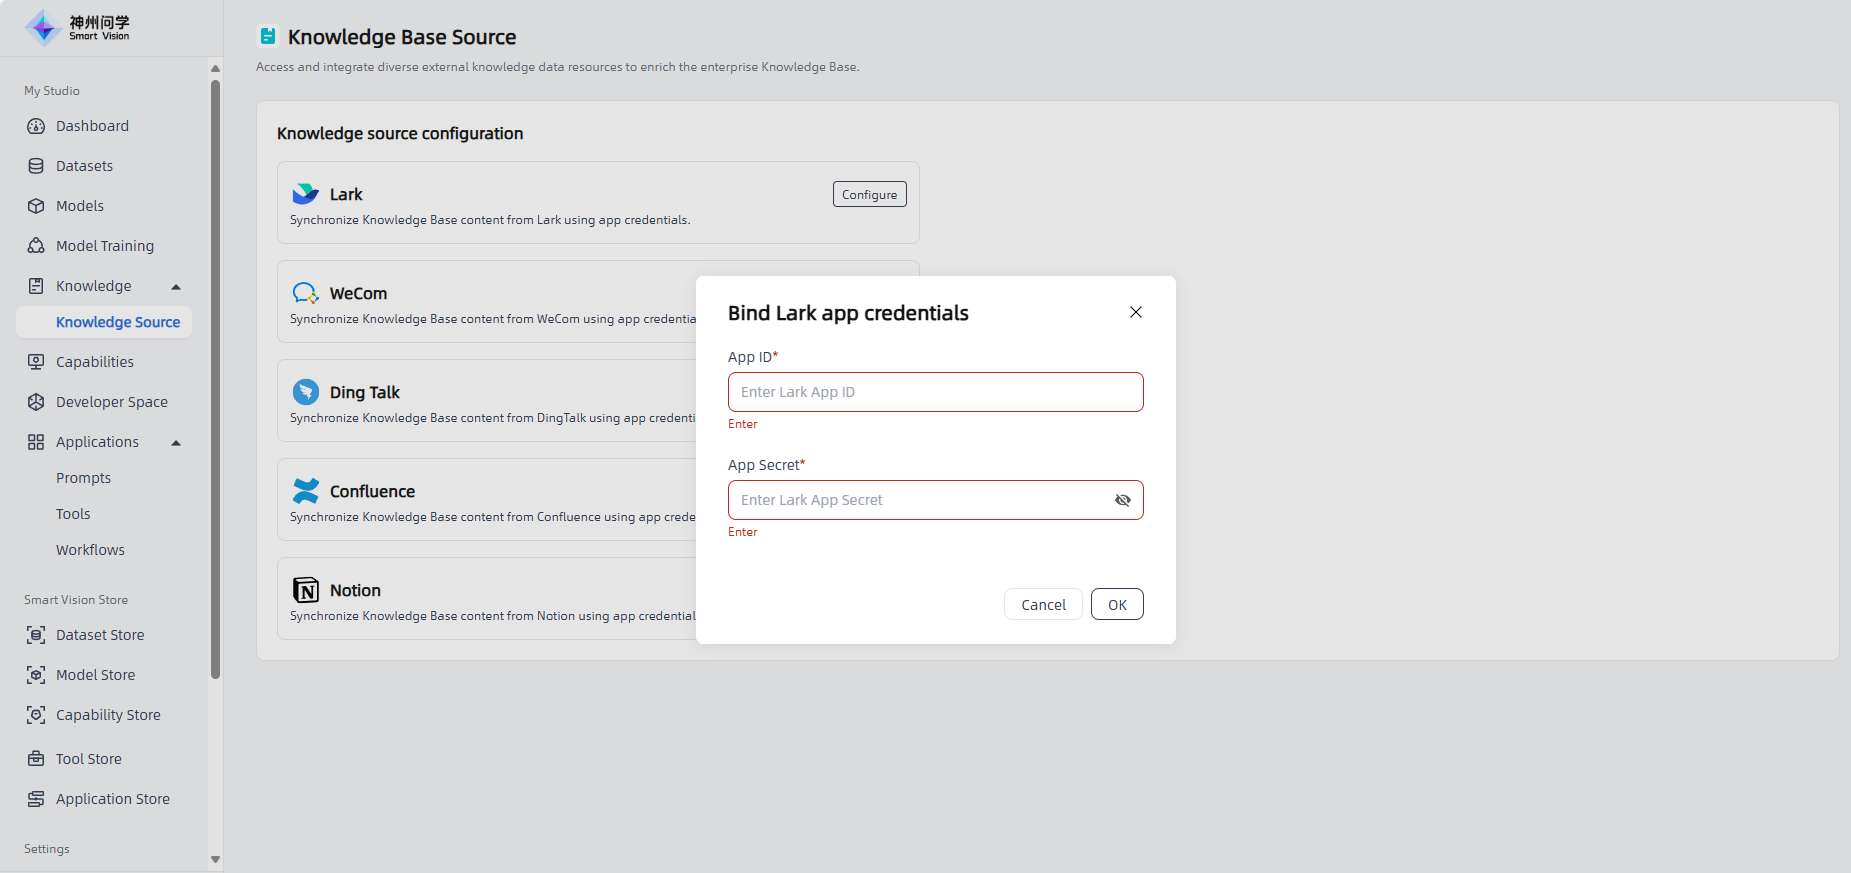
After clicking "Configure", fill in the Lark application credential information to bind the Lark application, and "Bound" will be displayed in the knowledge source configuration.
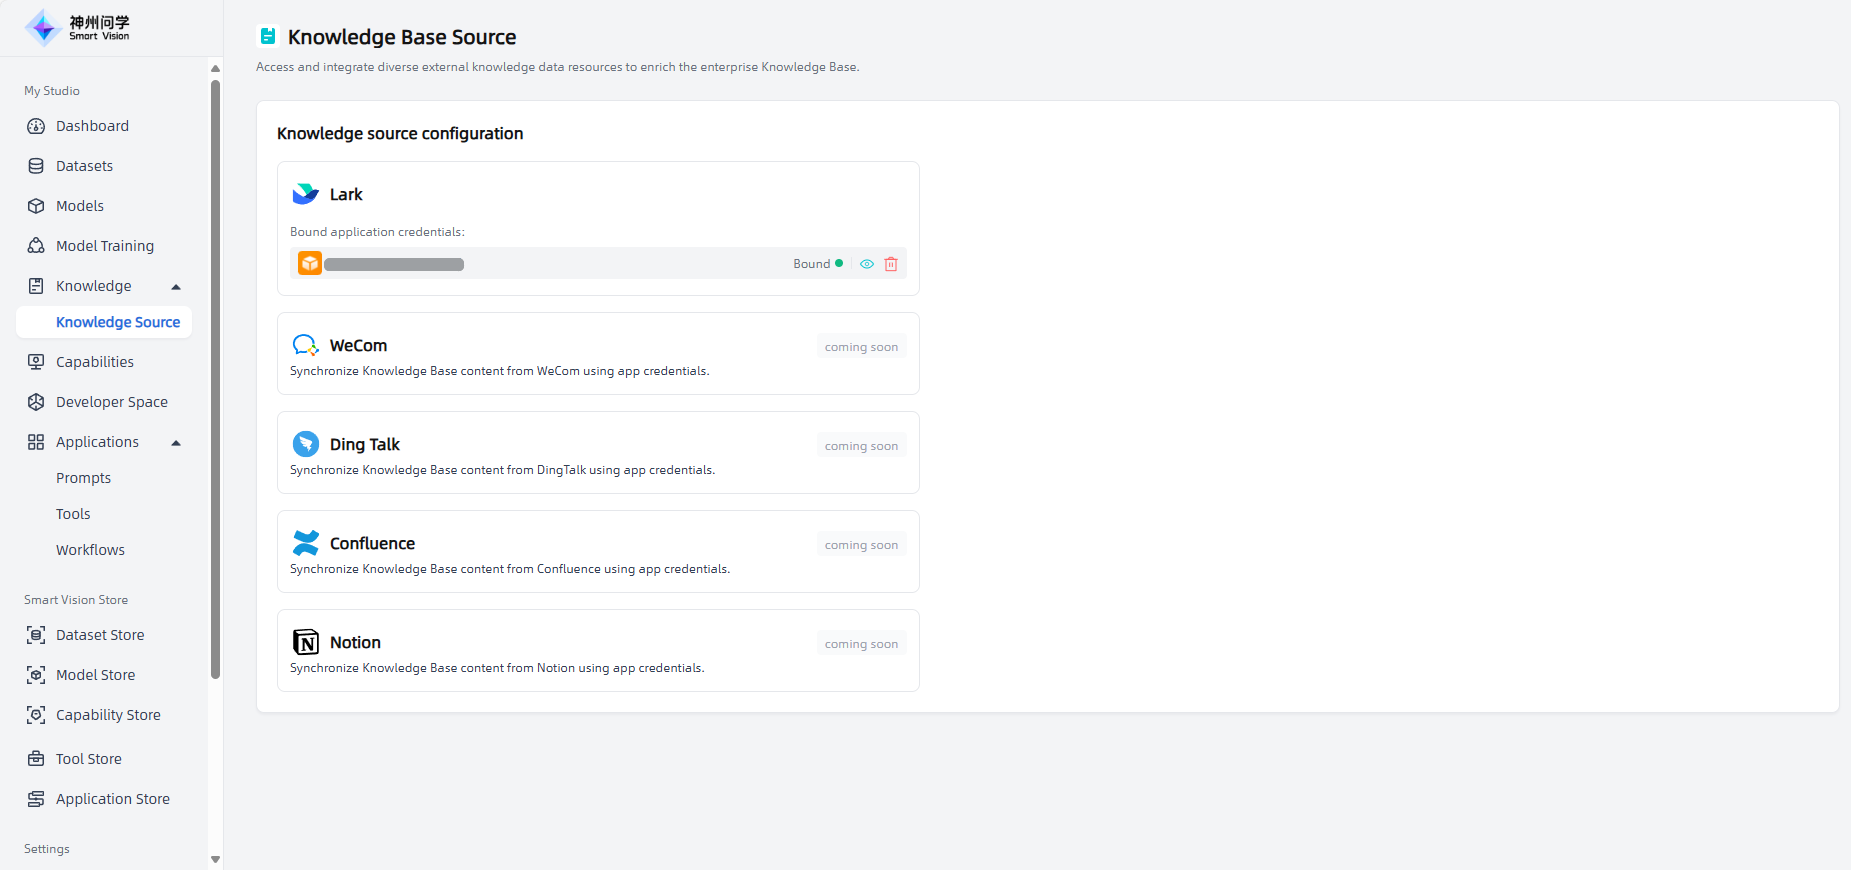
The newly bound Lark application will appear in the "Create Knowledge Base-Synchronize External Data Source" list (For details: [Create Knowledge Base](#Create Knowledge Base)), making it easy to select synchronization as needed.