Workflows
Introduction
Workflows reduce system complexity by breaking down complex tasks into smaller steps (nodes), reduce reliance on prompt engineering and model inference capabilities, and enhancing the performance of LLM applications for complex tasks. It not only realizes the process of complex business logic in automation and batch processing scenarios, improves the system's interpretability, stability, and fault tolerance.
Nodes are the key components of a workflow. By connecting nodes with different functionalities, you can execute a series of operations within the workflow.
Variables are used to link the input and output of nodes within a workflow, enabling complex processing logic throughout the process. To avoid variable name conflicts, node names must be unique and cannot be duplicated;.
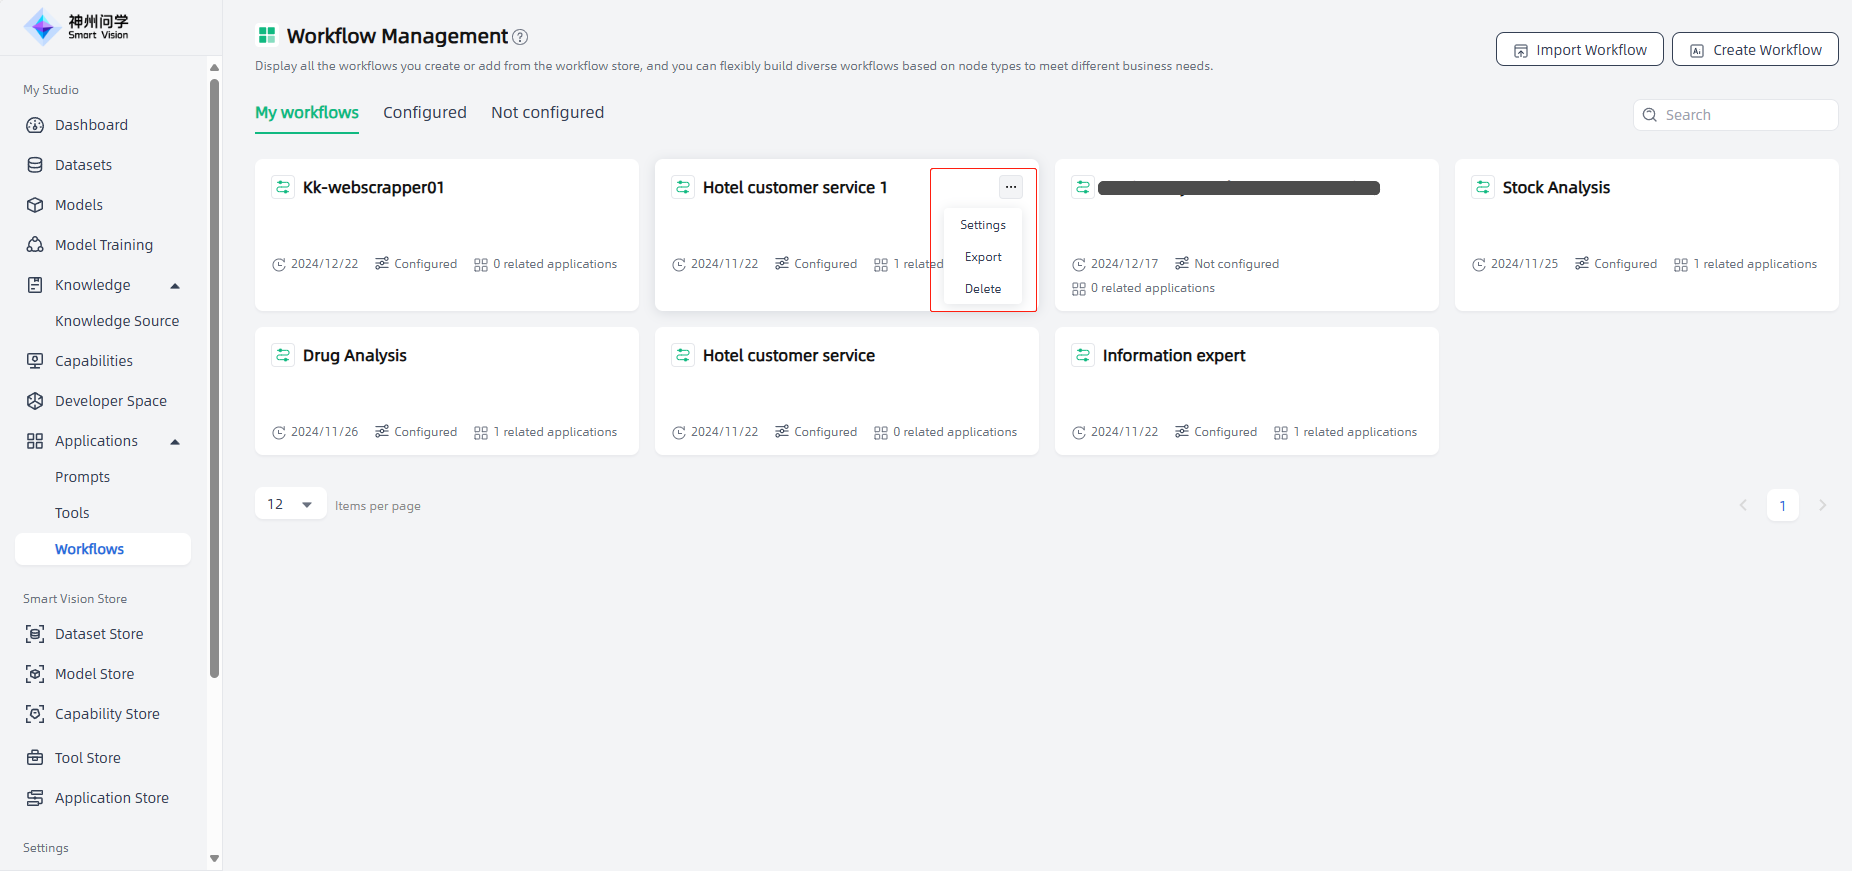
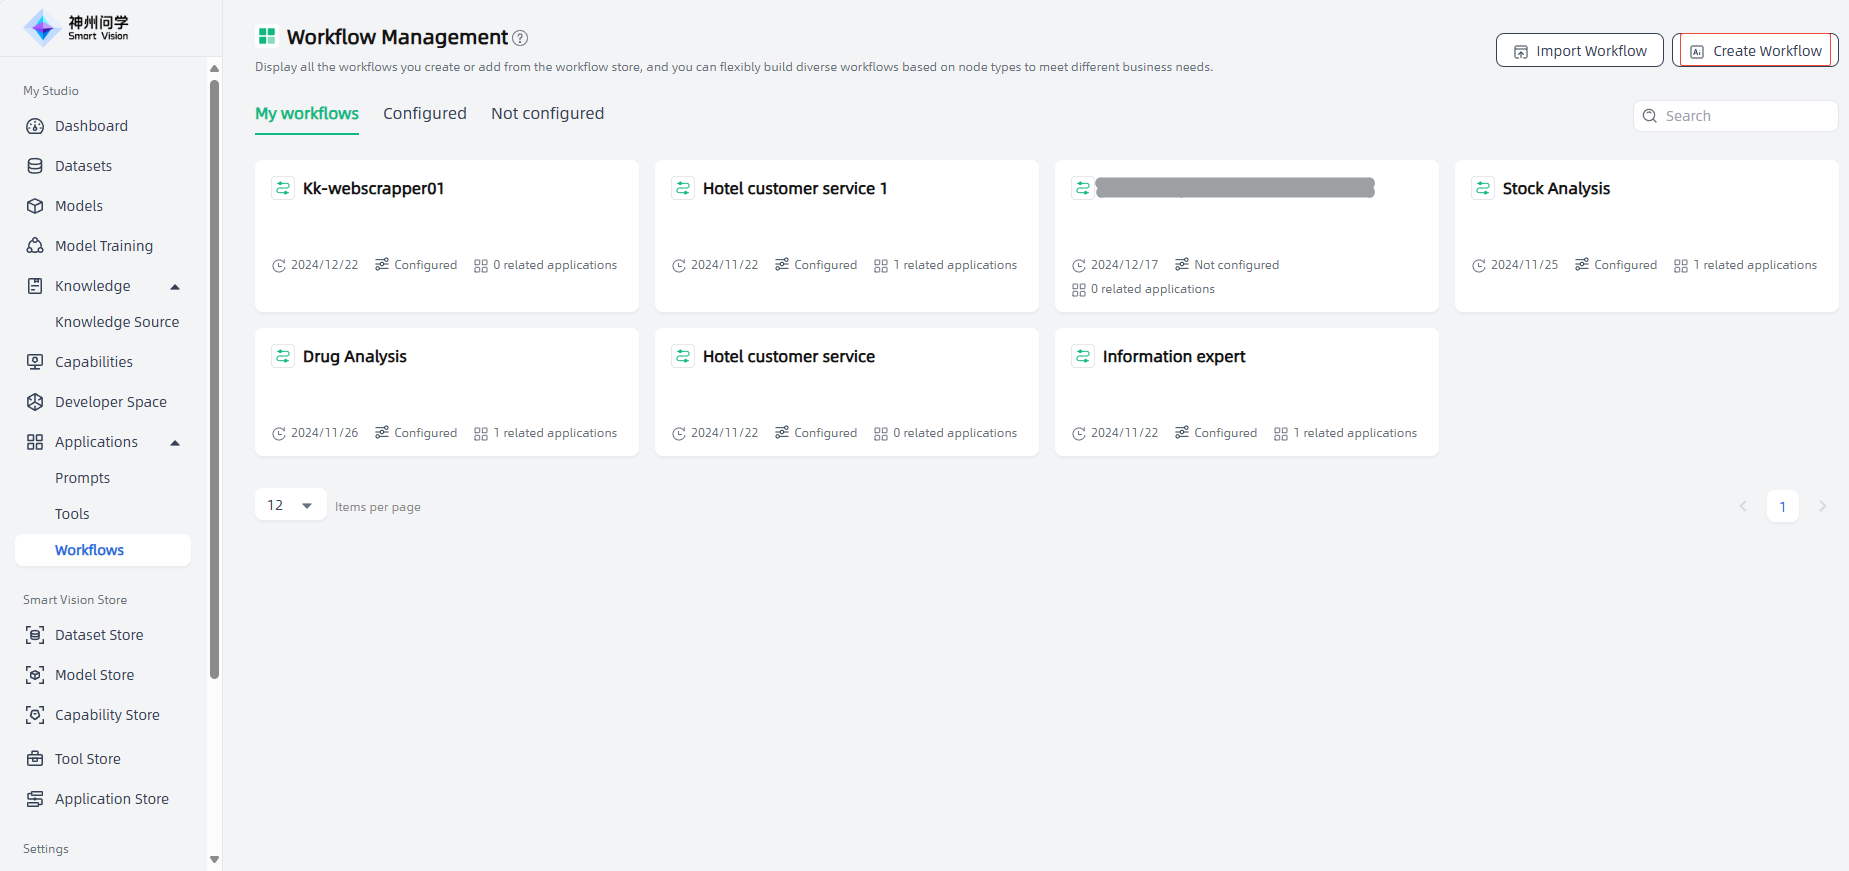
My Studio-Applications-Workflows, displays all the workflows you have added from Workflow Store (Workflow Store will be launched soon) and personally created, as well as their configuration status and the number of associated applications. Click "···" in the upper right corner of a workflow to set, delete, and other operations on the workflow. Click the "Create Workflow" or "Import Workflow" button in the upper right corner to create your own private workflow.
Node
Start
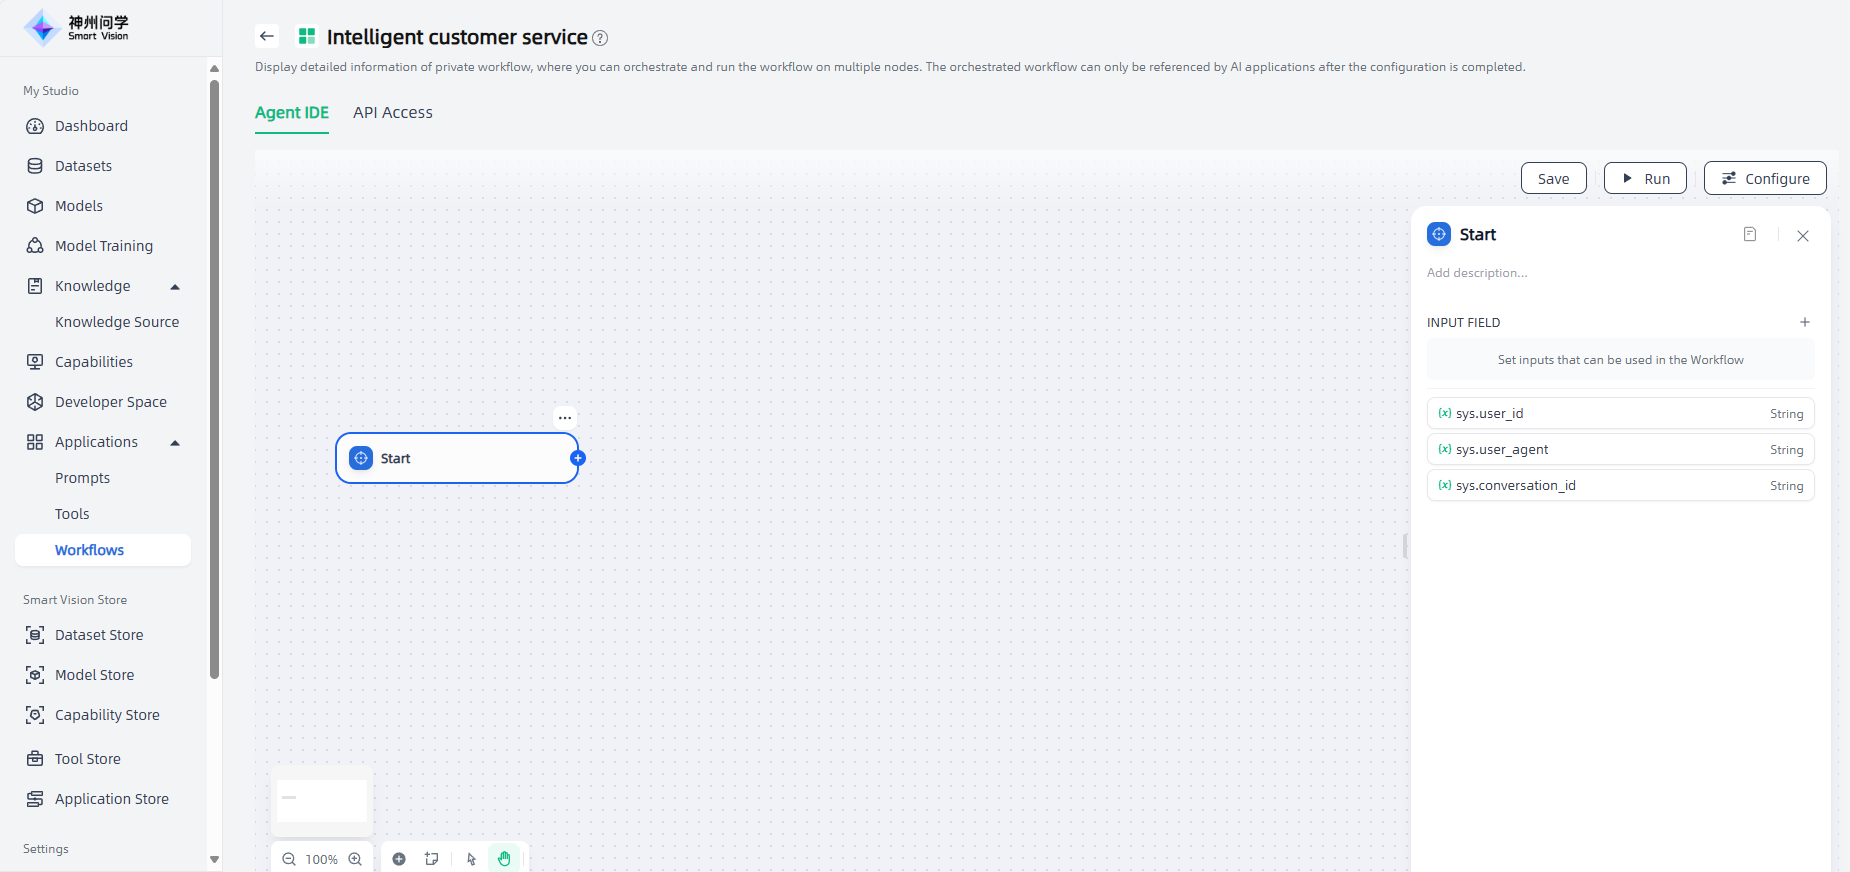
The "Start" node is a critical preset node in the Workflow, and it is the starting node of the workflow. Each workflow requires a start node. After creating a workflow, the start node will automatically appear.
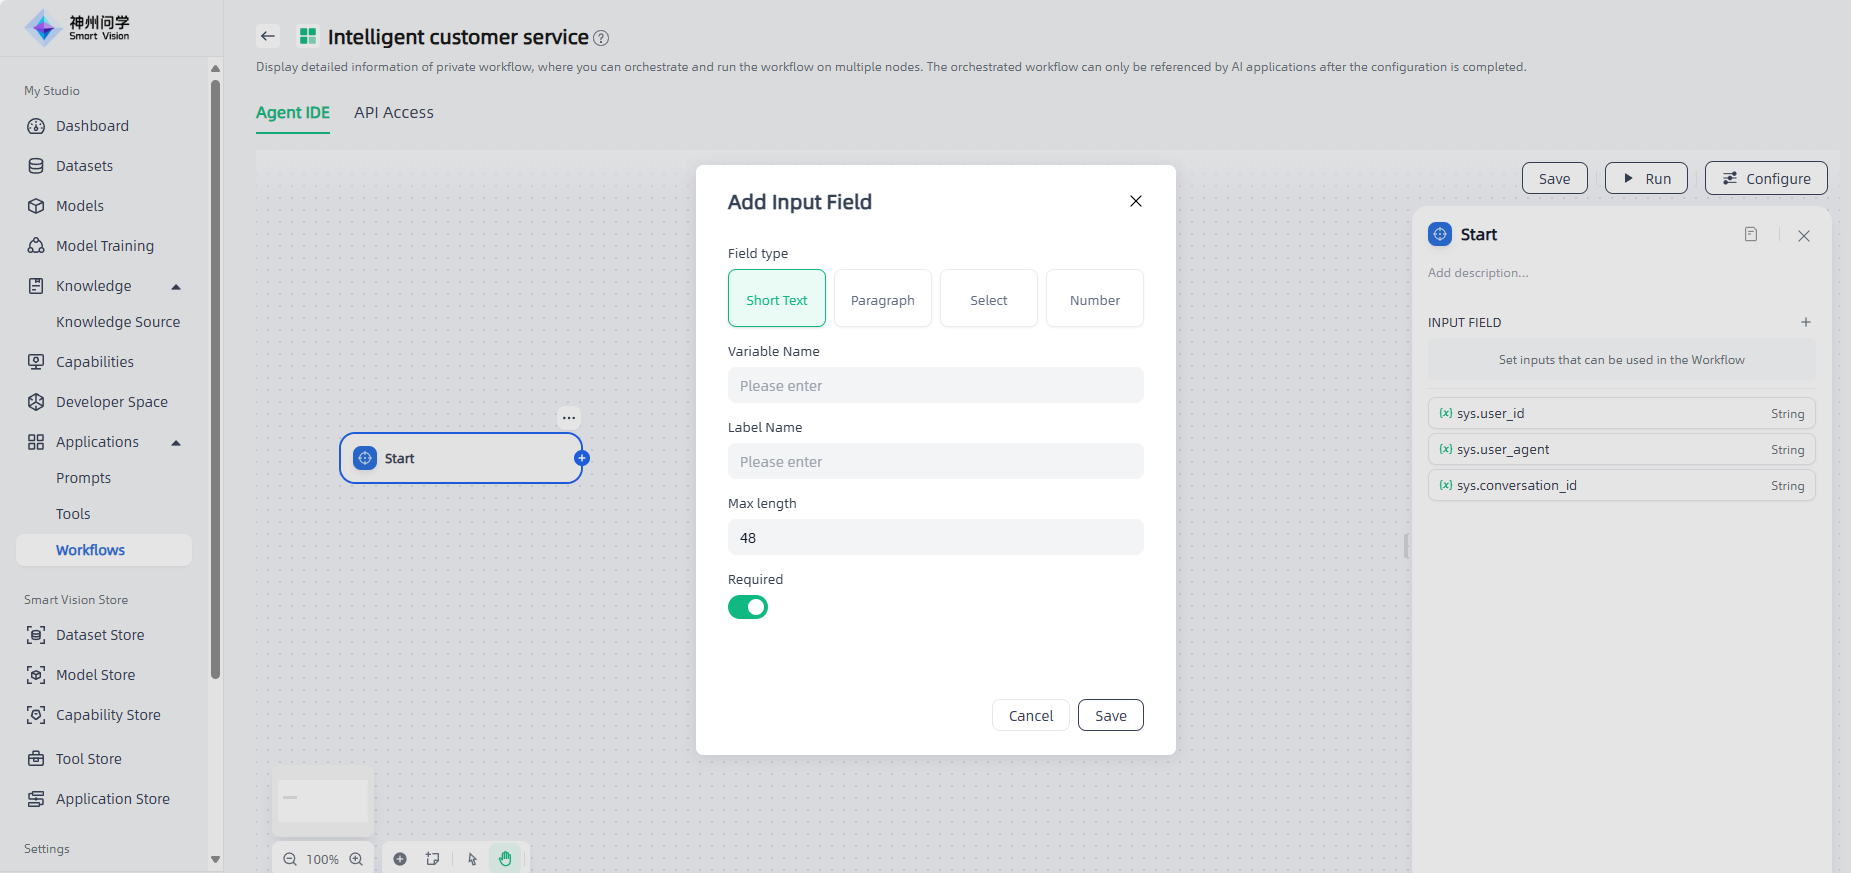
In the start node, you need to define the input variables used to start the workflow. Click "+" to select the appropriate variable type and add the variable.
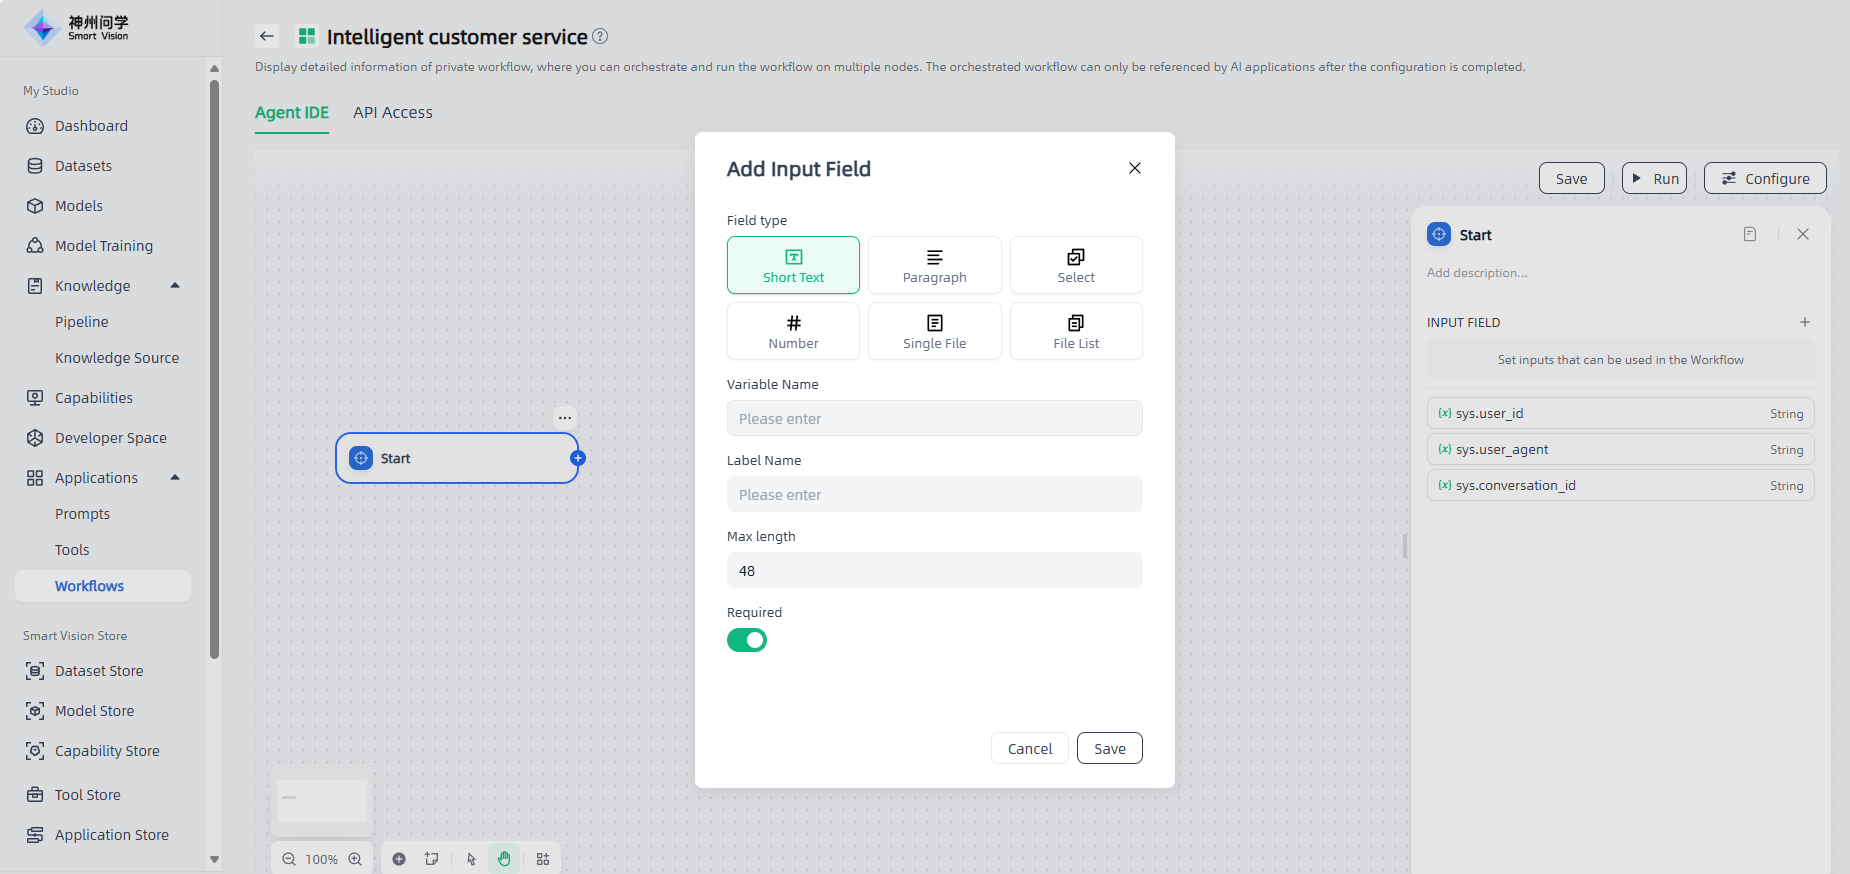
Six types of input variables are supported, all of which can be set as required:
Short text: With a maximum length of 256 characters.
Paragraph: Long text, allowing users to input longer content.
Select: Fixed options set by the developer; users can only select from preset options and cannot input custom content.
Number: Only allows numerical input.
Single File: Supports uploading local files (documents, images, audio, videos) or URLs.
File List: Supports uploading file lists and setting variable names, display names, maximum number of uploaded files, etc.
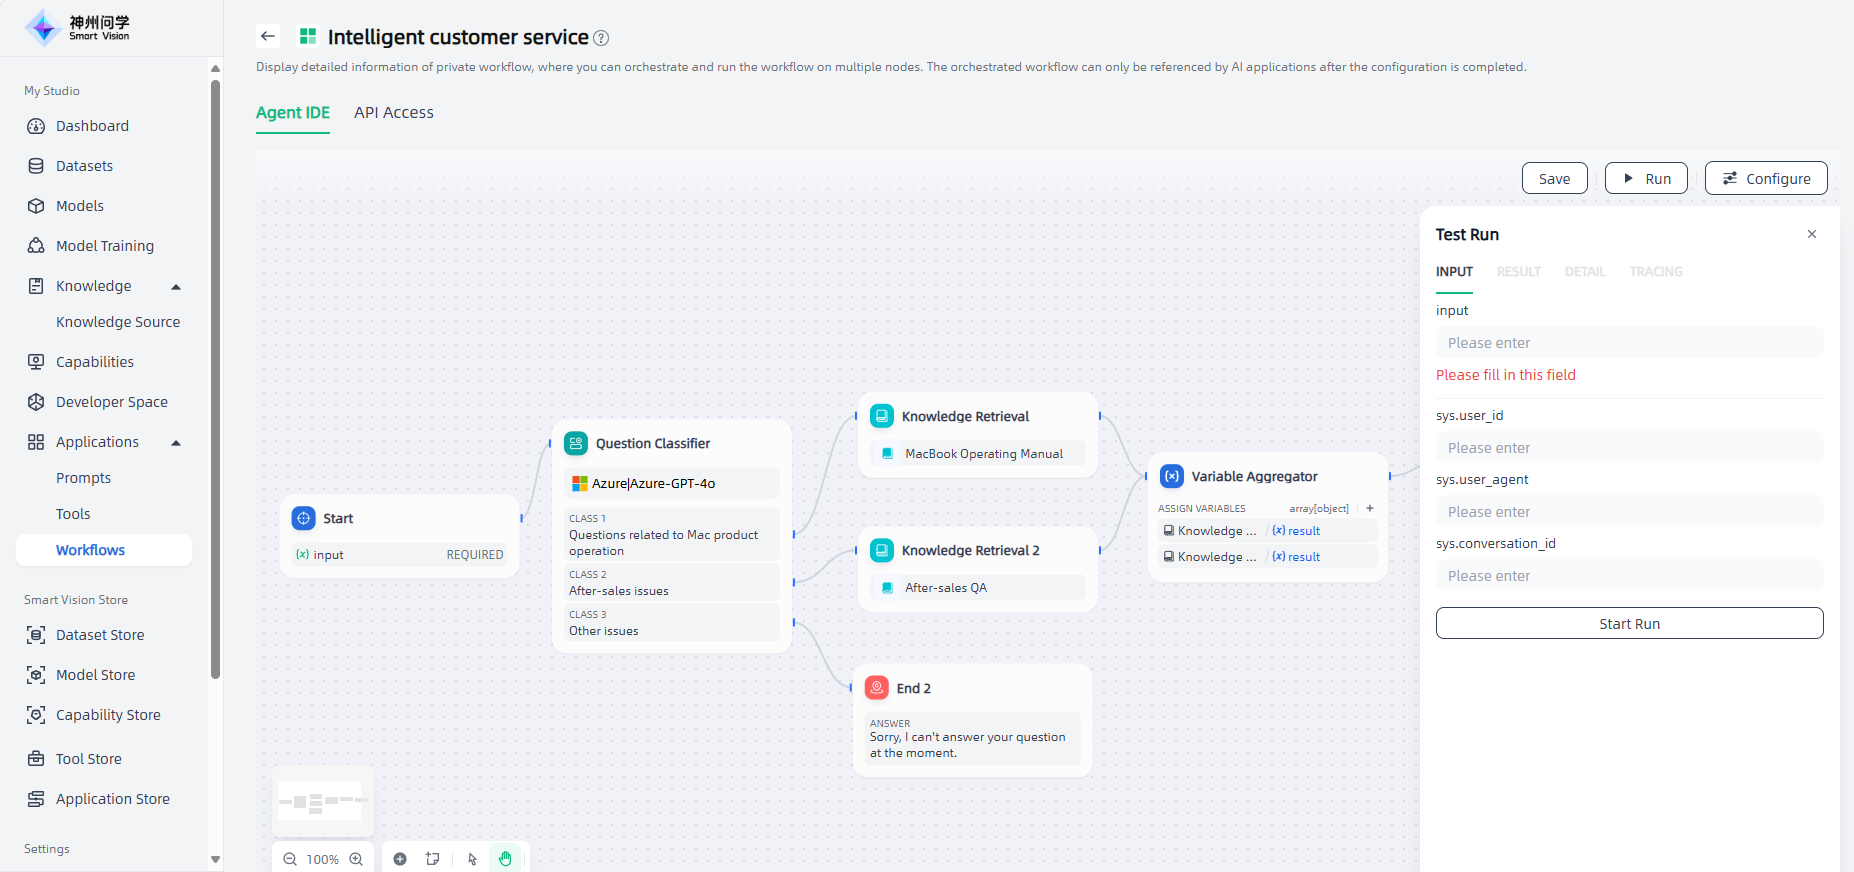
Once the input variables are configured, the workflow will prompt you to enter the variable values defined in the Start node when it executes.
End
In a workflow, the execution result is output only when it runs to the End node. The End node is the termination node of the workflow, and no other nodes can be added after the End node.
The End node is used to define the final output content of the workflow. Each workflow needs at least one End node after the execution is completed to output the final result.
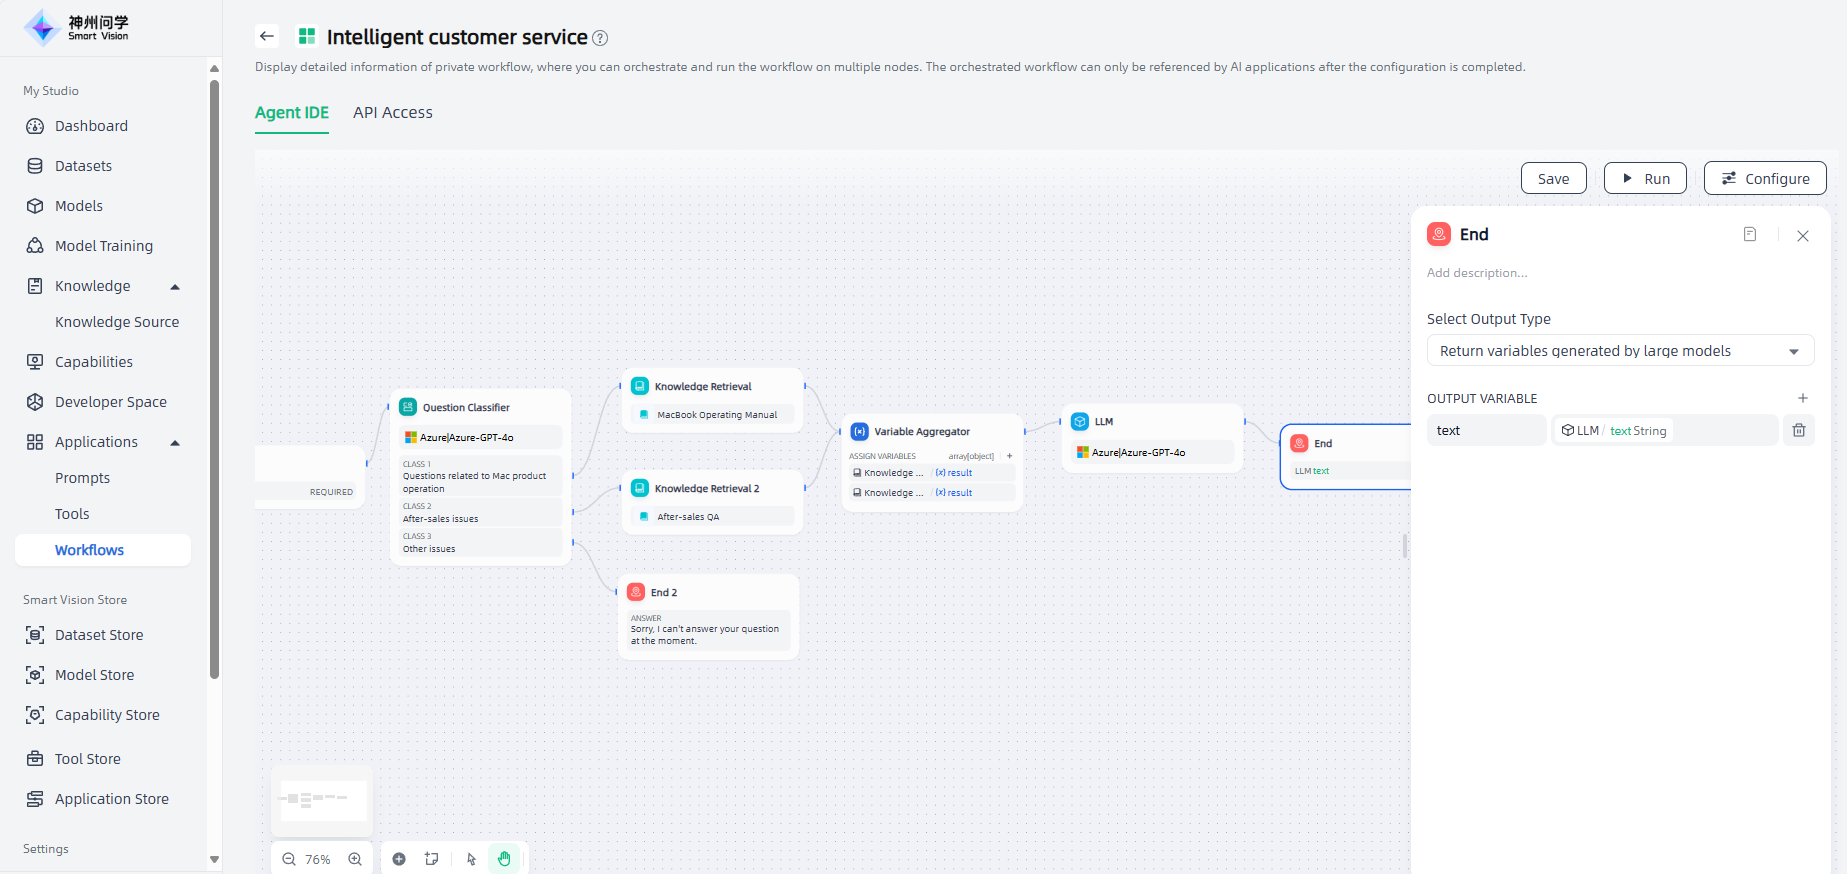
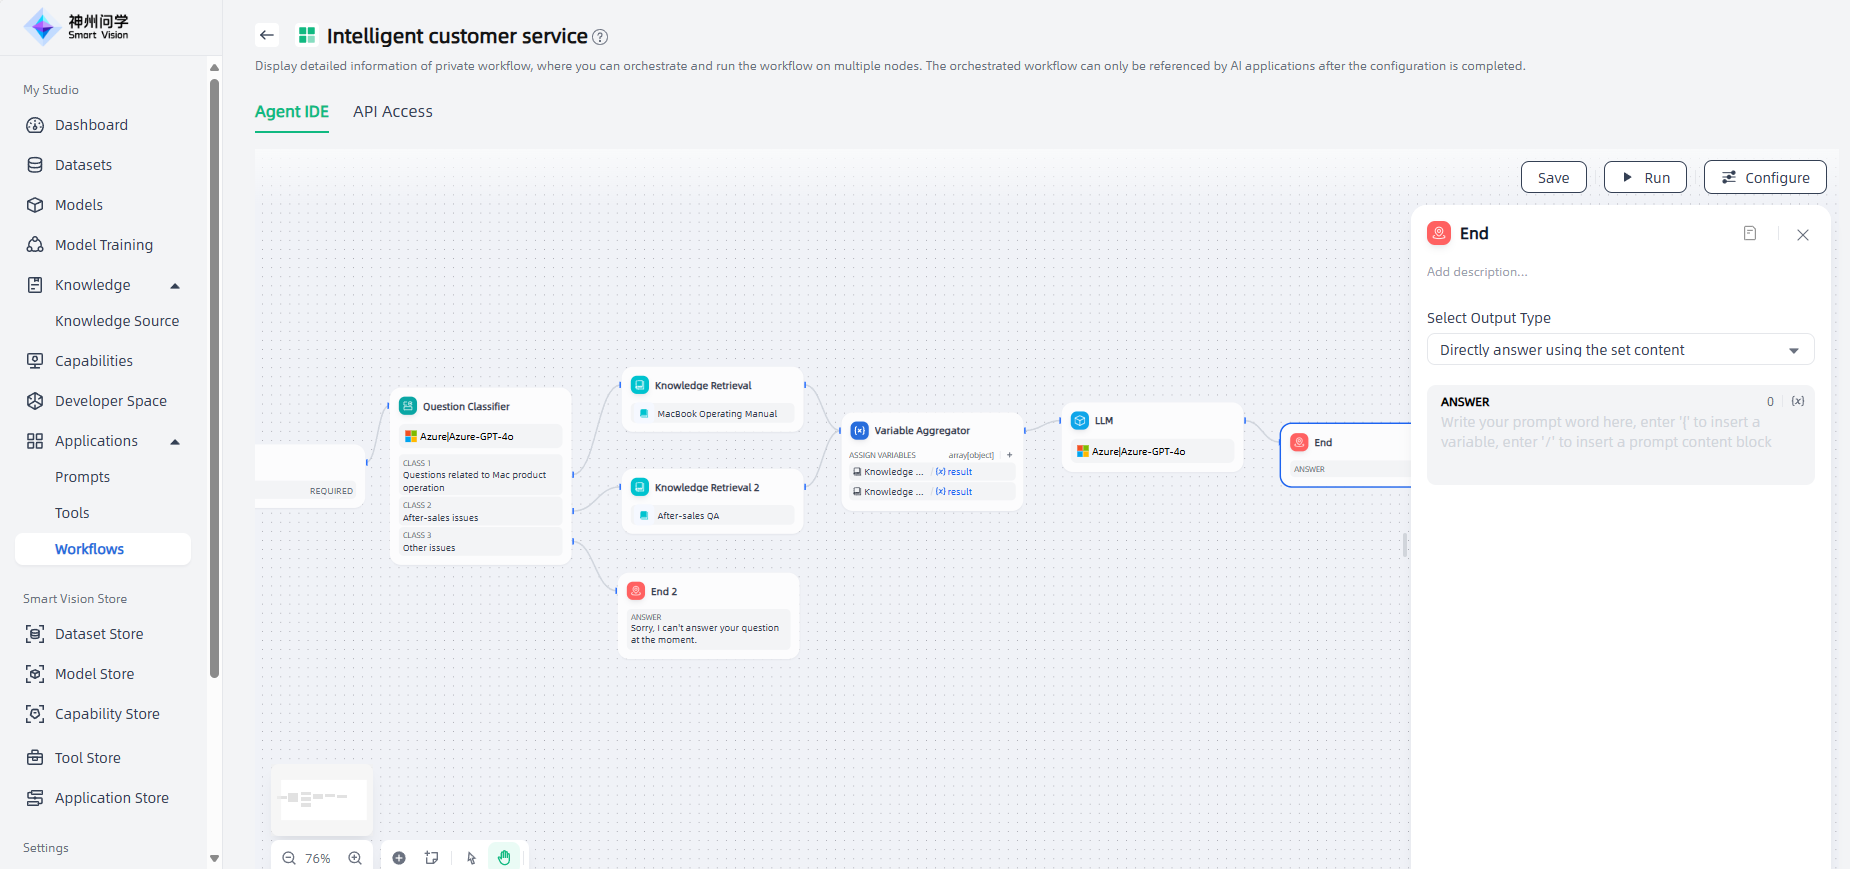
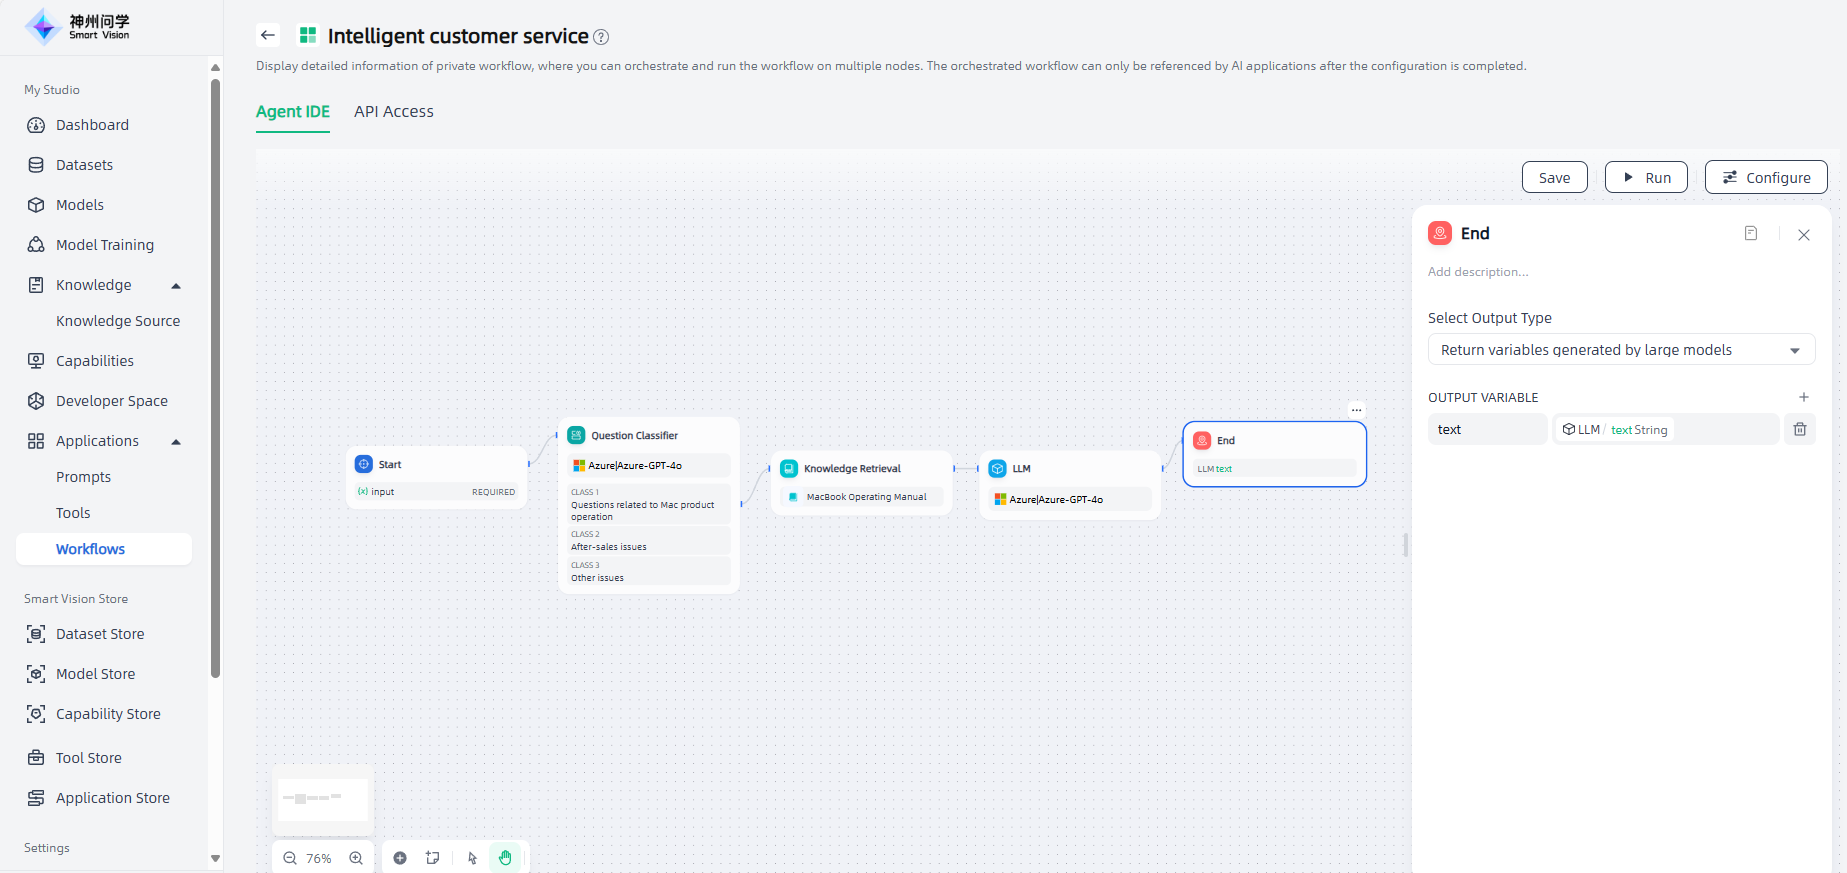
The End node provides two output types: ① Return variables, and generate answers by the large model; ② Directly answer using the set content.
Return variables, and generate answers by the large model: You need to declare one or more output variables (click "+"), which can reference the output variables of any upstream node.
Directly answer using the set content: Customize the output content, and support inserting variables and content blocks into the content.
If there are multiple branches in the workflow, you need to define multiple End nodes.
LLM
The LLM node is the core node of the workflow, which is used to call a large language model to answer questions or process natural language.
LLM node uses the conversation/generation/classification/processing capabilities of the large language model to handle a wide range of tasks based on given prompts, which can be used in different stages of the workflow, such as:
Text generation: In content creation scenarios, relevant text is generated based on topics and keywords.
Content classification: In email batch processing scenarios, emails are automatically classified, such as inquiries/complaints/spam, etc.
Code generation: In programming assistance scenarios, specific business codes are generated or test cases are written according to user needs.
RAG: In knowledge base Q&A scenarios, retrieved relevant knowledge is reorganized to respond to user questions.
Image understanding: Use a multimodal model with visual functions to understand and answer questions about information in images.
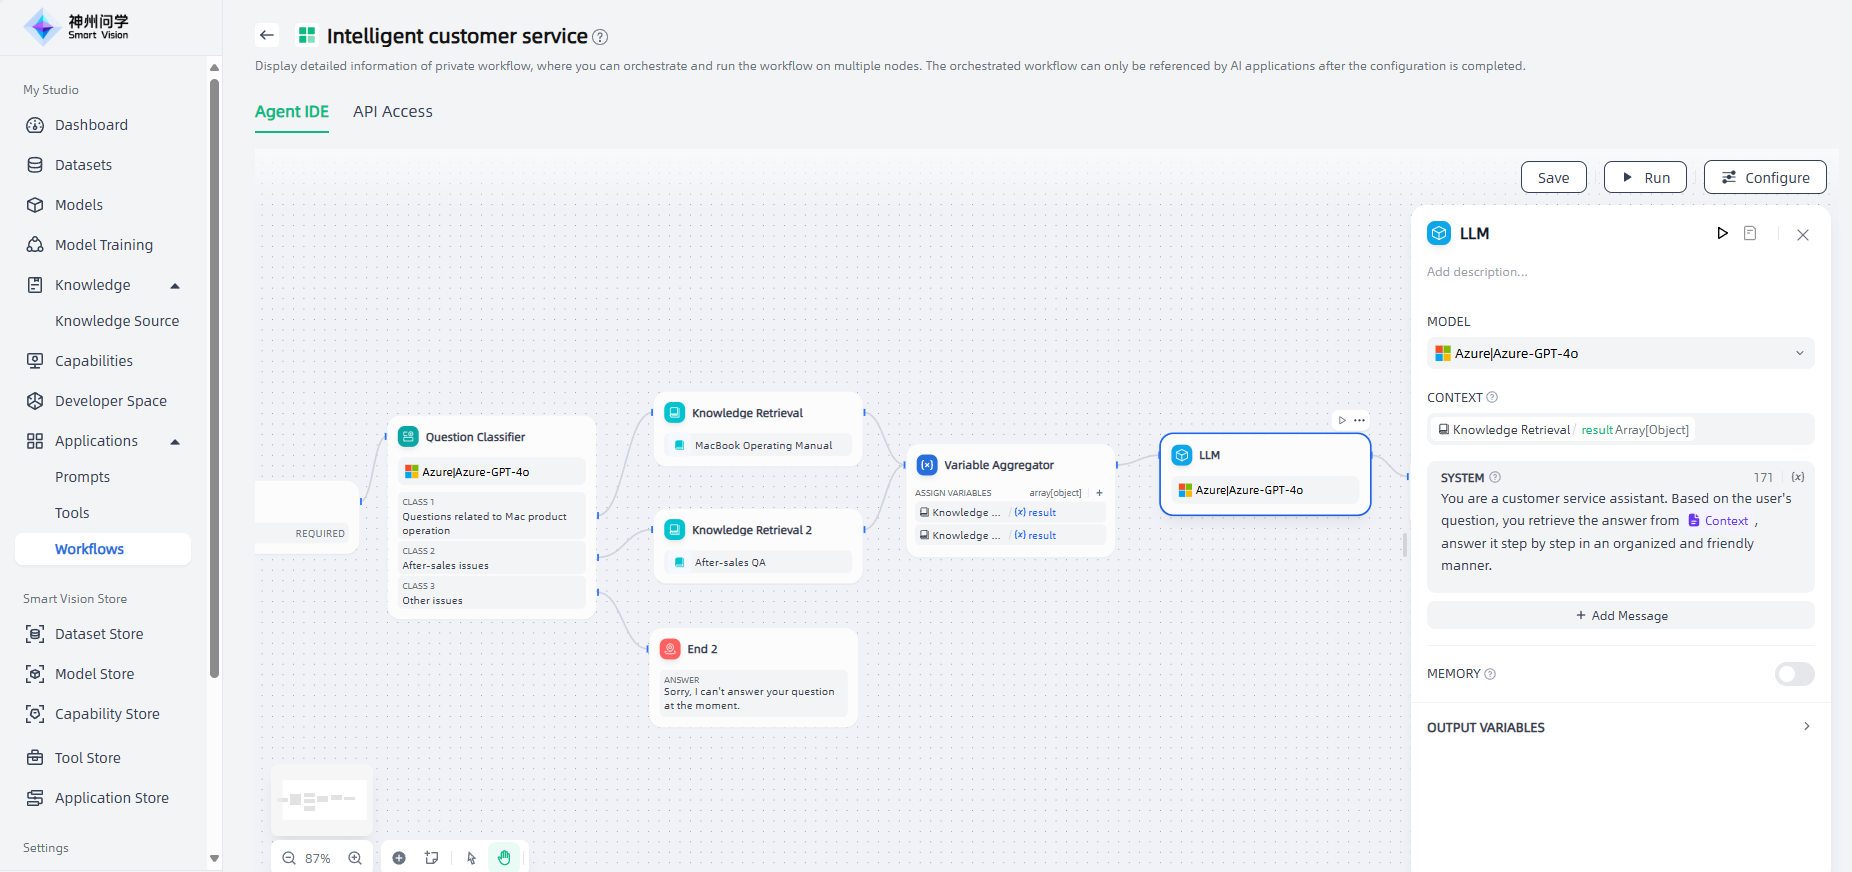
The configuration steps of the LLM node are as follows:
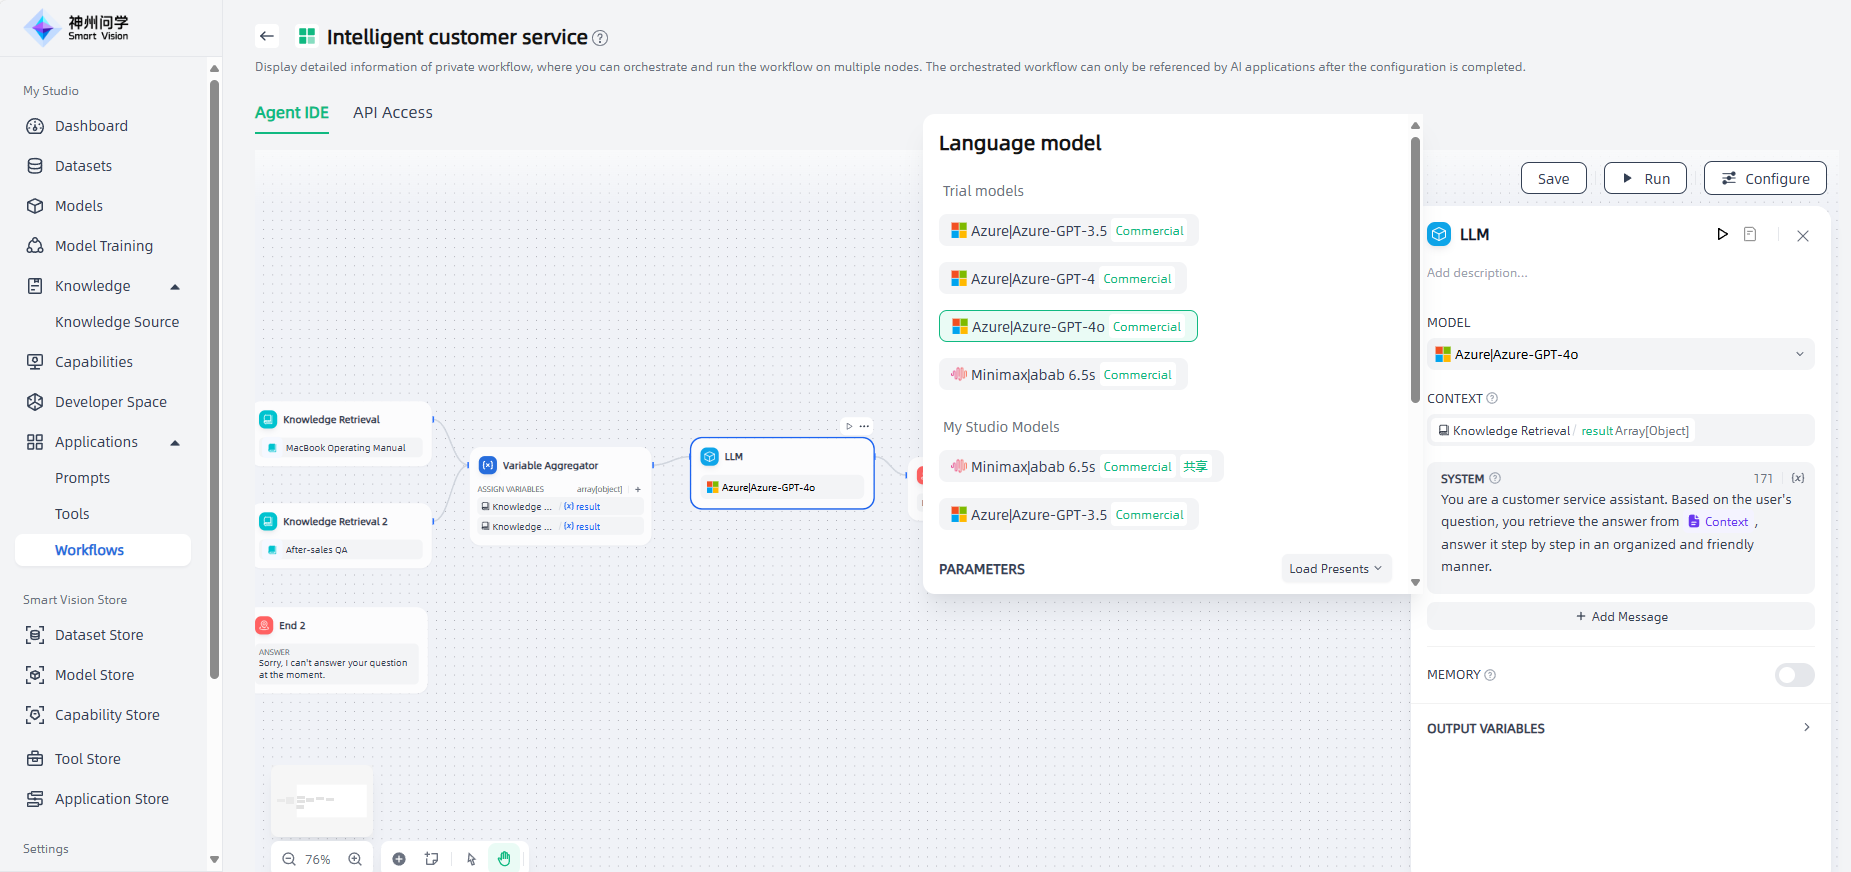
1.Select model: When using the LLM node, you need to select a suitable model based on the scenario requirements and task type (the selectable models correspond to Studio-Model-Deployed) and set the parameters.
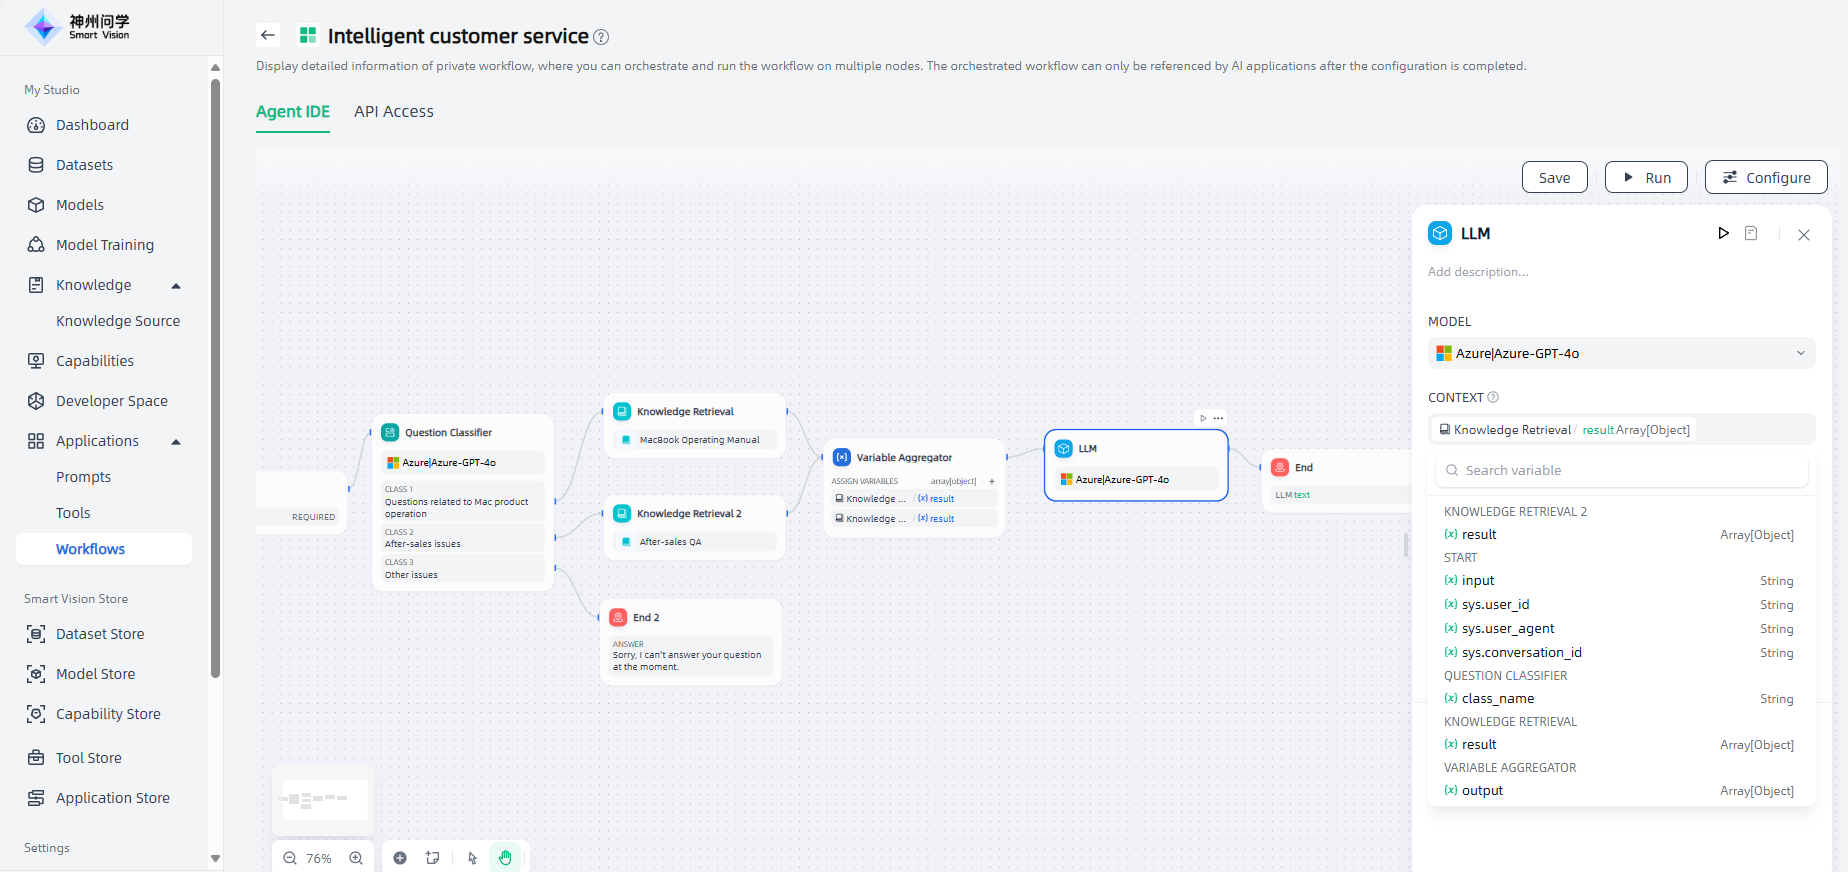
2.Context: Context is a special type of variable defined in the LLM node. You can select the appropriate variable as the context according to the scenario requirements to facilitate the insertion of external search text content into the prompt. Taking the knowledge base question and answer scenario as an example, the downstream node of knowledge retrieval is usually an LLM node. The output variable of knowledge retrieval needs to be configured in the context variable within the LLM node for association and assignment; after association, insert the context variable at the appropriate position of the prompt to merge the retrieved knowledge into the prompt.
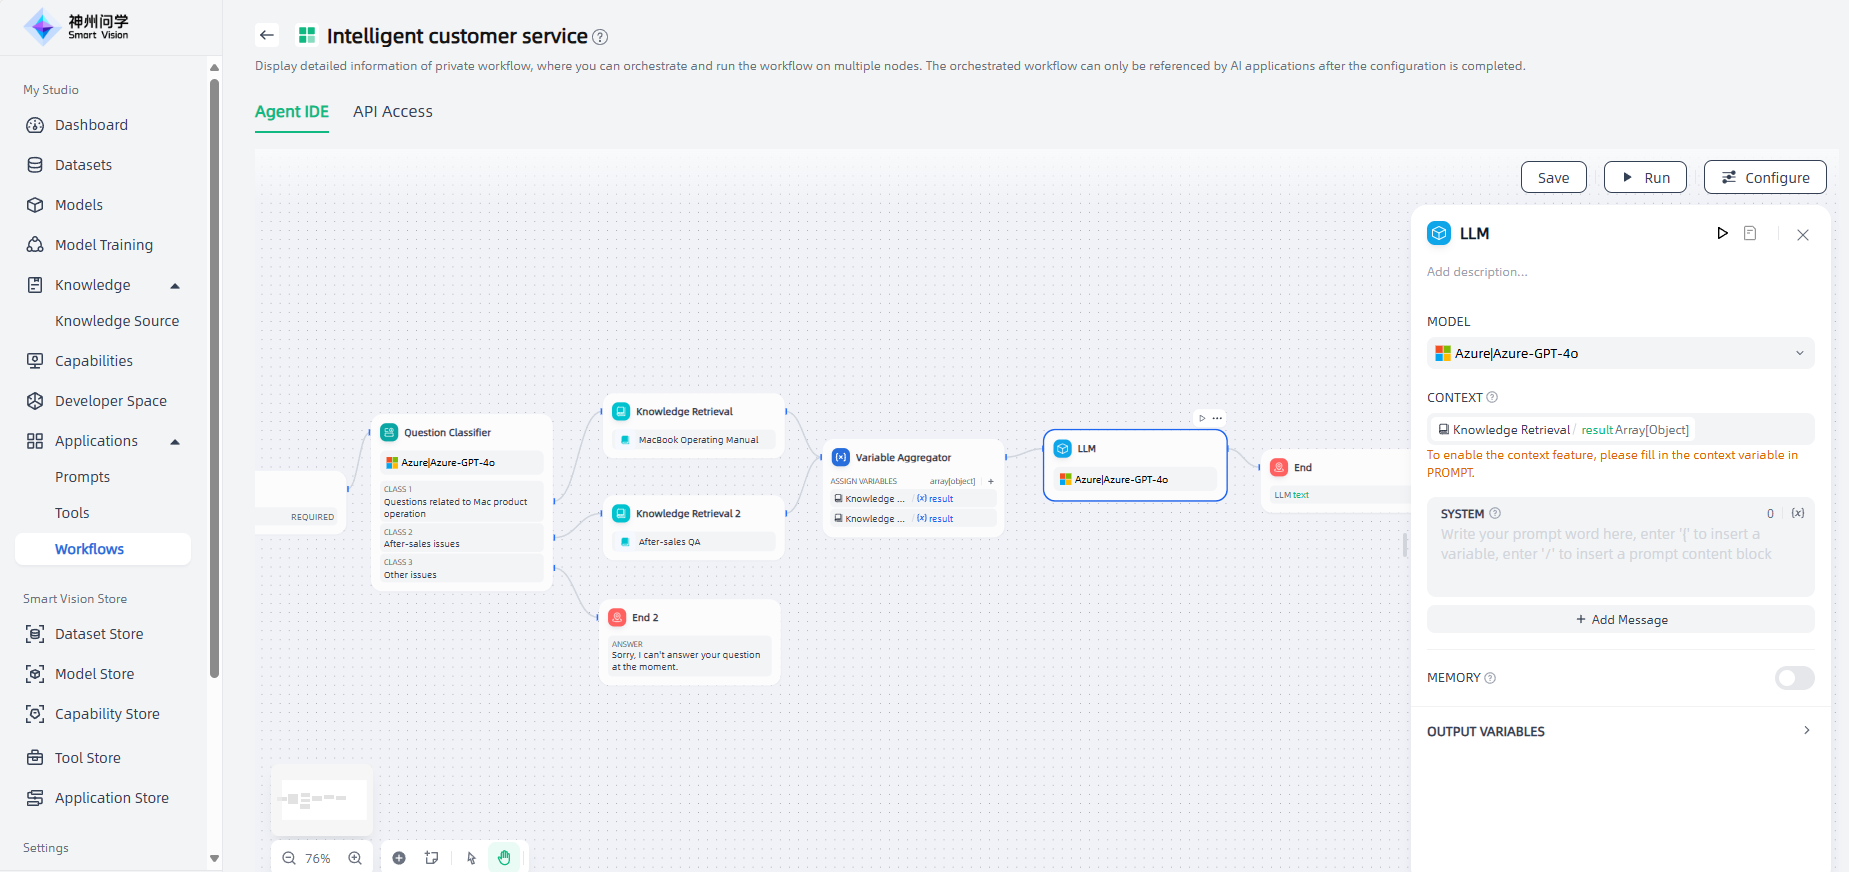
3.Prompt: In the LLM node, you can customize the model prompt. In the prompt editor, you can enter "/" or "{" to bring up the variable insertion menu and insert a special variable block or upstream node variable into the prompt as context content.
Knowledge Retrieval
The knowledge retrieval node is used to query the enterprise knowledge base for text content related to the question, which can be used as context for subsequent answers from the large language model.
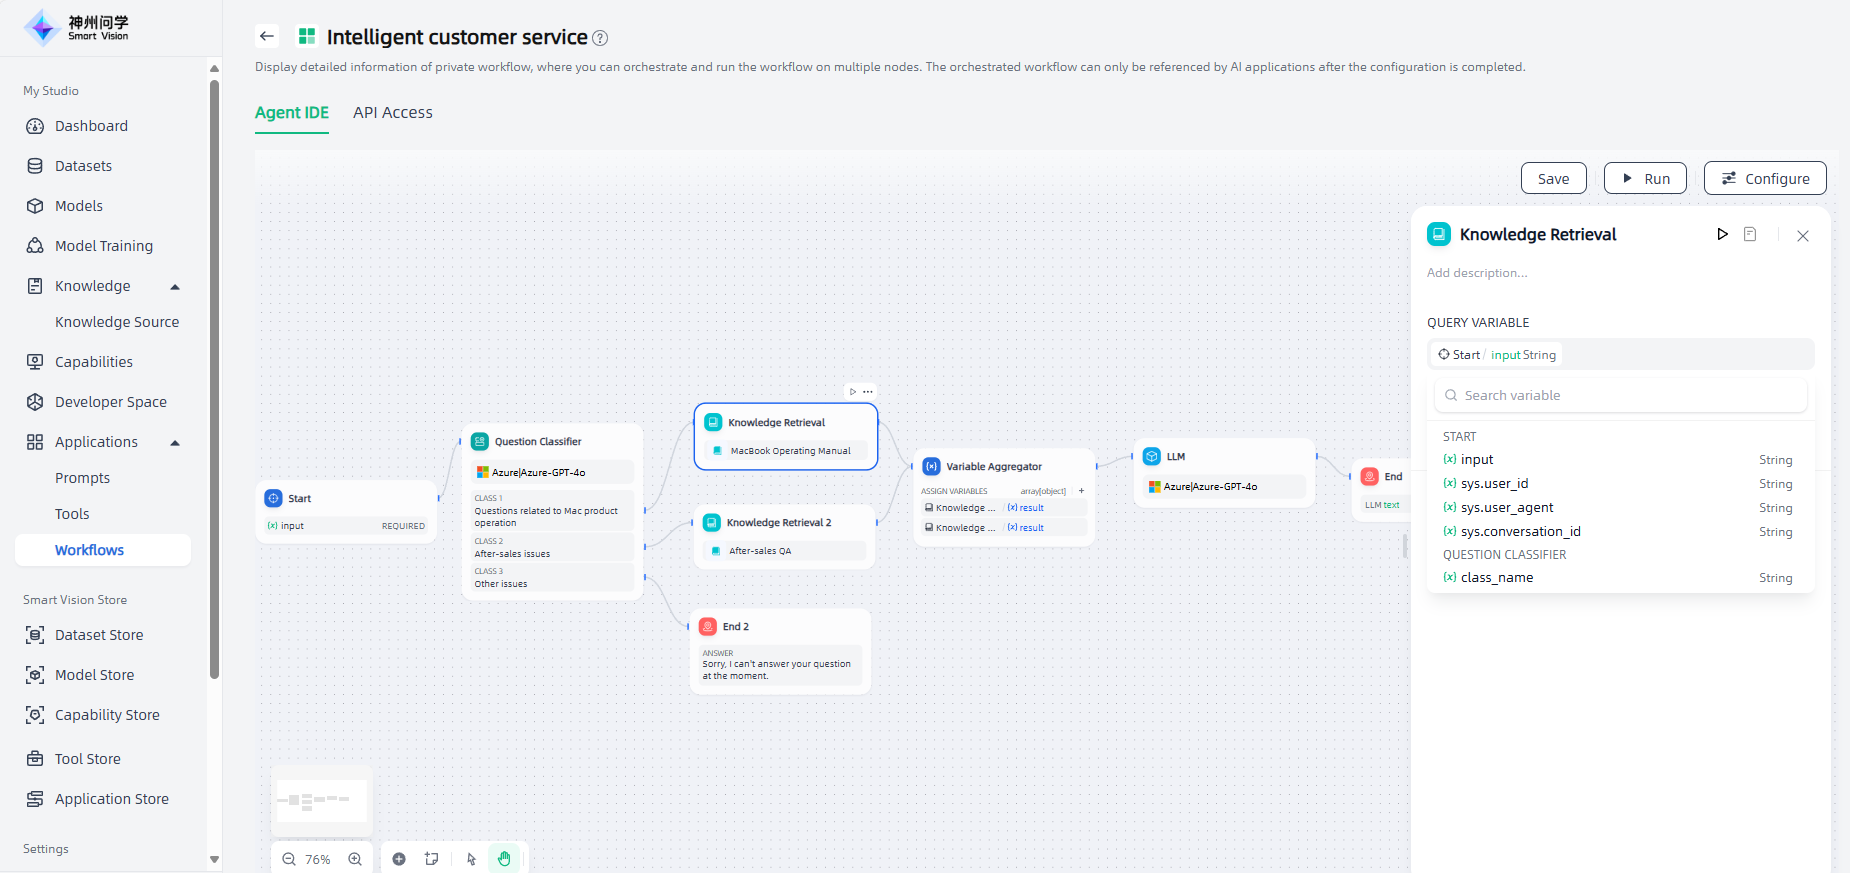
The configuration steps of the knowledge retrieval node are as follows:
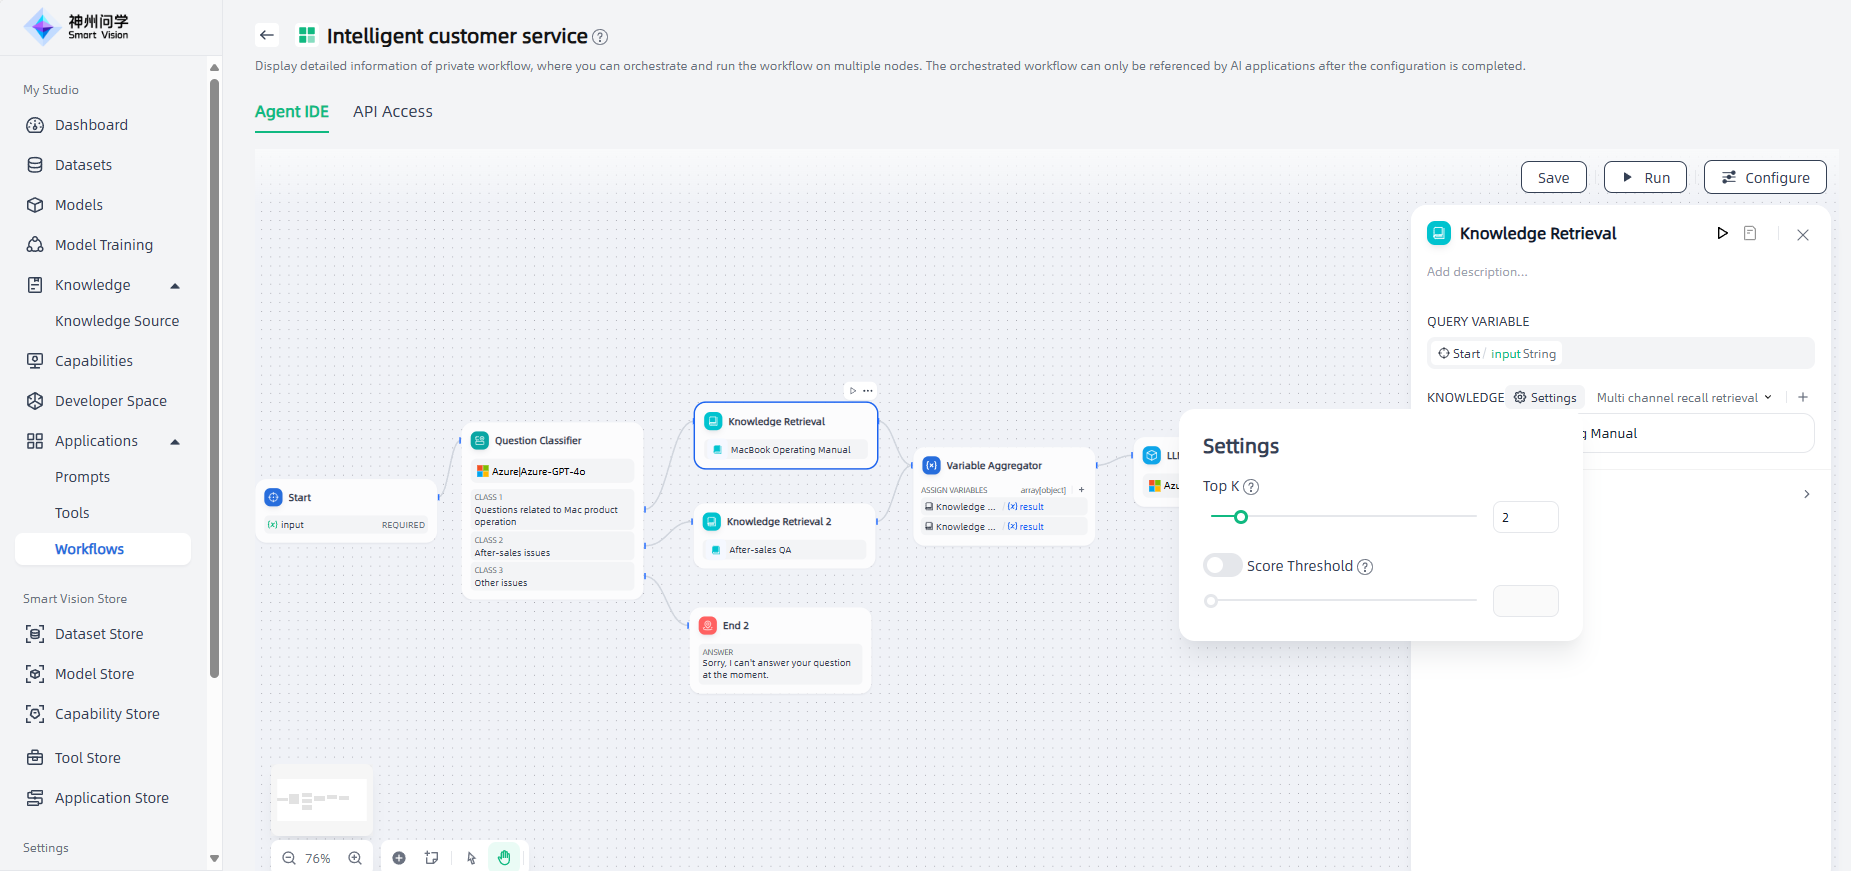
1.Query variable: In the knowledge base retrieval scenario, the query variable usually represents the user's input question.
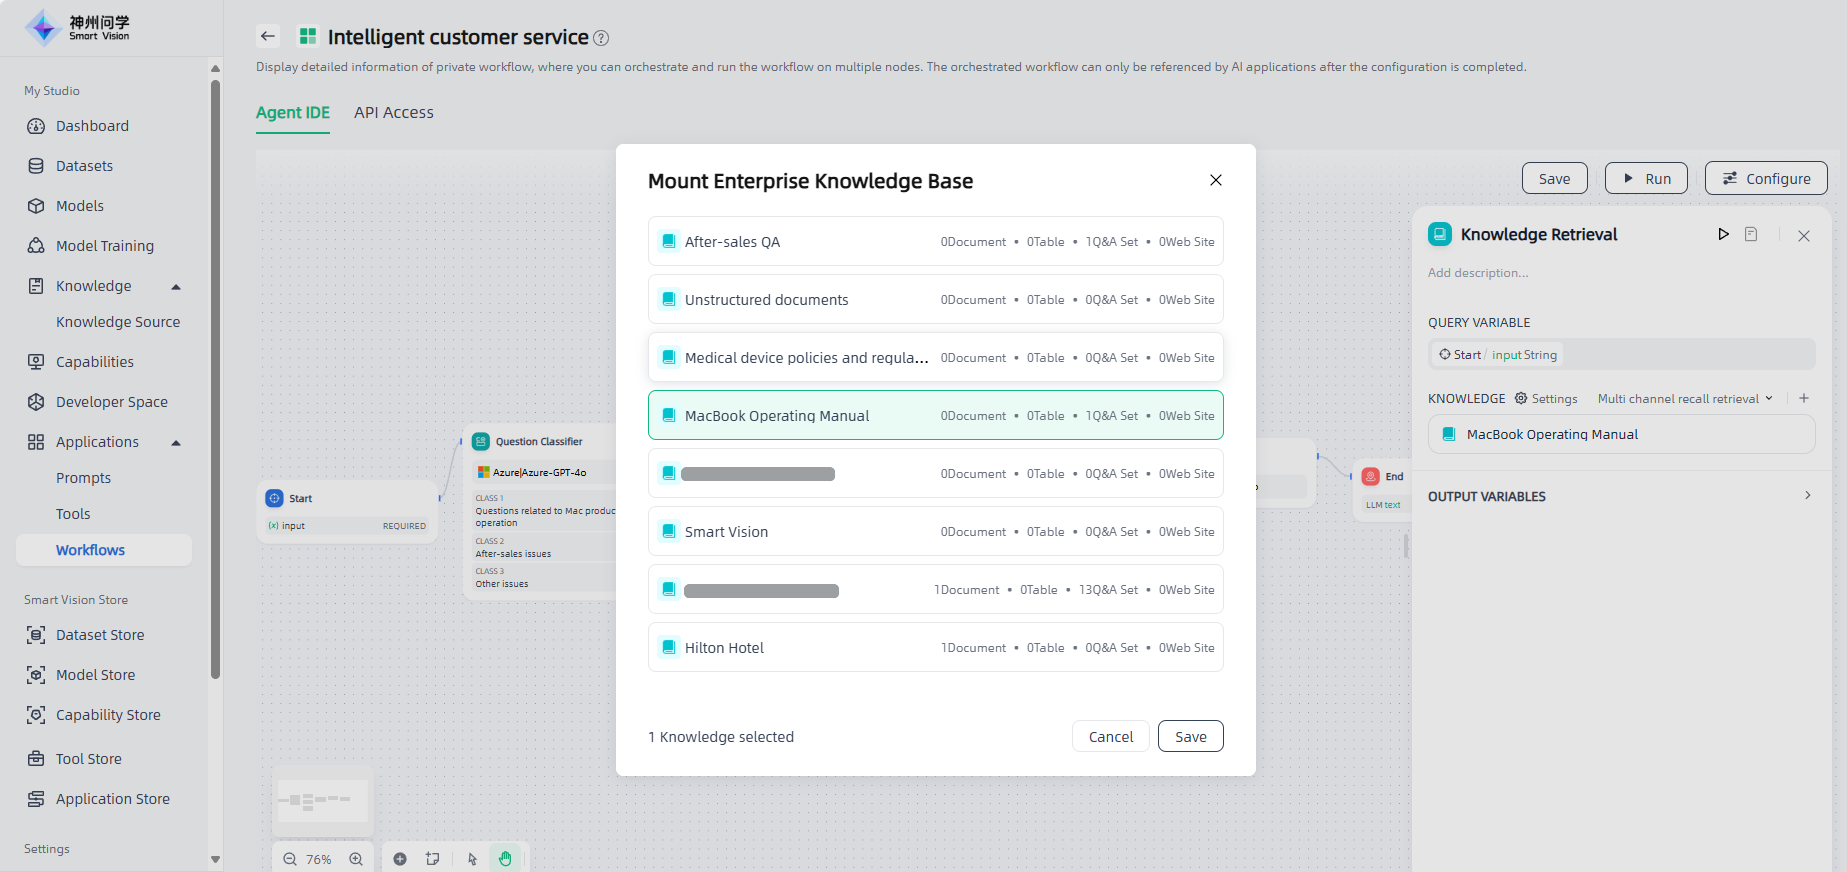
2.Add knowledge base: In the knowledge retrieval node, you can click "+" to add a knowledge base (corresponding to the knowledge base in Studio-Knowledge).
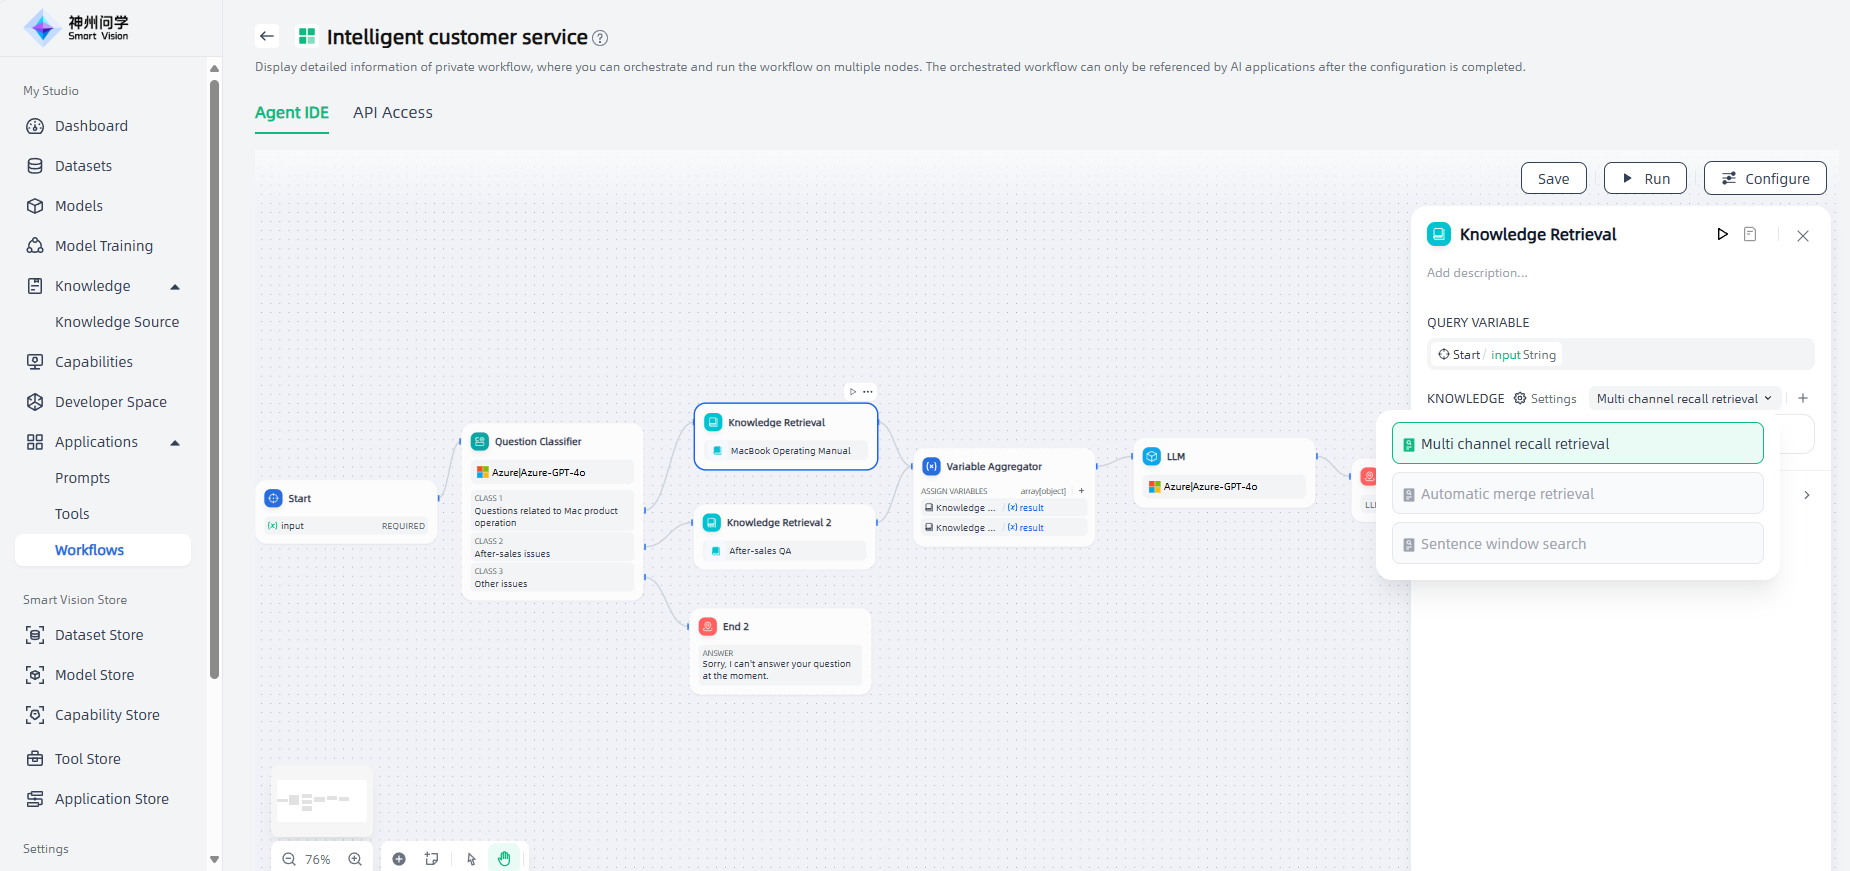
3.Retrieval mode: After adding a knowledge base, you need to select a retrieval mode (the optional retrieval mode is related to the segmentation and cleaning rules of the mounted enterprise knowledge base), and switching is supported.
4.Recall Settings: After adding the knowledge base, you can adjust the similarity values of Top K and Score Threshold as needed.
Question Classifier
By defining the classification description, question classifier node can infer and output the classification results that match the user input based on the user input.
Question classifier nodes are often used in customer service conversation intent classification, email classification, user comment classification and other scenarios. For example, in the product customer service Q&A scenario, the question classifier can be used as a step before knowledge retrieval to classify the user's input questions and divert them to different downstream knowledge bases for query, so as to accurately respond to the user's questions.
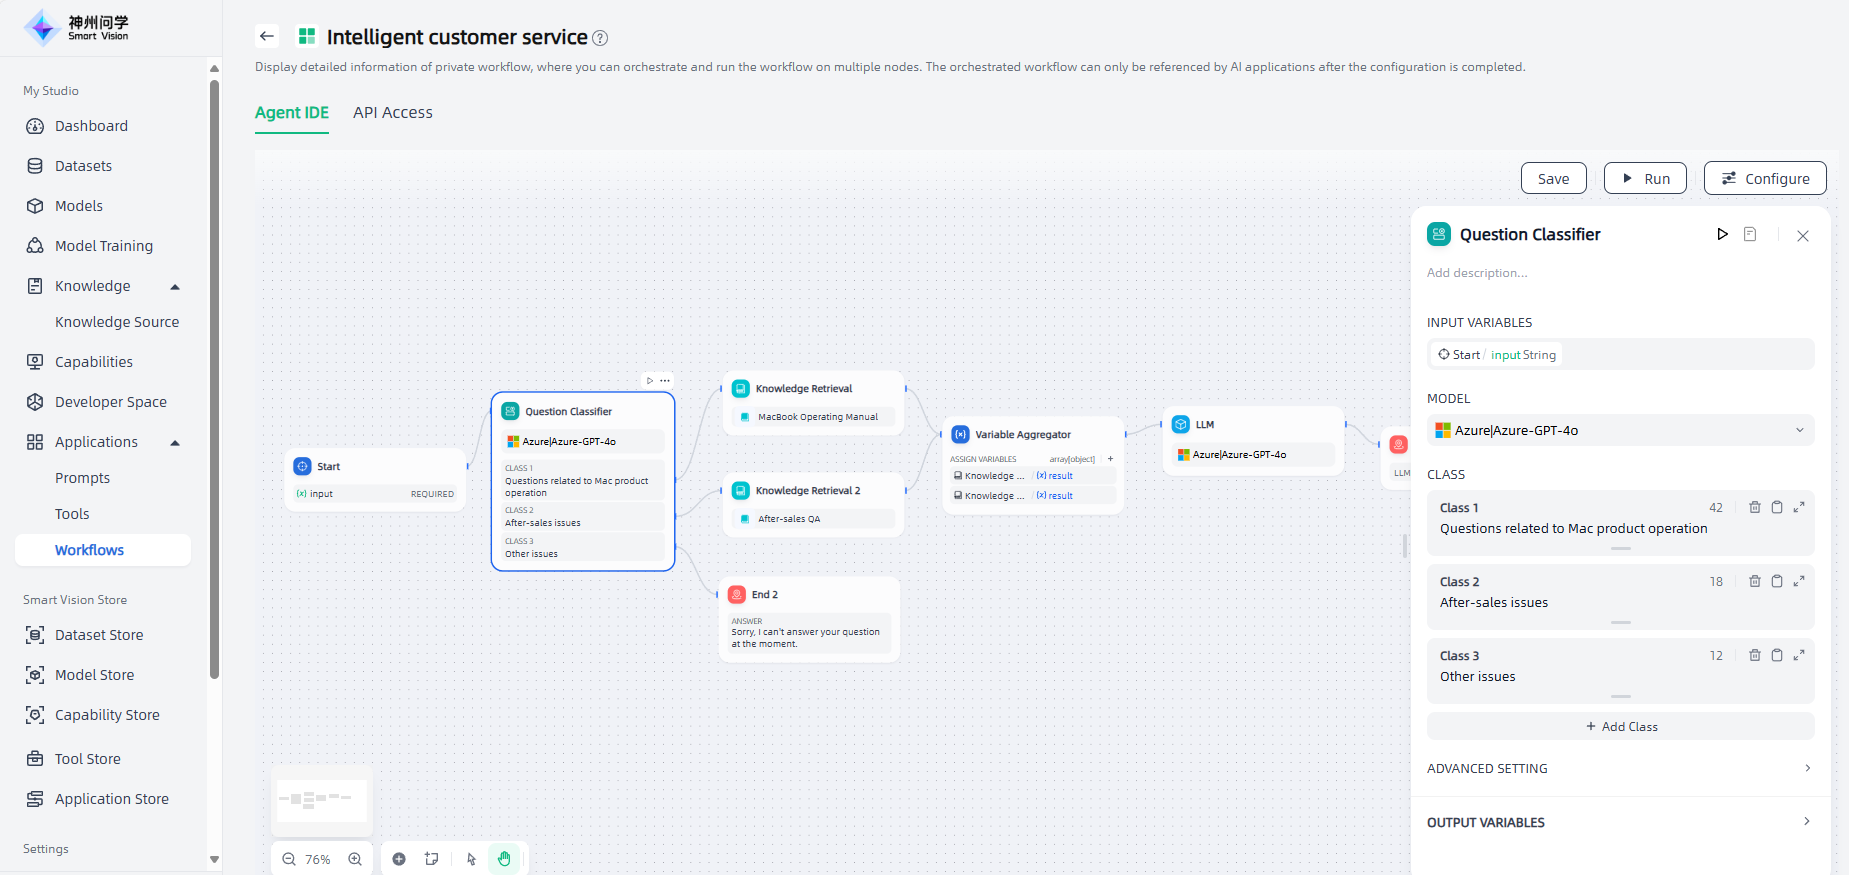
The configuration steps of the Question Classifier node are as follows:
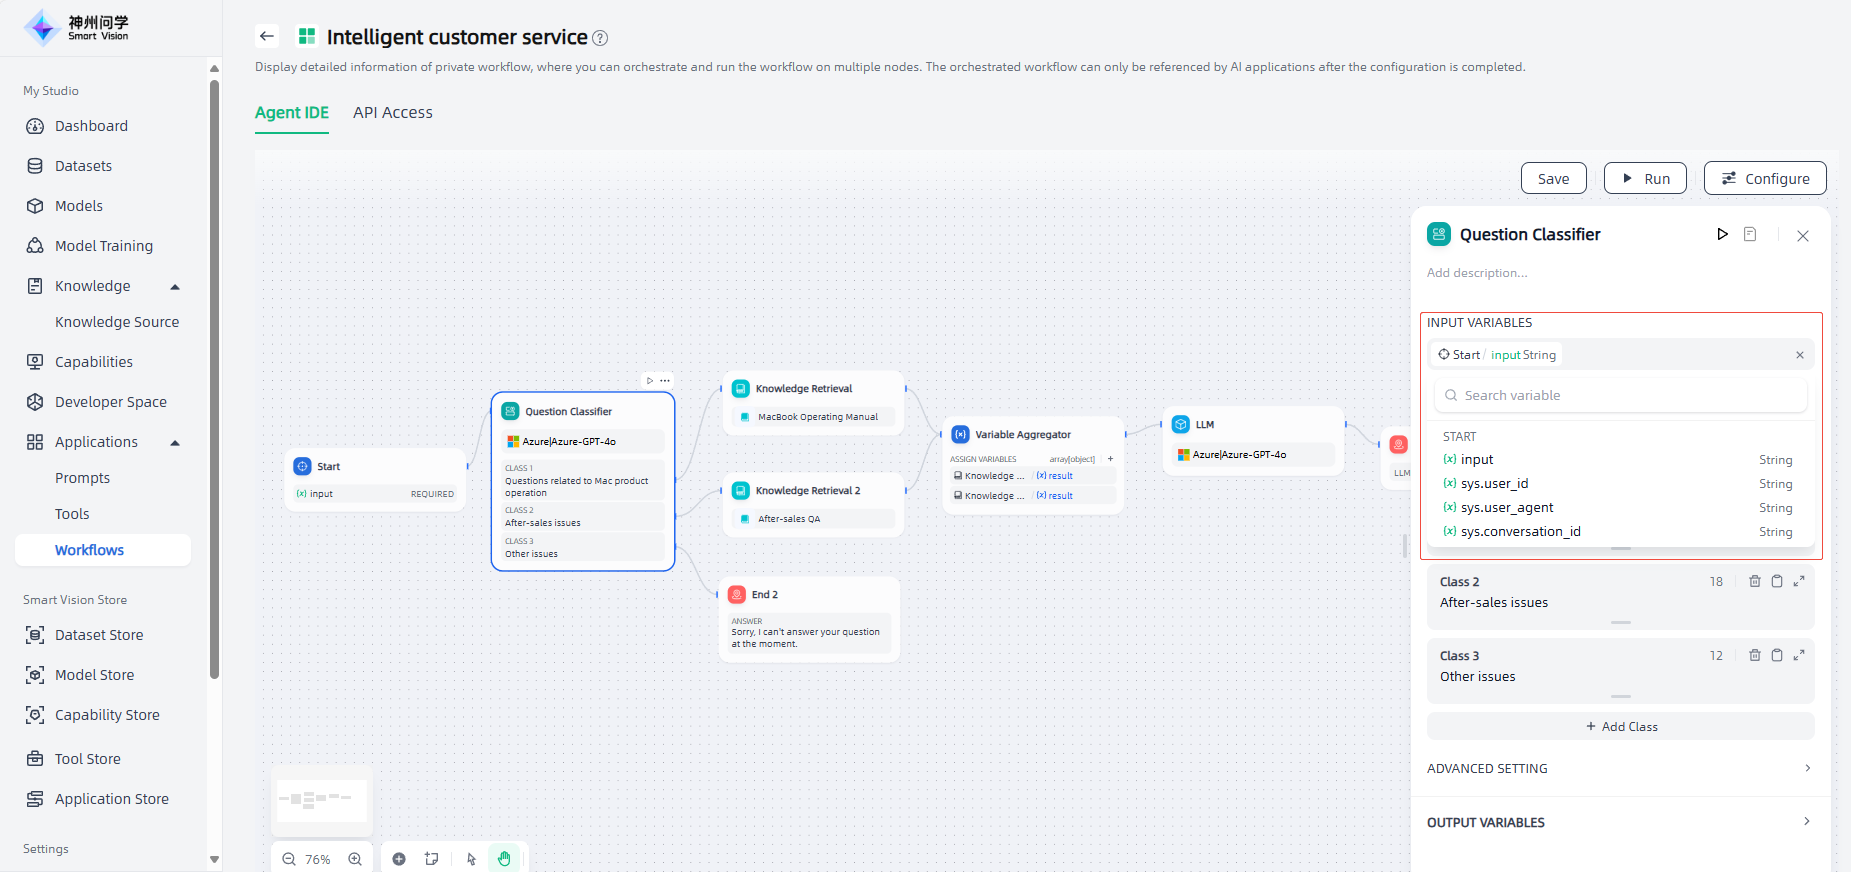
1.Input variables: Set the content that needs to be classified, such as the questions entered by users in the customer service Q&A scenario.
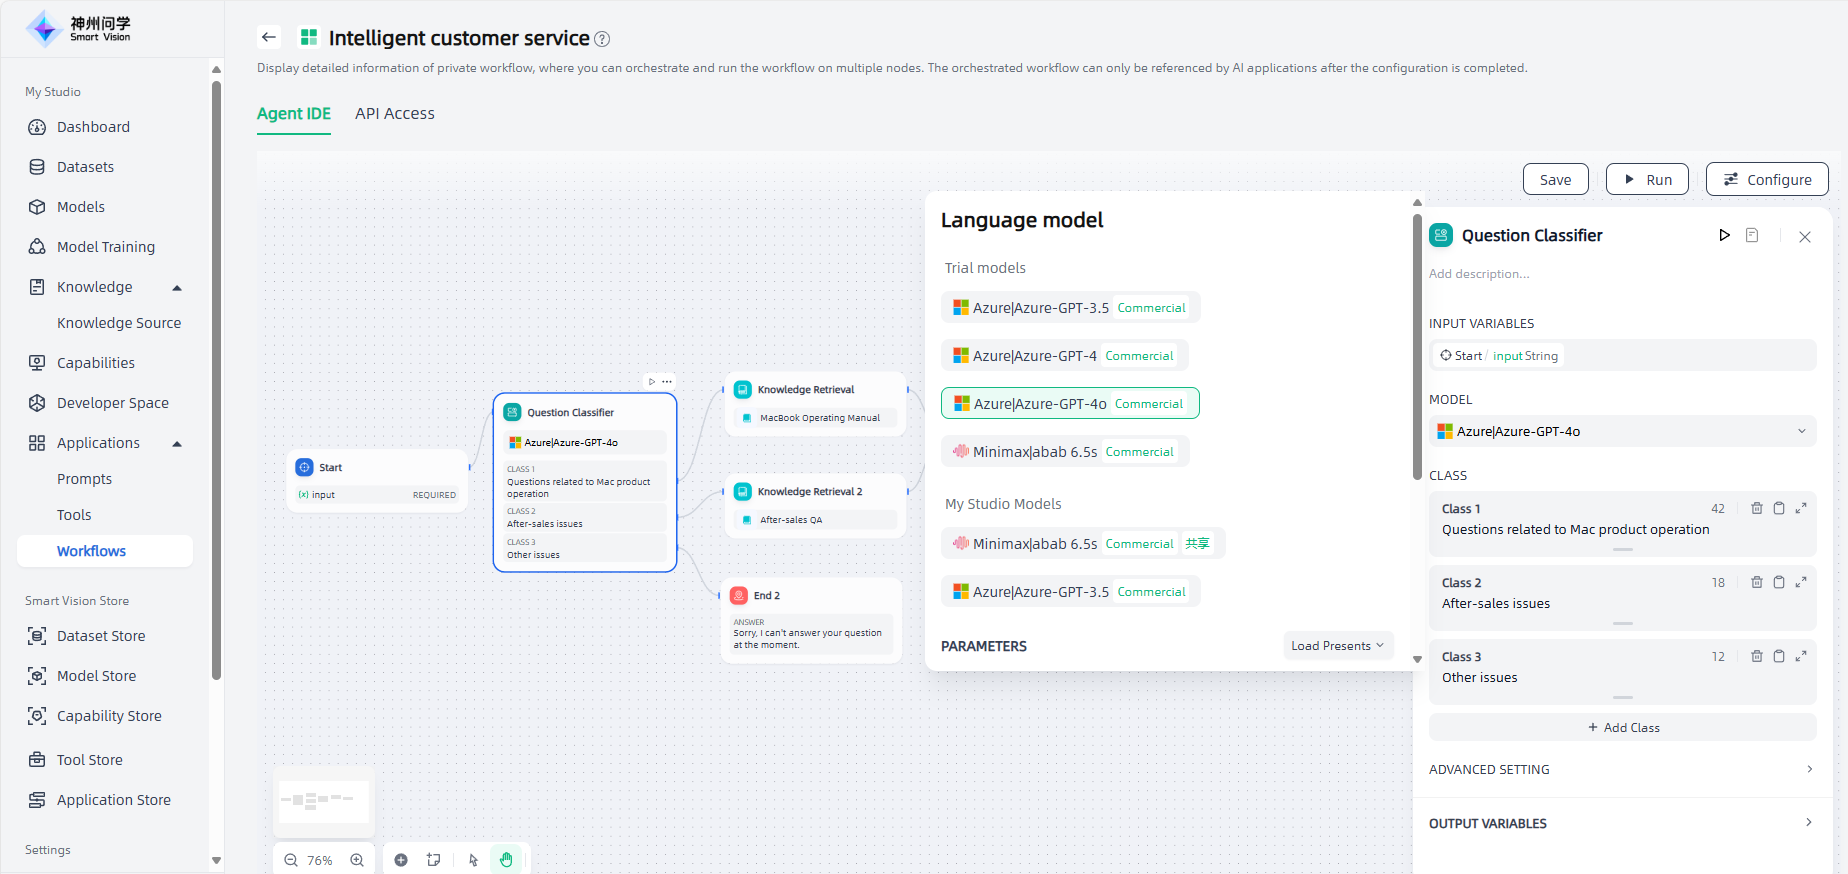
2.Select model: When using the Question Classifier node, you need to select an appropriate model and use its natural language classification and reasoning capabilities to ensure classification results.
3.Classification: You need to set keywords or descriptive statements for each classification based on your scenario requirements to help the model better understand the classification criteria.
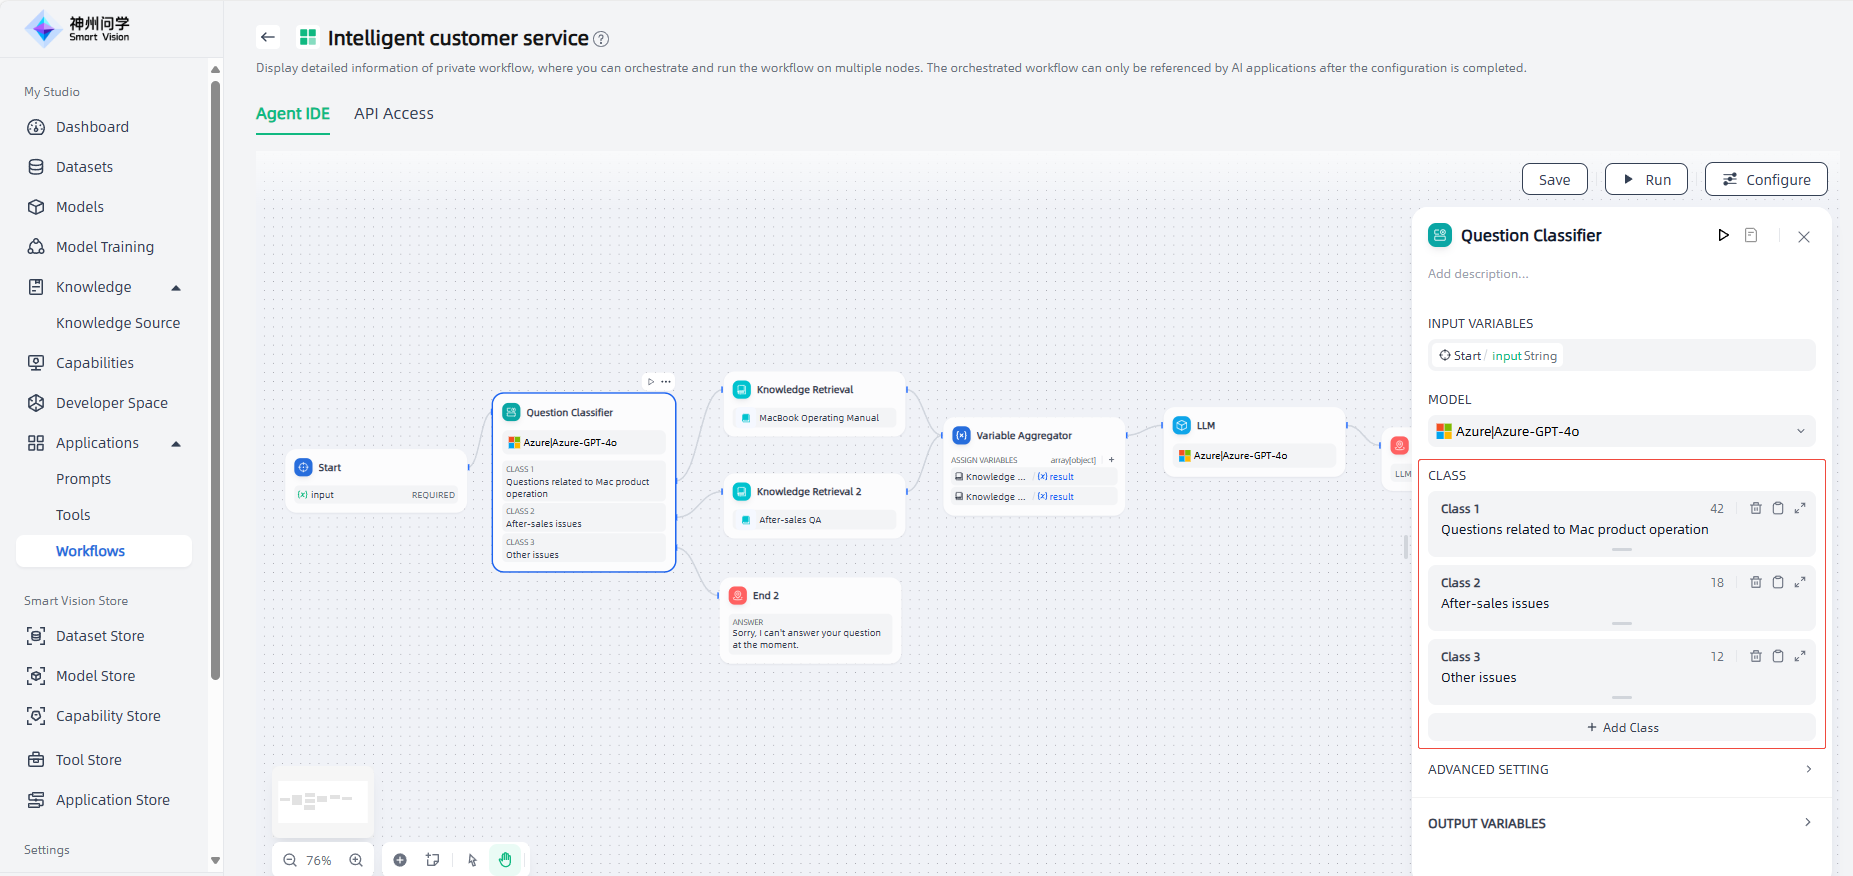
4.Set downstream nodes: Each category needs to be connected to a corresponding downstream node to facilitate the diversion of user questions to different paths.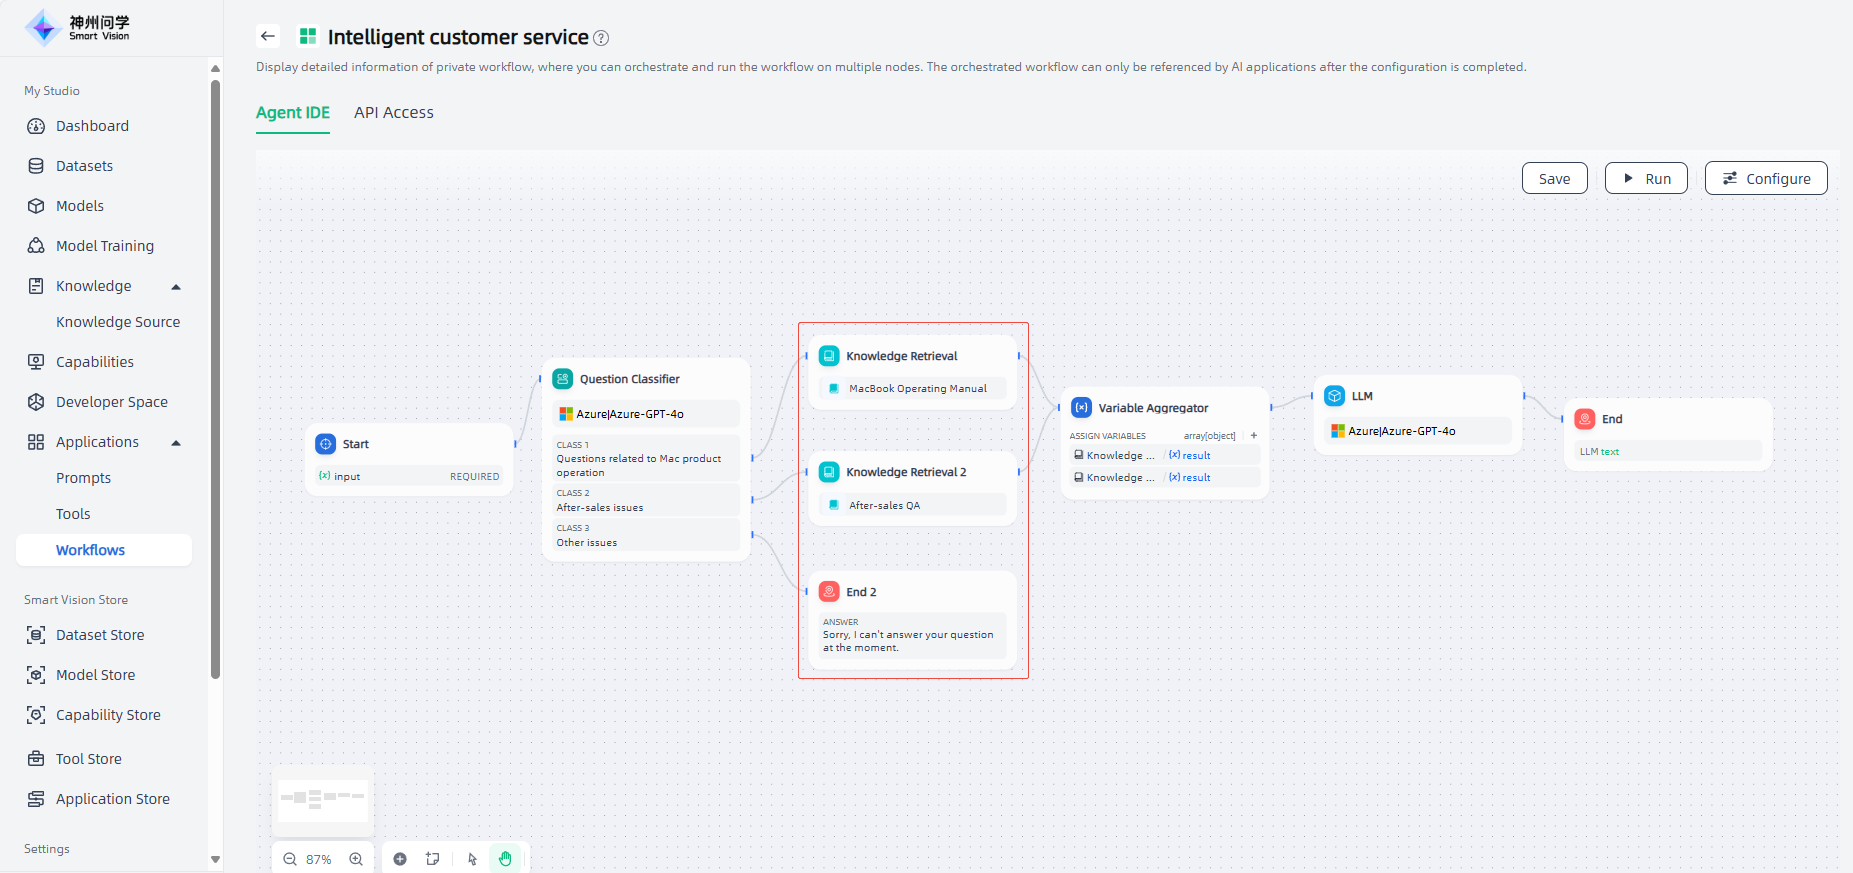
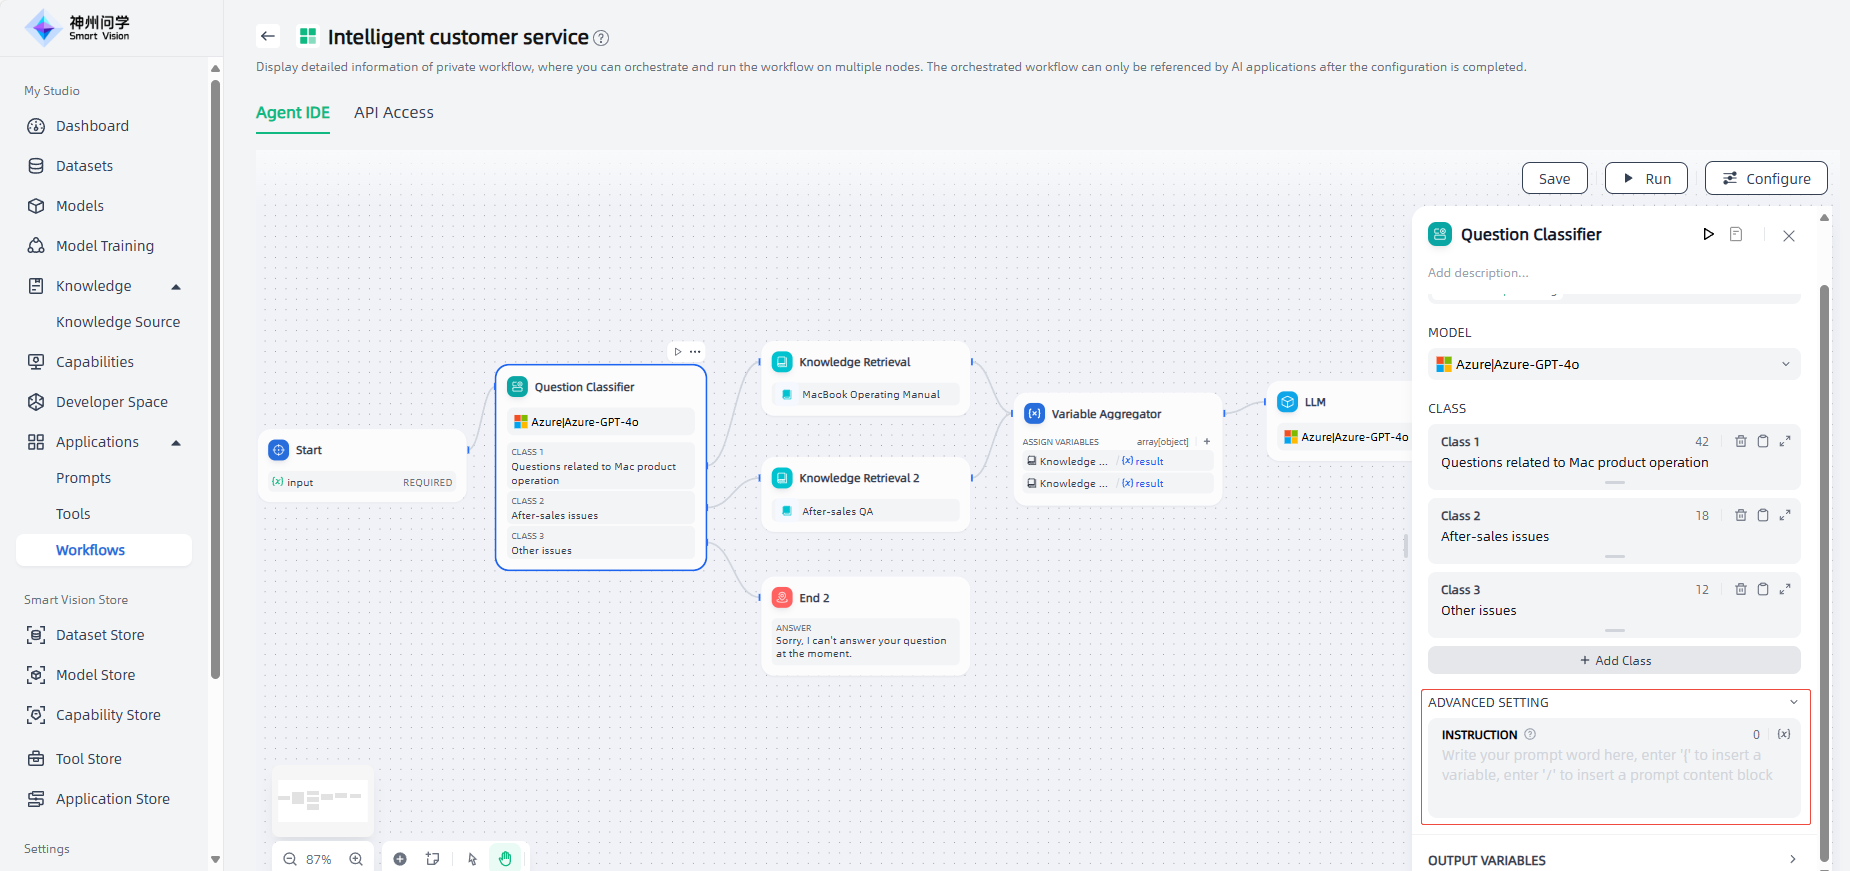
5.Advanced Settings: You can write additional instructions as needed to help the question classifier better understand how to classify.
IF/ELSE
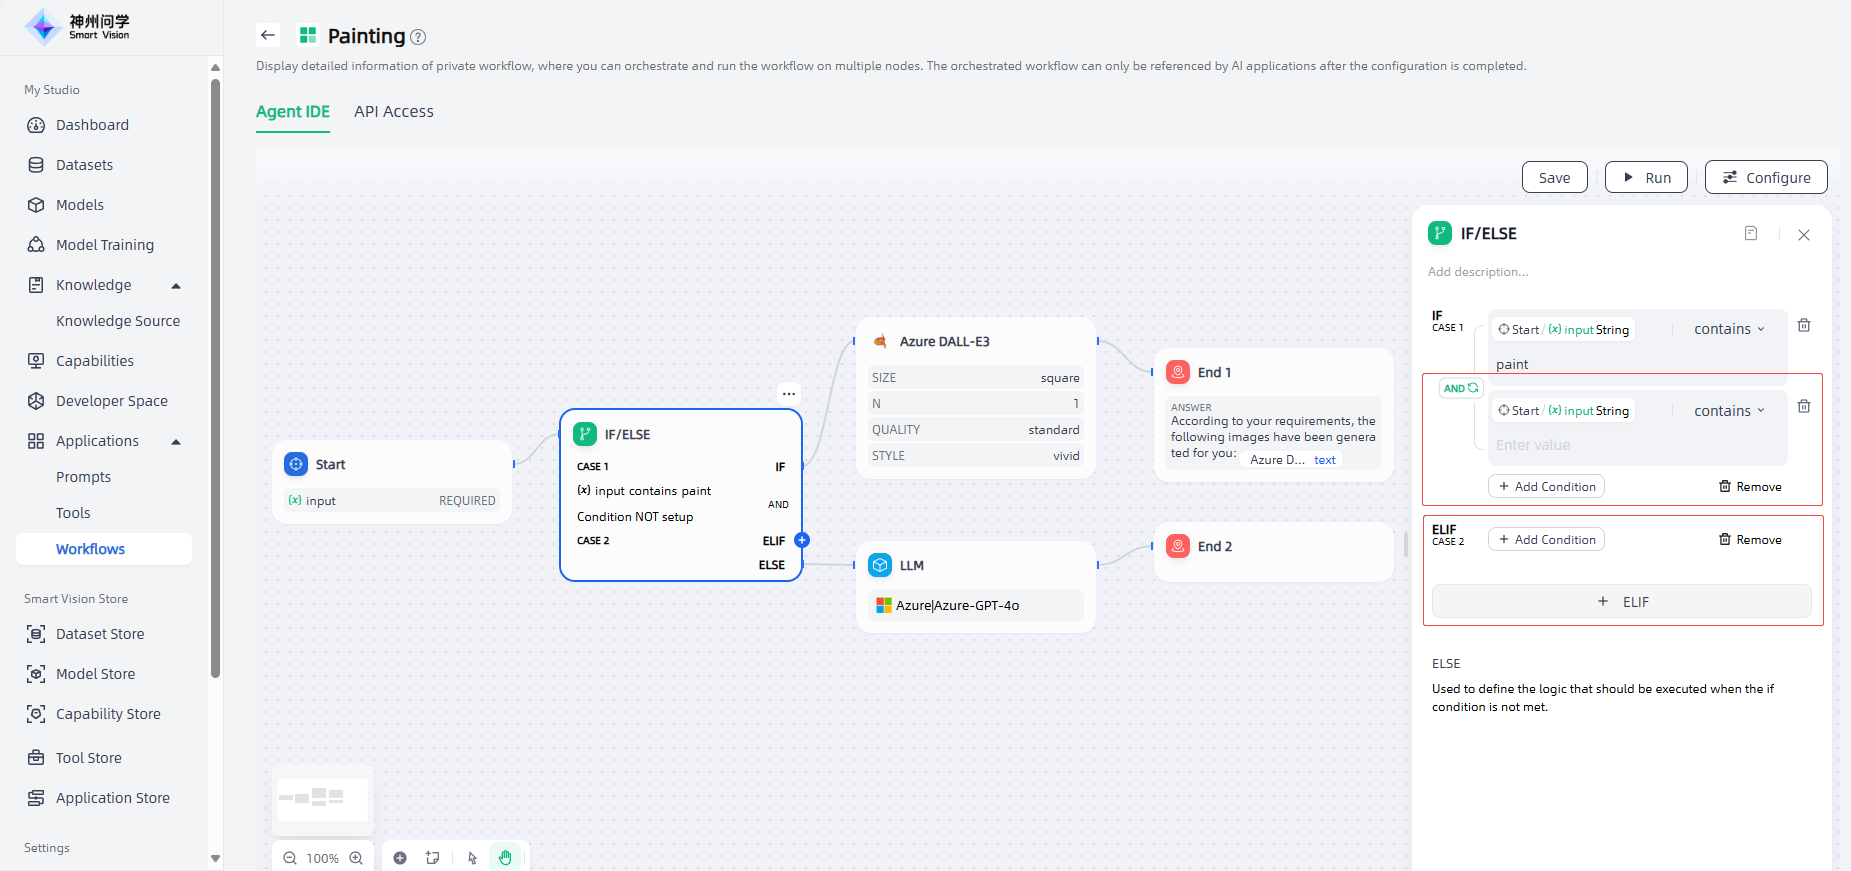
Using the If/Else node, you can split the workflow into multiple branches through the If/Else condition: if the calculation result of the IF condition is True, the IF path is executed; if the calculation result of the IF condition is False, the ELSE path is executed; you can also click "+ELIF" to add an ELIF condition. If the calculation result of the ELIF condition is True, the ELIF path is executed; if the calculation result of the ELIF condition is False, the next ELIF path is calculated or the final ELSE path is executed.
The If/Else node supports 8 types of conditions: Contains, not contains, Start with, End with, Is, Is not, Is empty, Is not empty. For example, the following workflow uses the If/Else node and uses the "Contains" condition type.
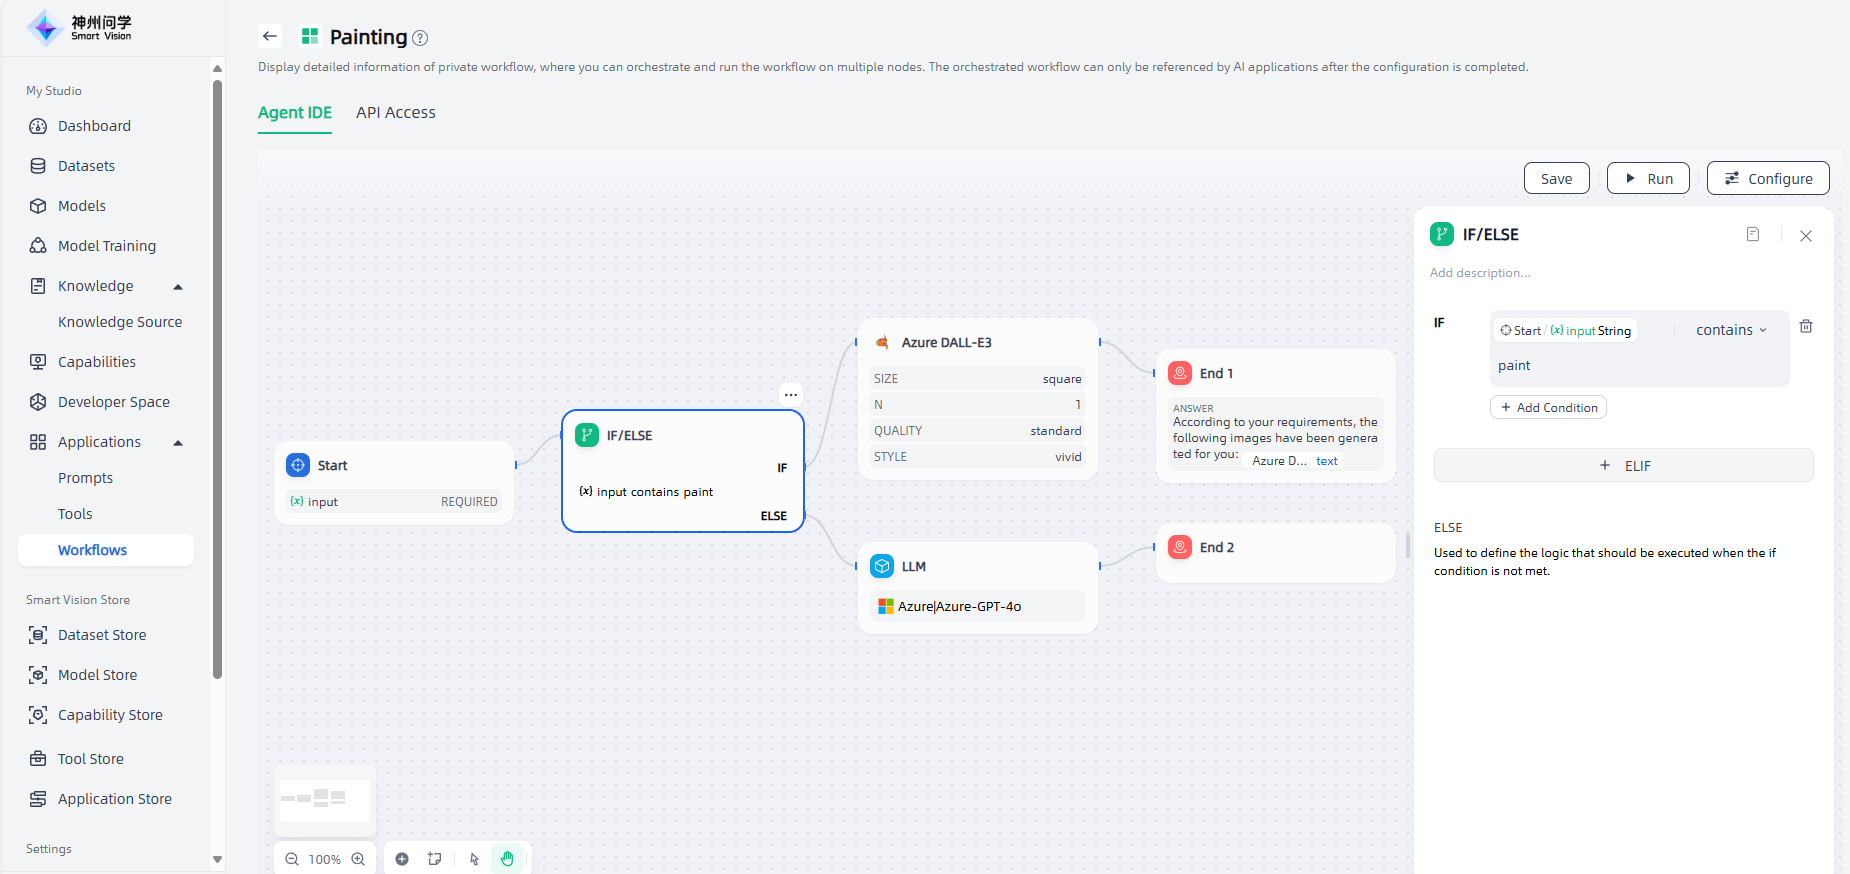
For complex conditional judgment scenarios, you can also set multiple conditional judgments and set AND or OR between the conditions to facilitate the intersection or union between the conditions.
The core of the If/Else is to set the judgment condition: click "Add condition", select the variable, select the condition type, and specify the value that meets the condition to complete the condition setting. You can click "Add Condition" to set multiple conditions. If more branches are needed, click "+ELIF" to set ELIF conditions.
Iteration
Using the iteration node, you can process the contents of the array in a loop, that is, execute the same steps for each item in the array until all the results are output. This makes it easier for workflows to handle more complex scene logic and is often used in scenarios where long texts need to be processed in a specific way.
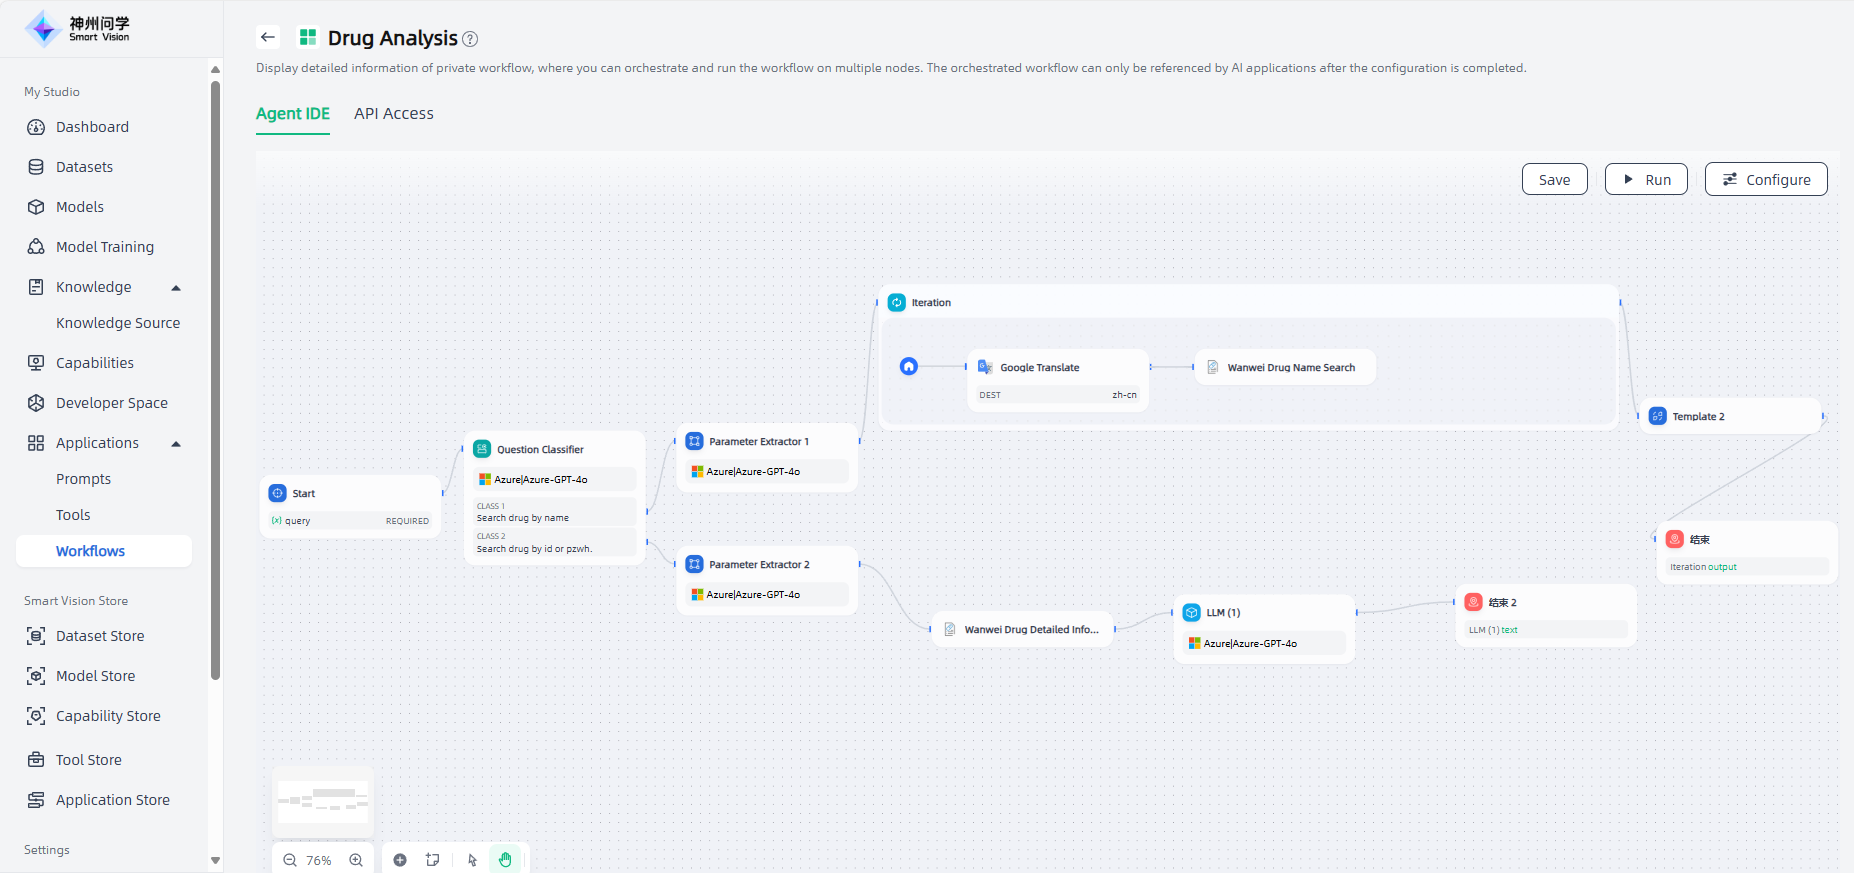
The input and output variables of the iteration node are both in array format. To use the iteration node, the upstream node must support returning arrays (the nodes that support returning arrays are: code, parameter extractor, knowledge retrieval, iteration, and HTTP request).
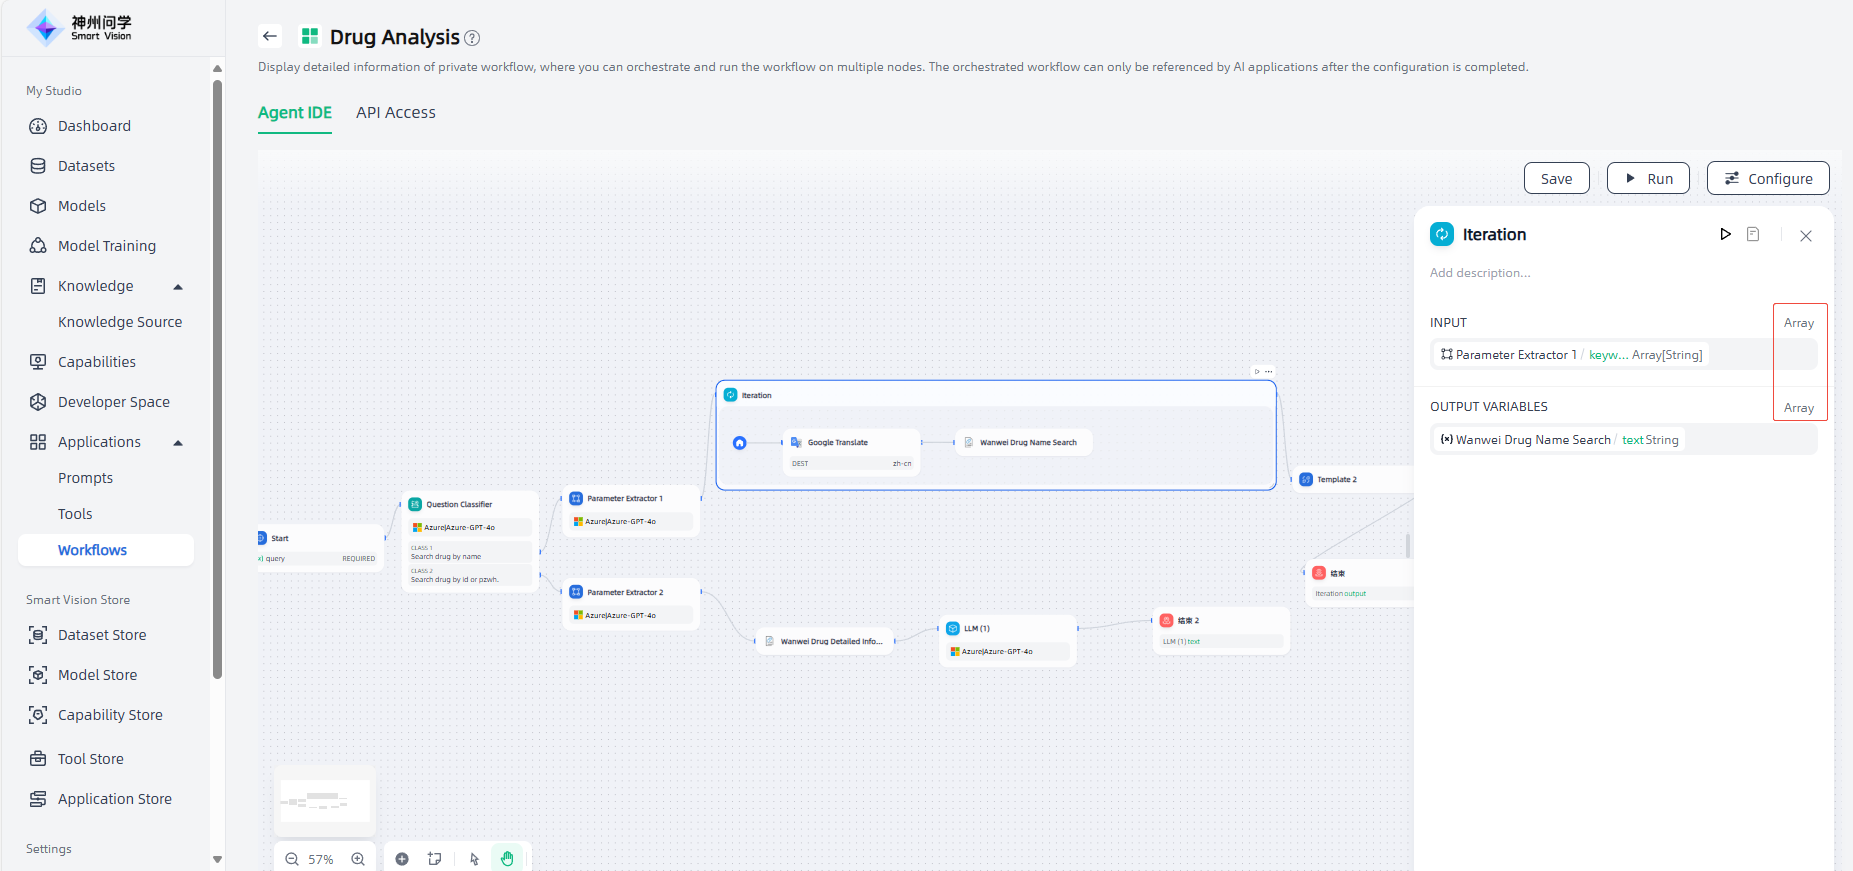
The configuration steps of the iteration node are as follows:
1.Input variables: Set the input variable (Array) used to execute loop processing.
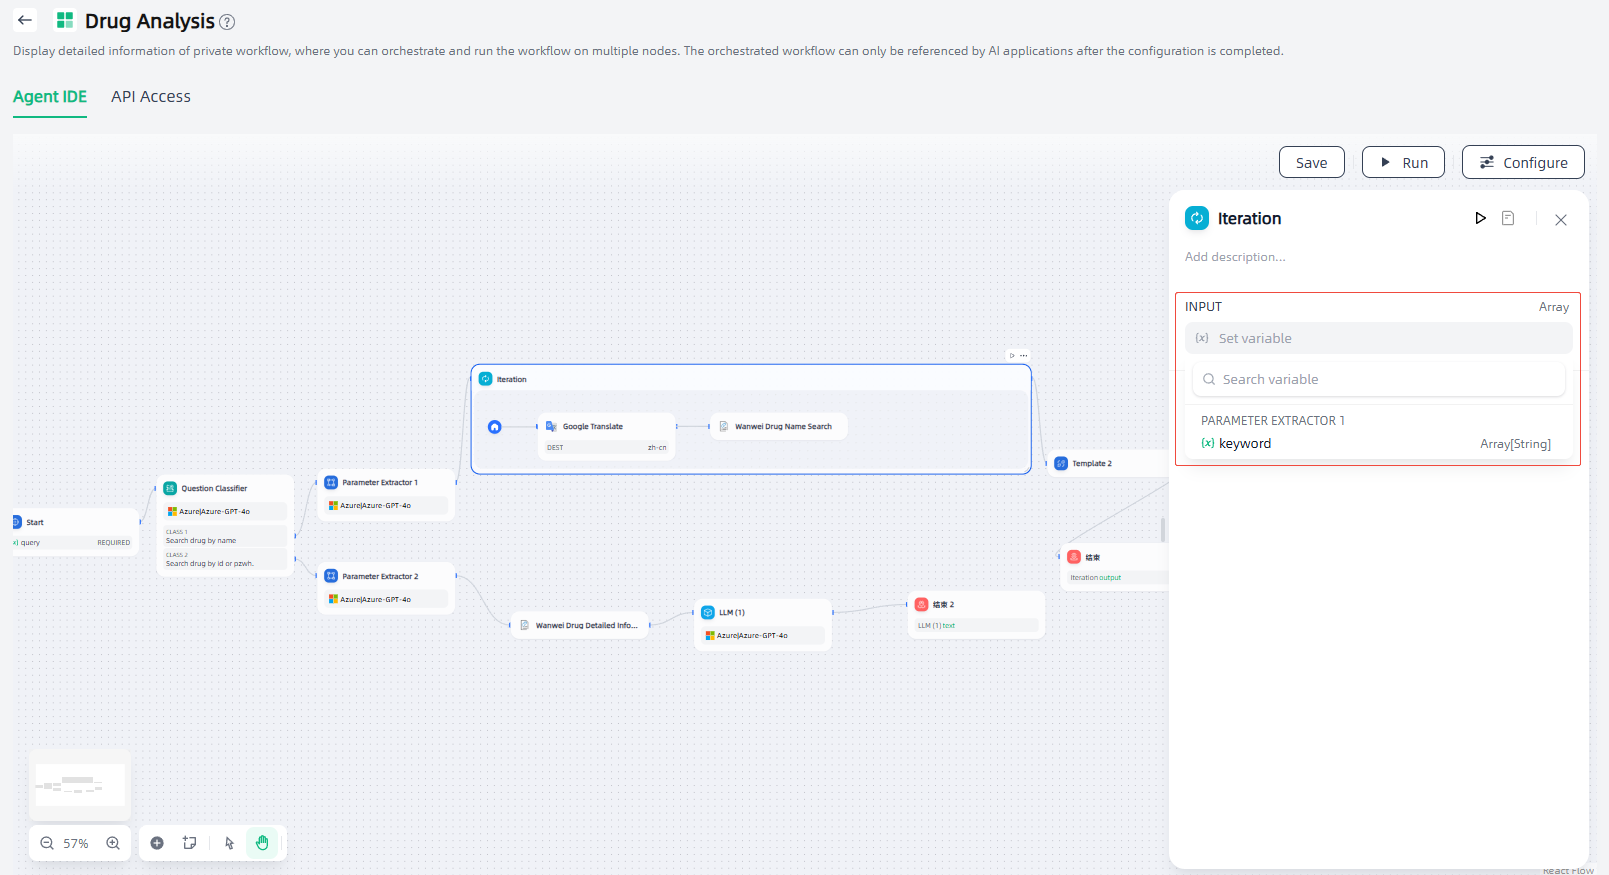
2.Add nodes within iteration: Add child nodes within the iteration node and configure each child node such as input variables.
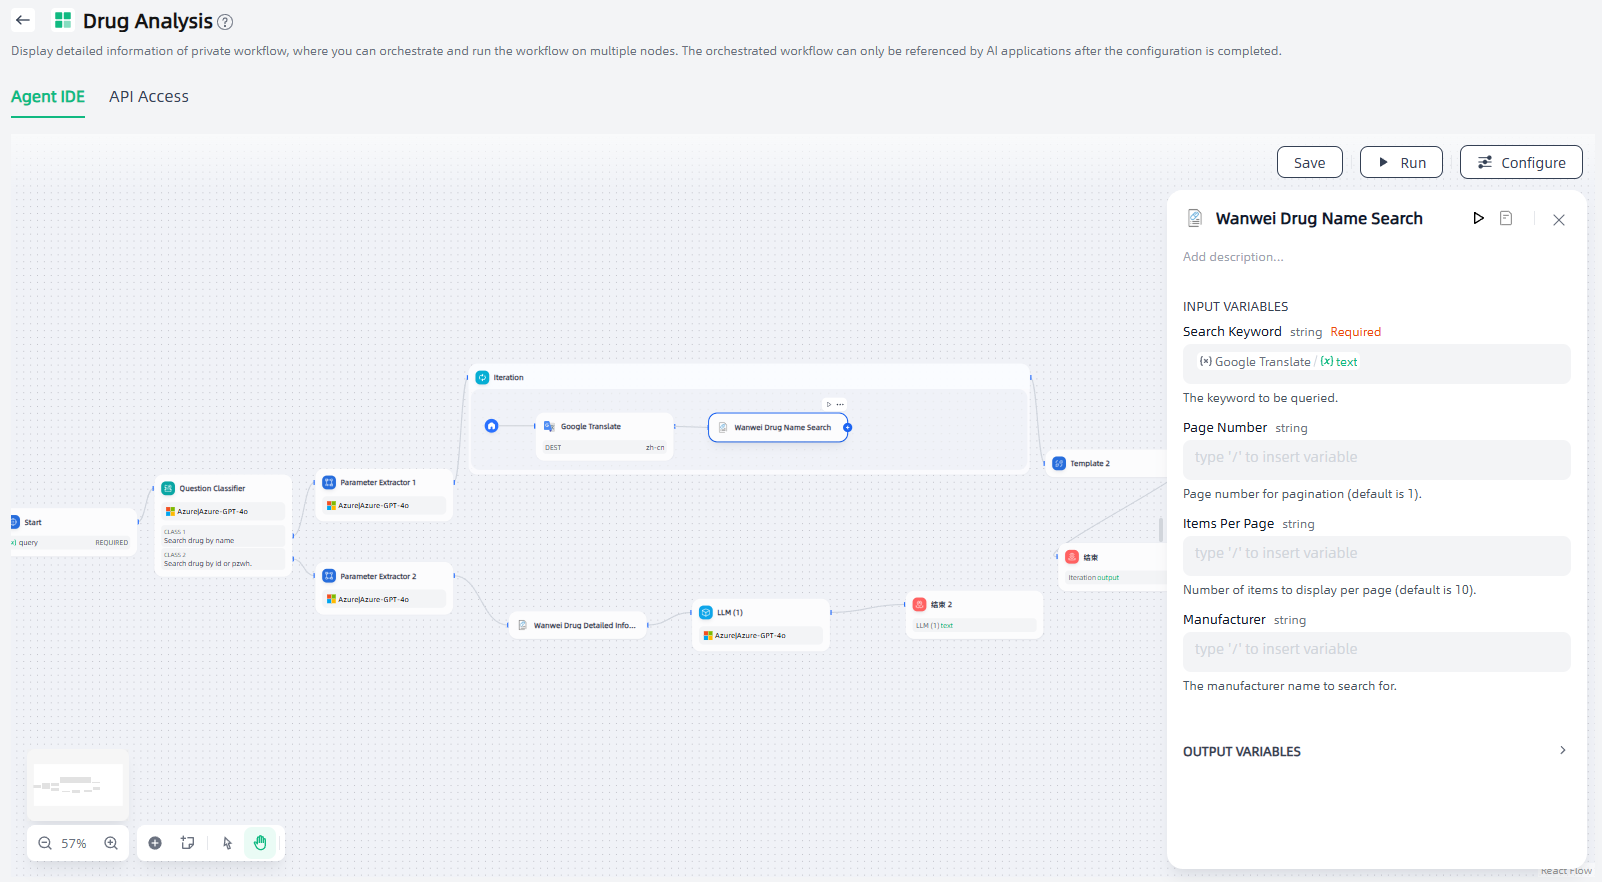
3.Output variable: Set the output variable of the iteration node.
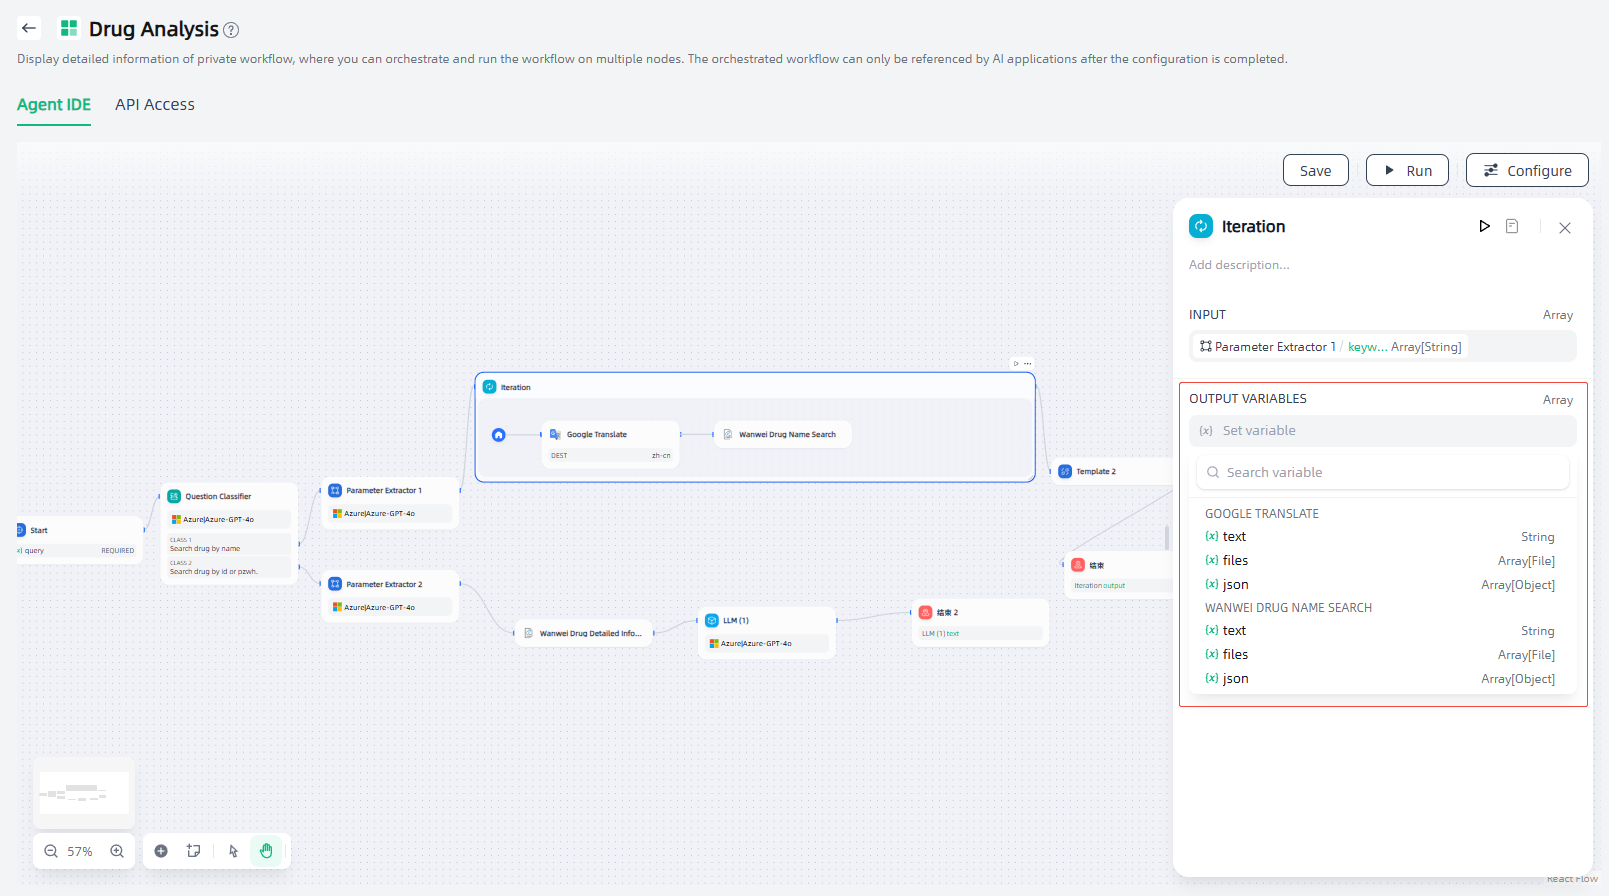
Code
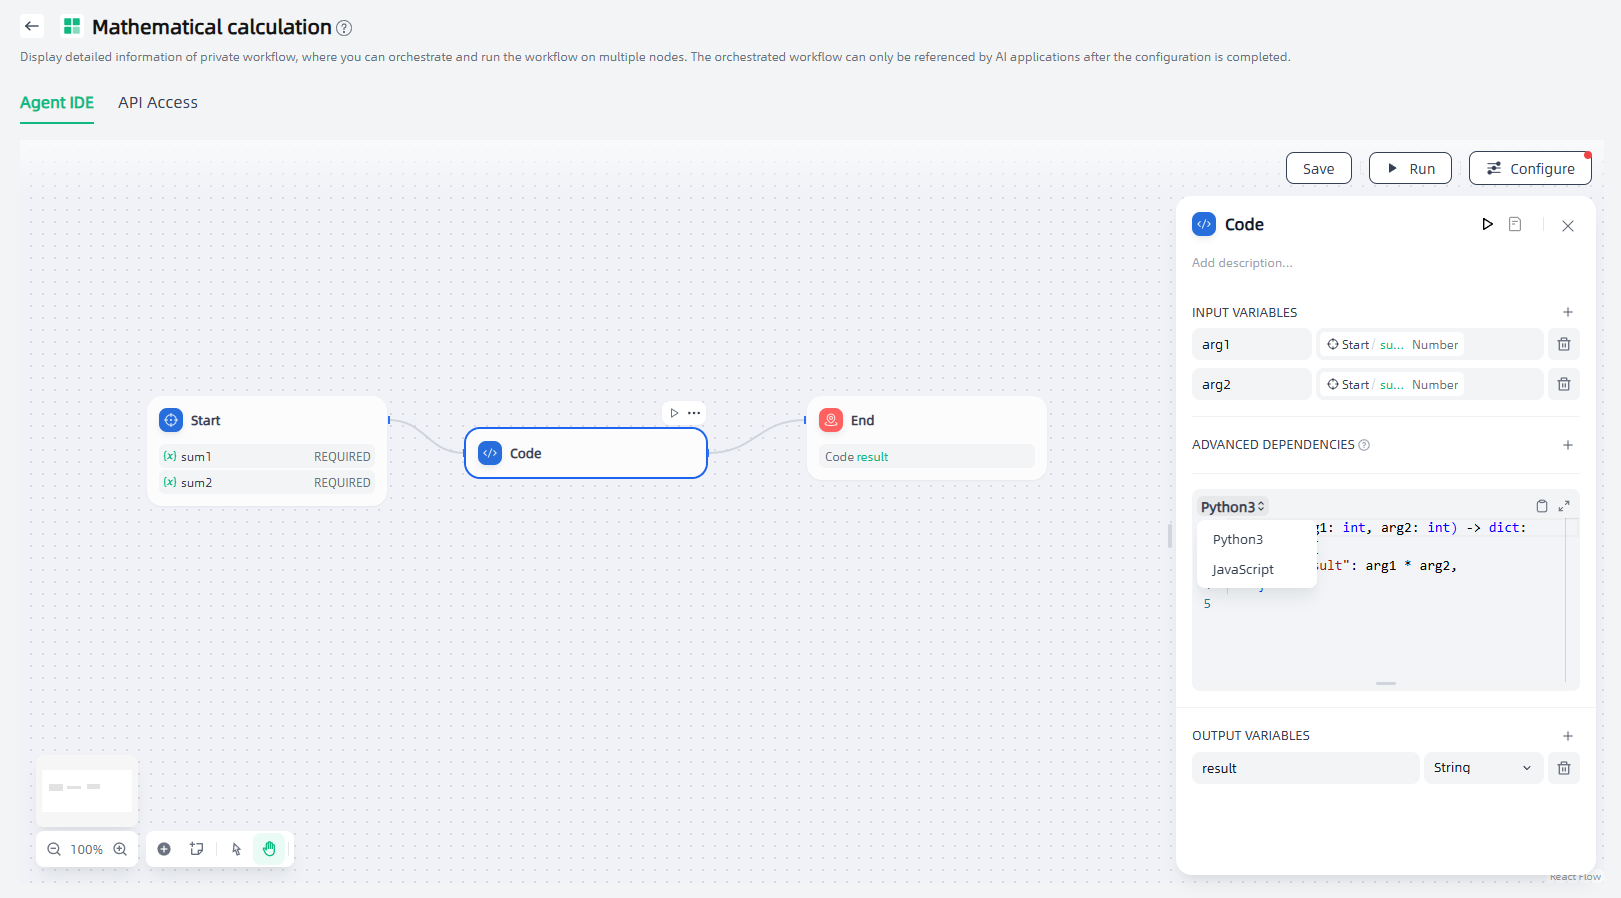
Code node supports running Python/NodeJS code to perform data transformations in workflows. With code execution nodes, you can embed custom Python or JavaScript scripts to manipulate variables and simplify your workflow in ways that preset nodes cannot.
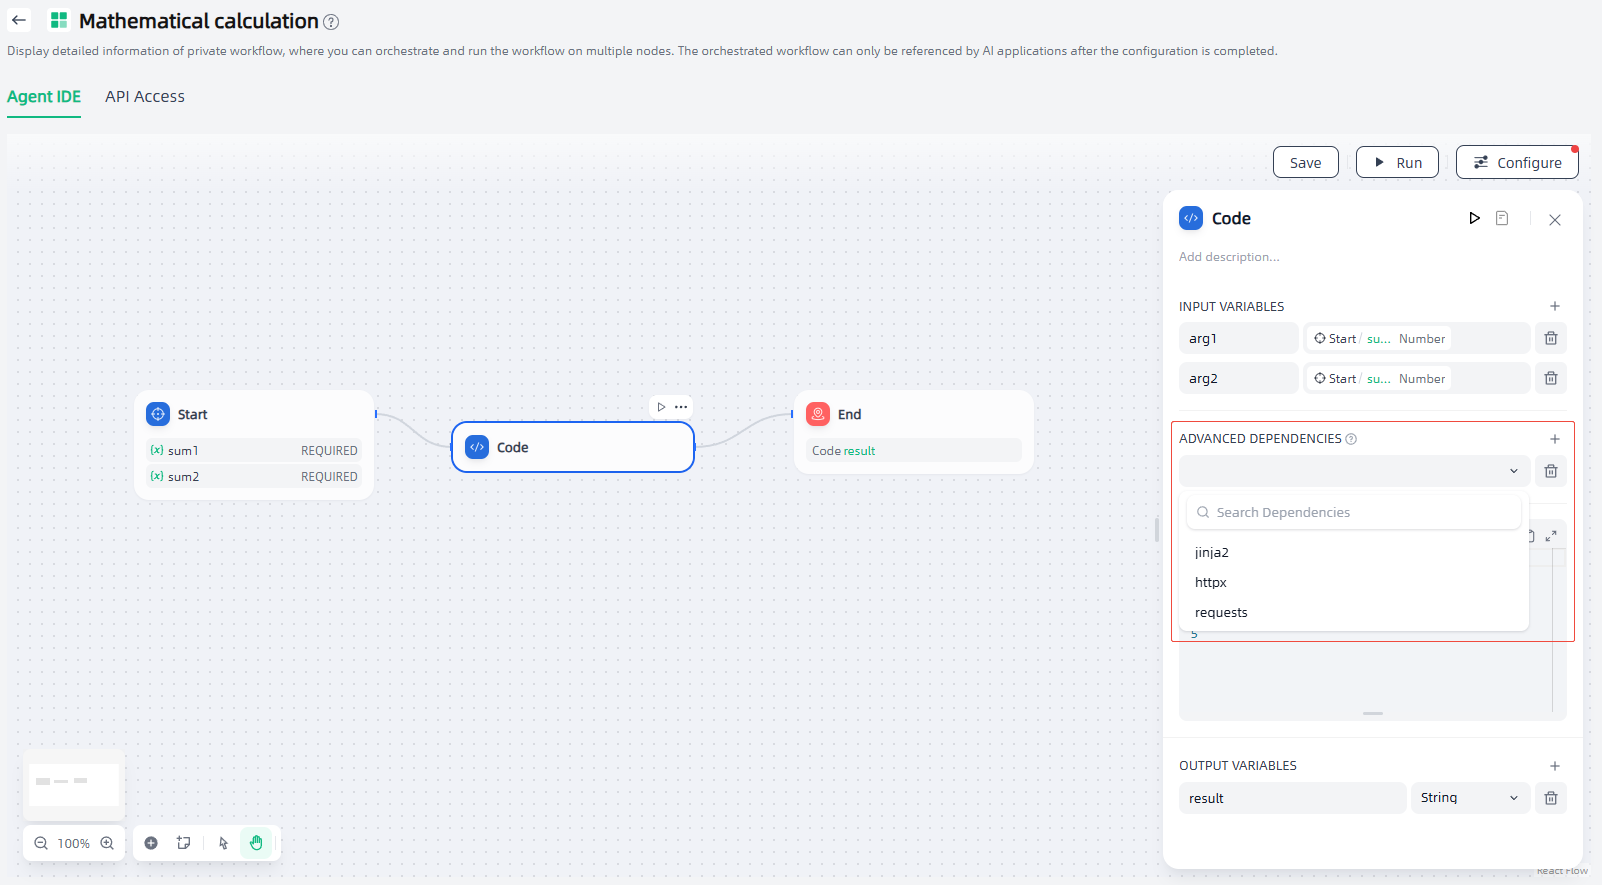
Code node is suitable for scenarios such as mathematical calculations, JSON conversion, and text processing. For example, the following mathematical calculation scenario workflow uses code execution nodes.
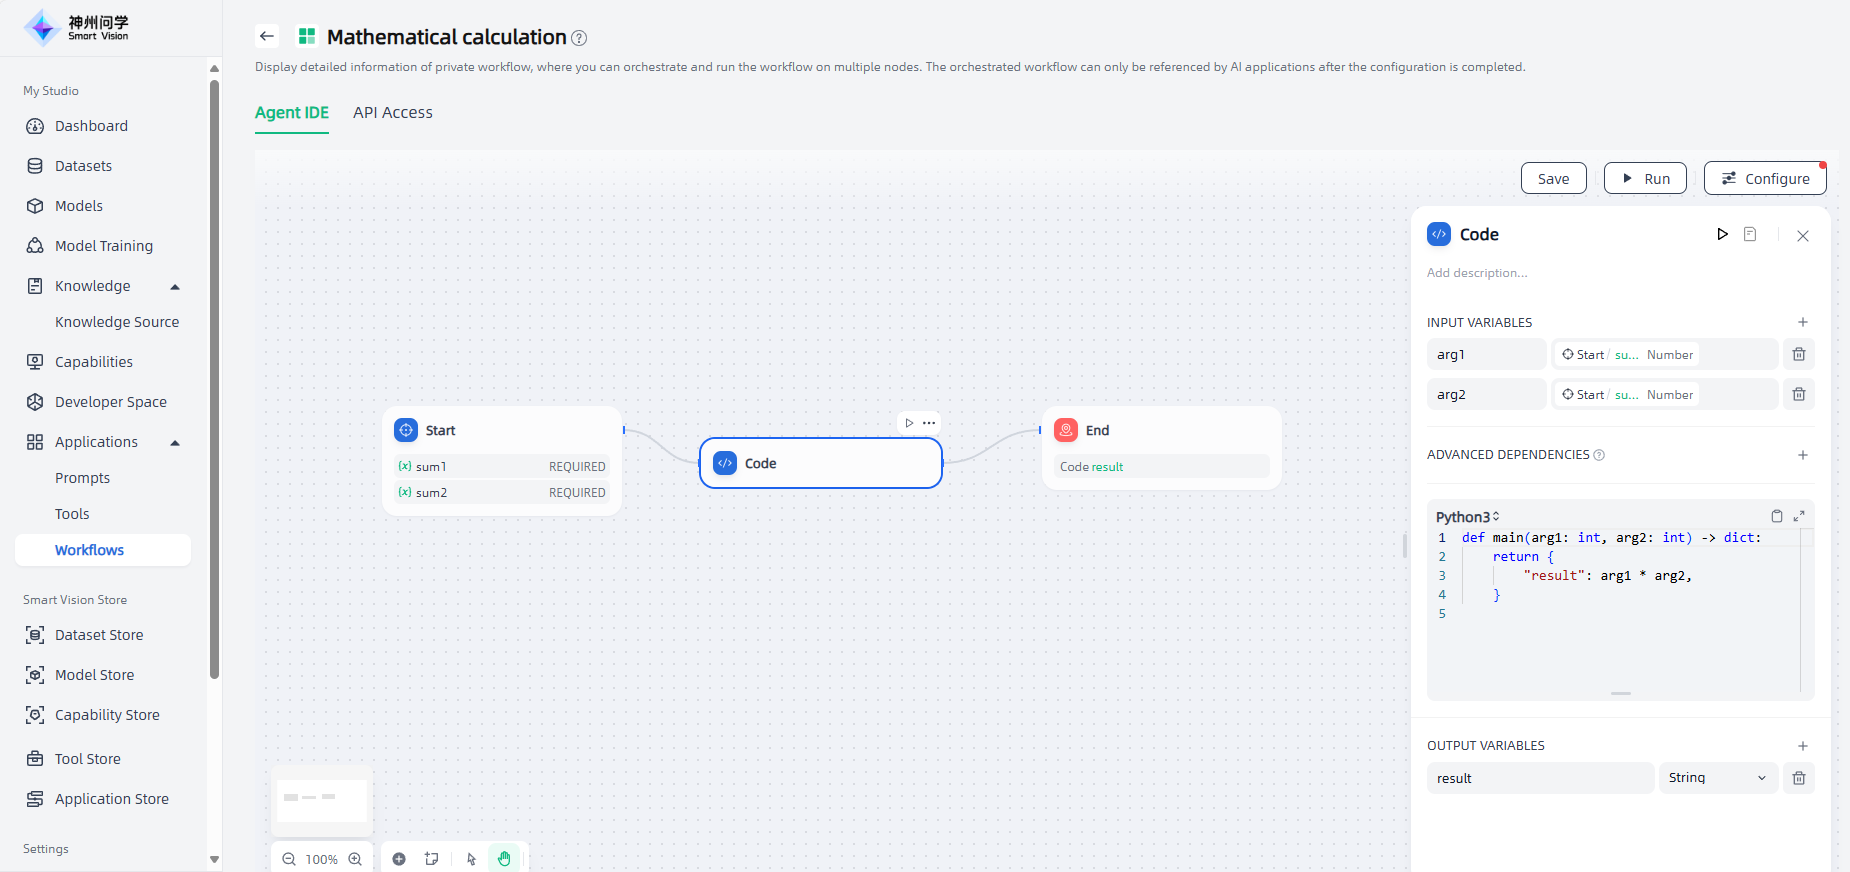
The configuration steps of the code execution node are as follows:
1.Input variables: Usually set as input variable for code execution.
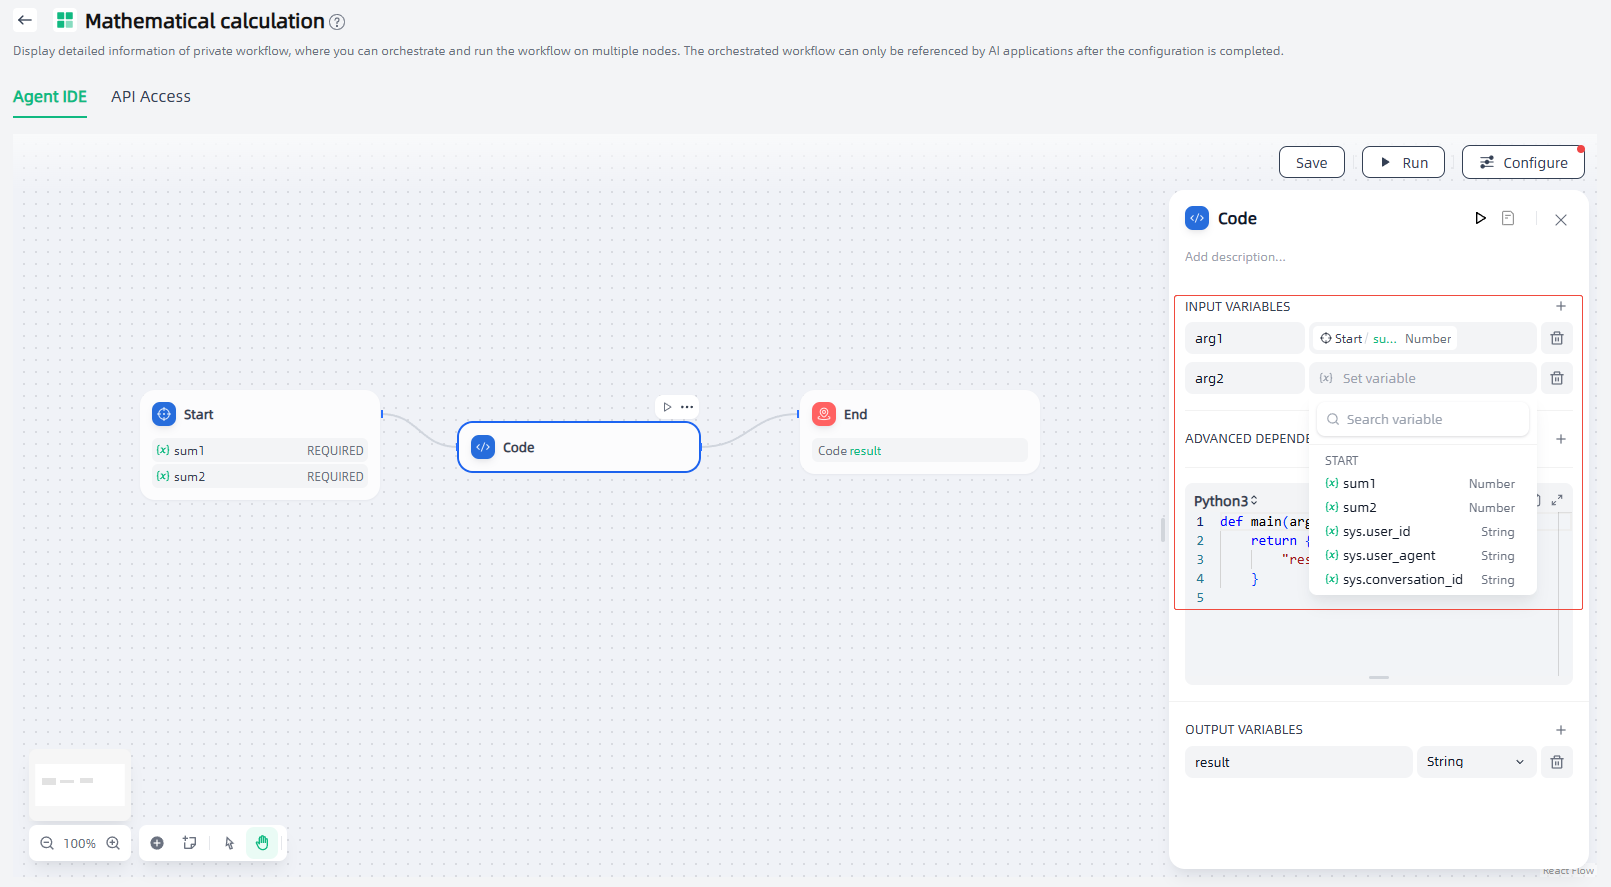
2.Advanced Dependencies: Add preloading dependencies that take more time or are not built-in by default on demand.
3.Write execution code: Select the required language and write code.
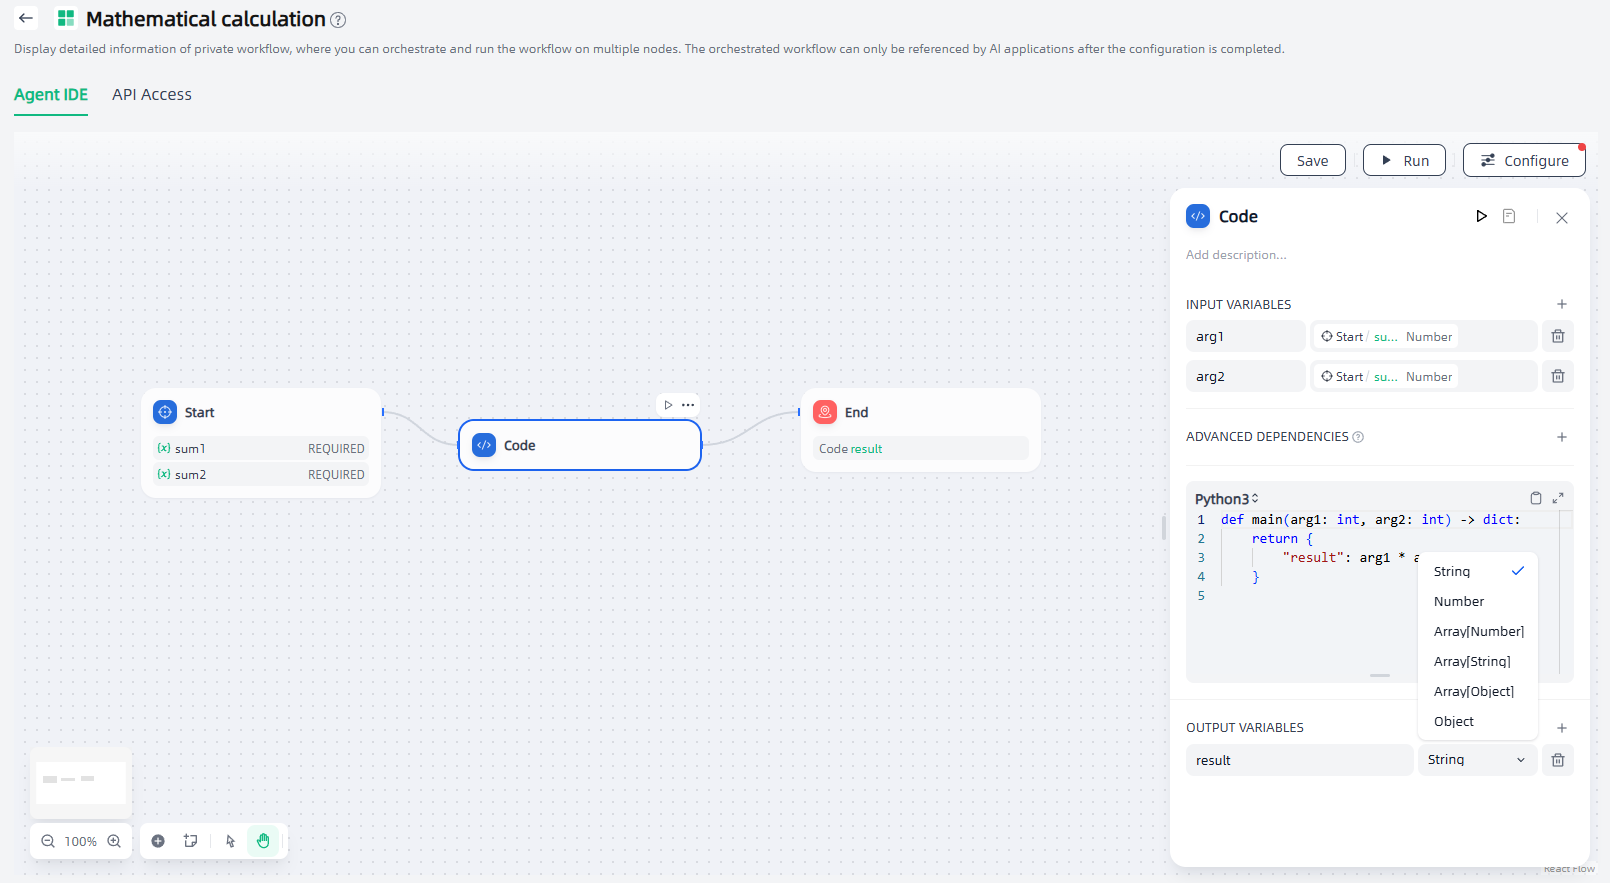
4.Output variables: Set the output variables and their types. It supports adding multiple output variables.
Template
The Template node allows you to use Jinja2 to dynamically format and combine variables from upstream nodes into a single text-based output. It can be used to merge data from multiple sources into a specific structure required by subsequent nodes, helping you implement lightweight and flexible data transformation within a workflow.
For example, in the following workflow, the Template node is used to structure the information obtained by the Knowledge Retrieval Node and its related metadata into formatted Markdown to meet the requirements of subsequent steps.
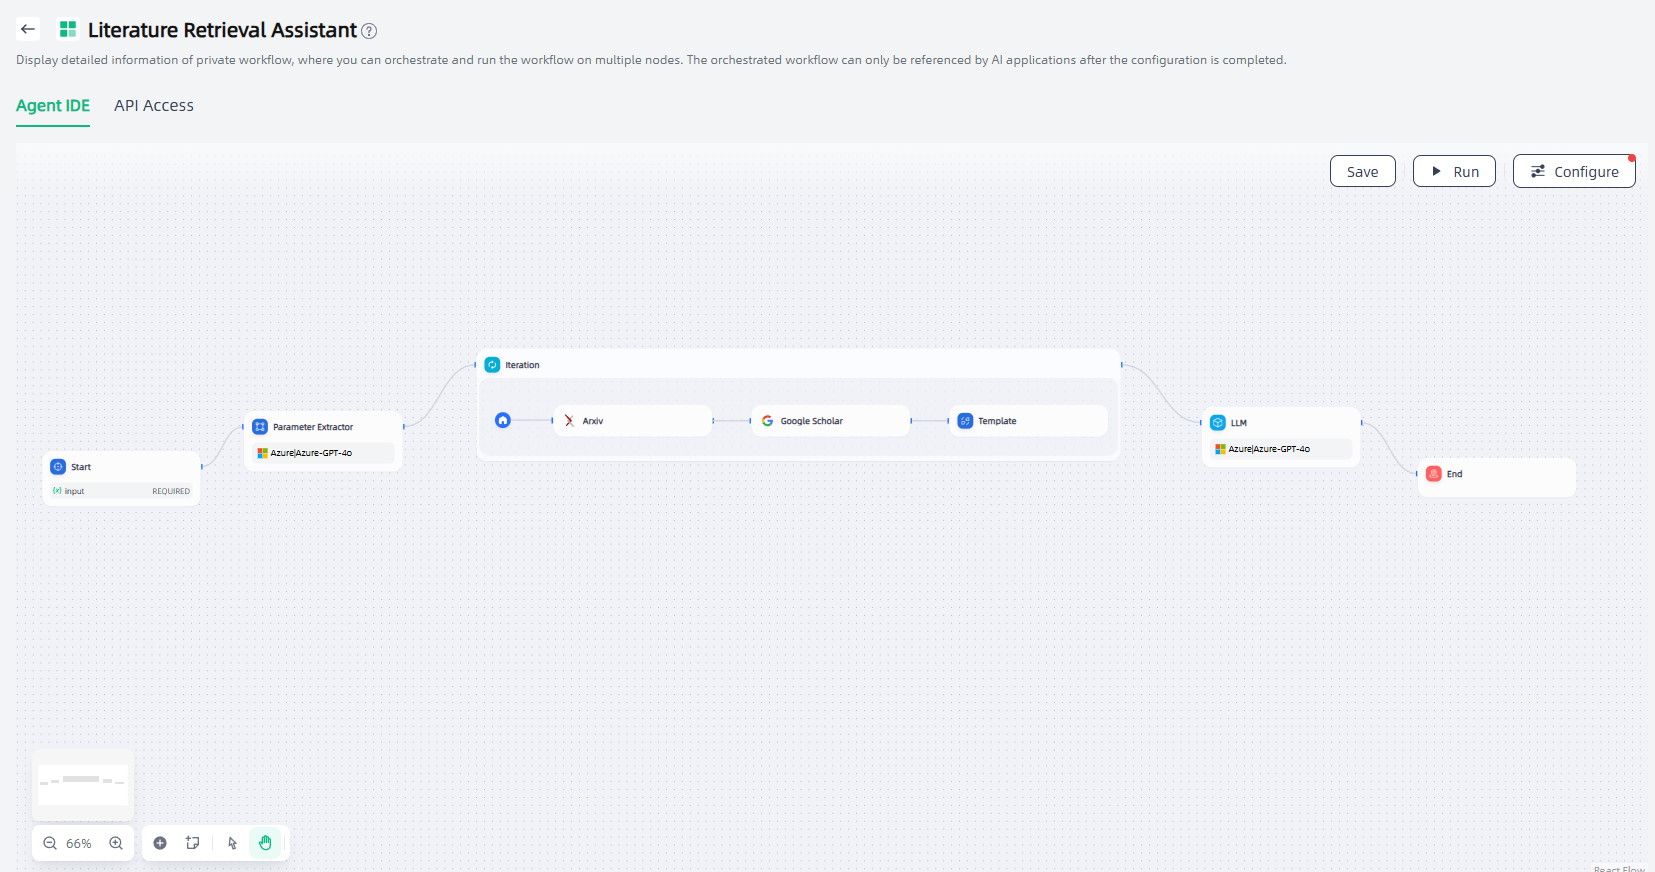
The configuration steps of the template node are as follows:
1.Input variables: Set the input variables that need to be converted. Multiple input variables can be set (click "+" to add).
2.Write code: Write code using Jinja2 templates.
Variable Aggregator
The variable aggregator node is a key node in the workflow. It is used to aggregate variables from multiple branches into one variable to achieve unified configuration of downstream nodes. The variable aggregator node is responsible for integrating the output results of different branches to ensure that no matter which branch is executed, its results can be referenced and accessed through a unified variable.
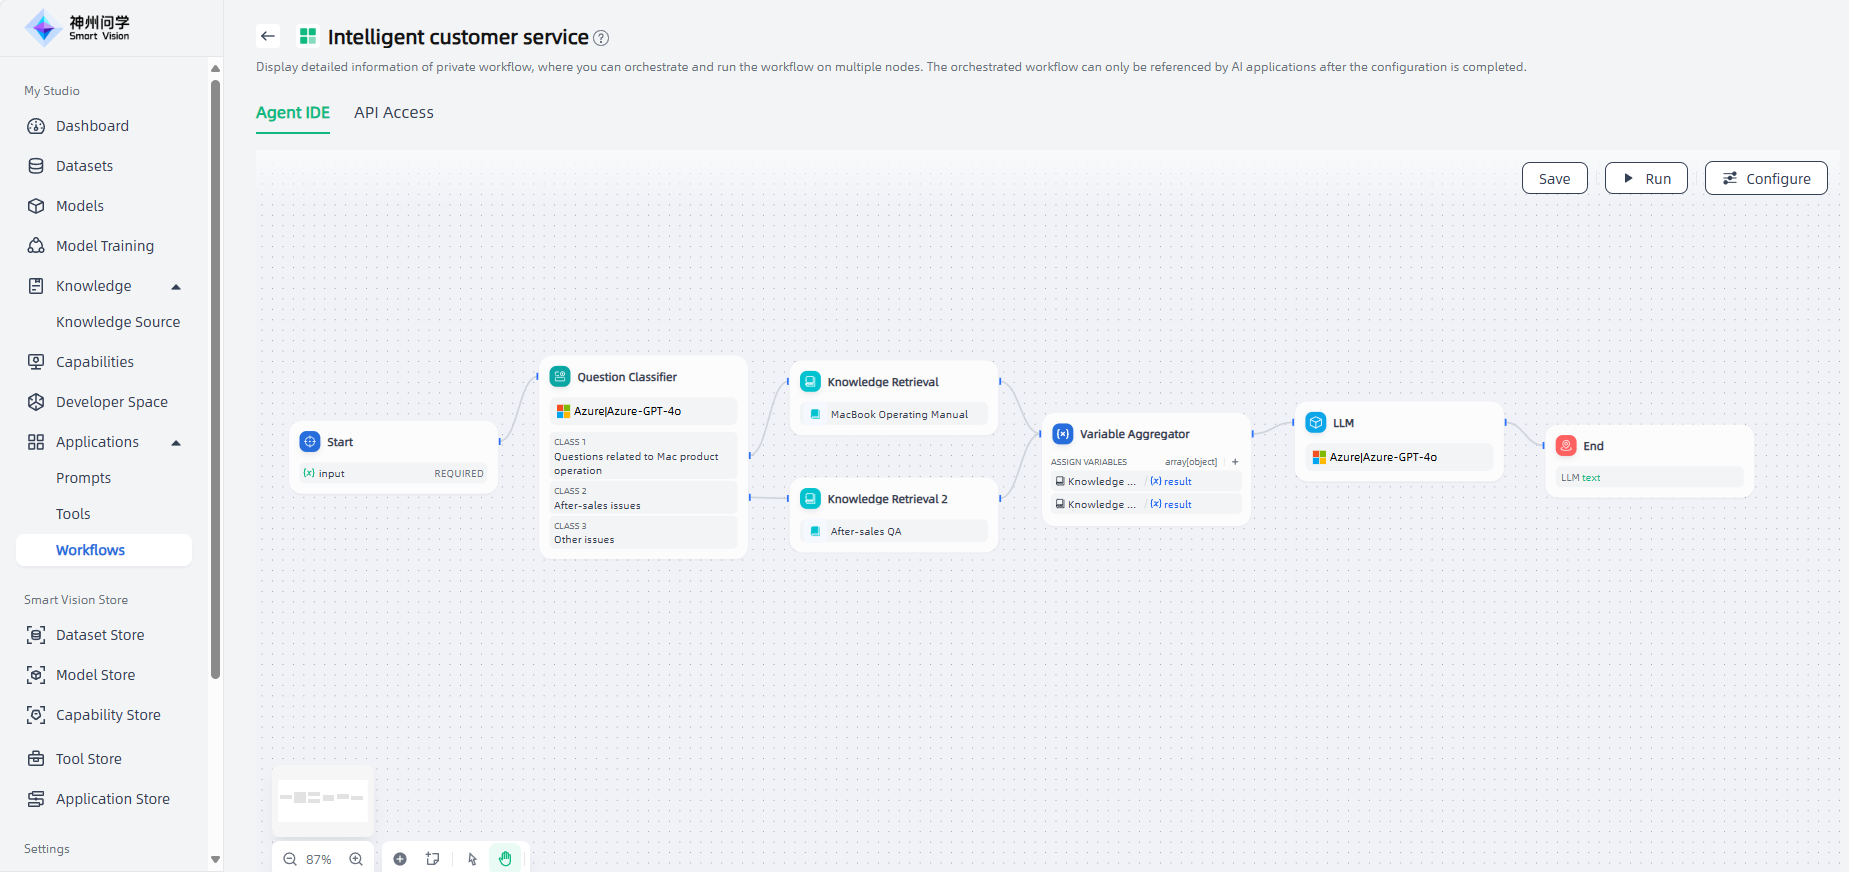
The variable aggregator node can effectively simplify the data flow management of multi-branch scenarios. Through variable aggregation, multiple outputs can be aggregated into a single output for use and operation by downstream nodes. For example, in the customer service question and answer scenario, if the variable aggregator node is not used, the branches of the classification one question and the classification two question need to define downstream nodes separately after performing different knowledge base retrievals.
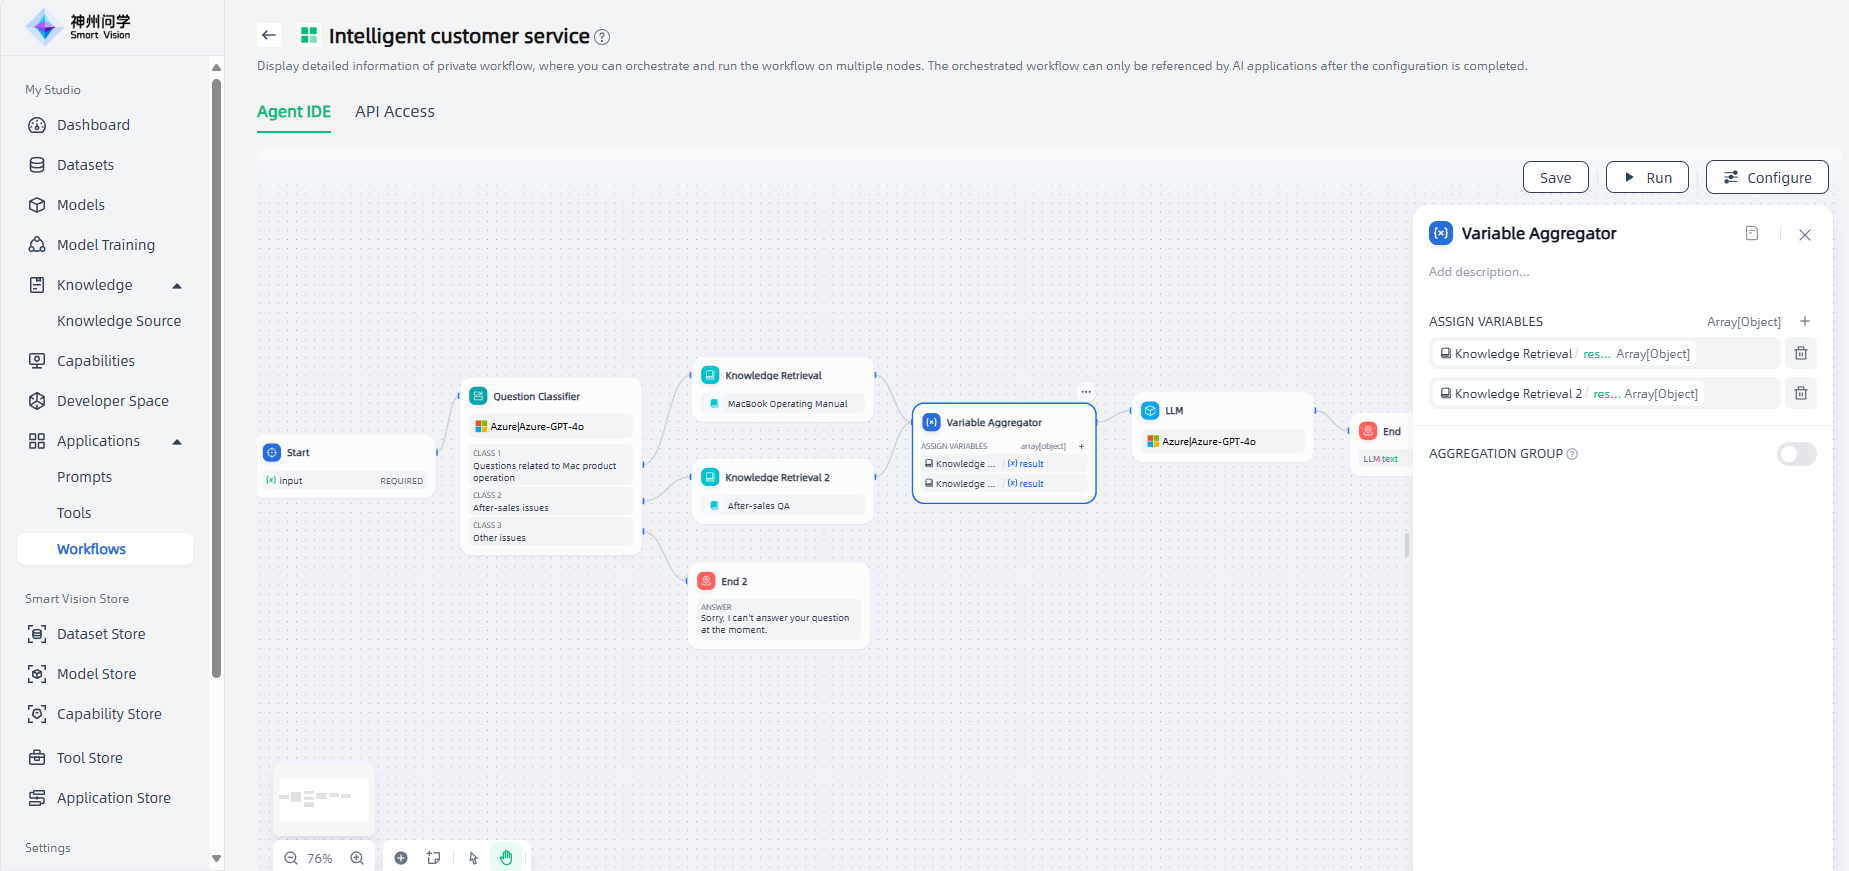
The configuration steps of the variable aggregator node are as follows:
1.Assign variable: Set the variables of the branch that needs to be aggregated.
Note: The variable aggregator can only aggregate variables of the same data type. If the first variable added to the variable aggregation node is an array type, the subsequent variables will be automatically filtered and only variables of the same type will be allowed to be added.
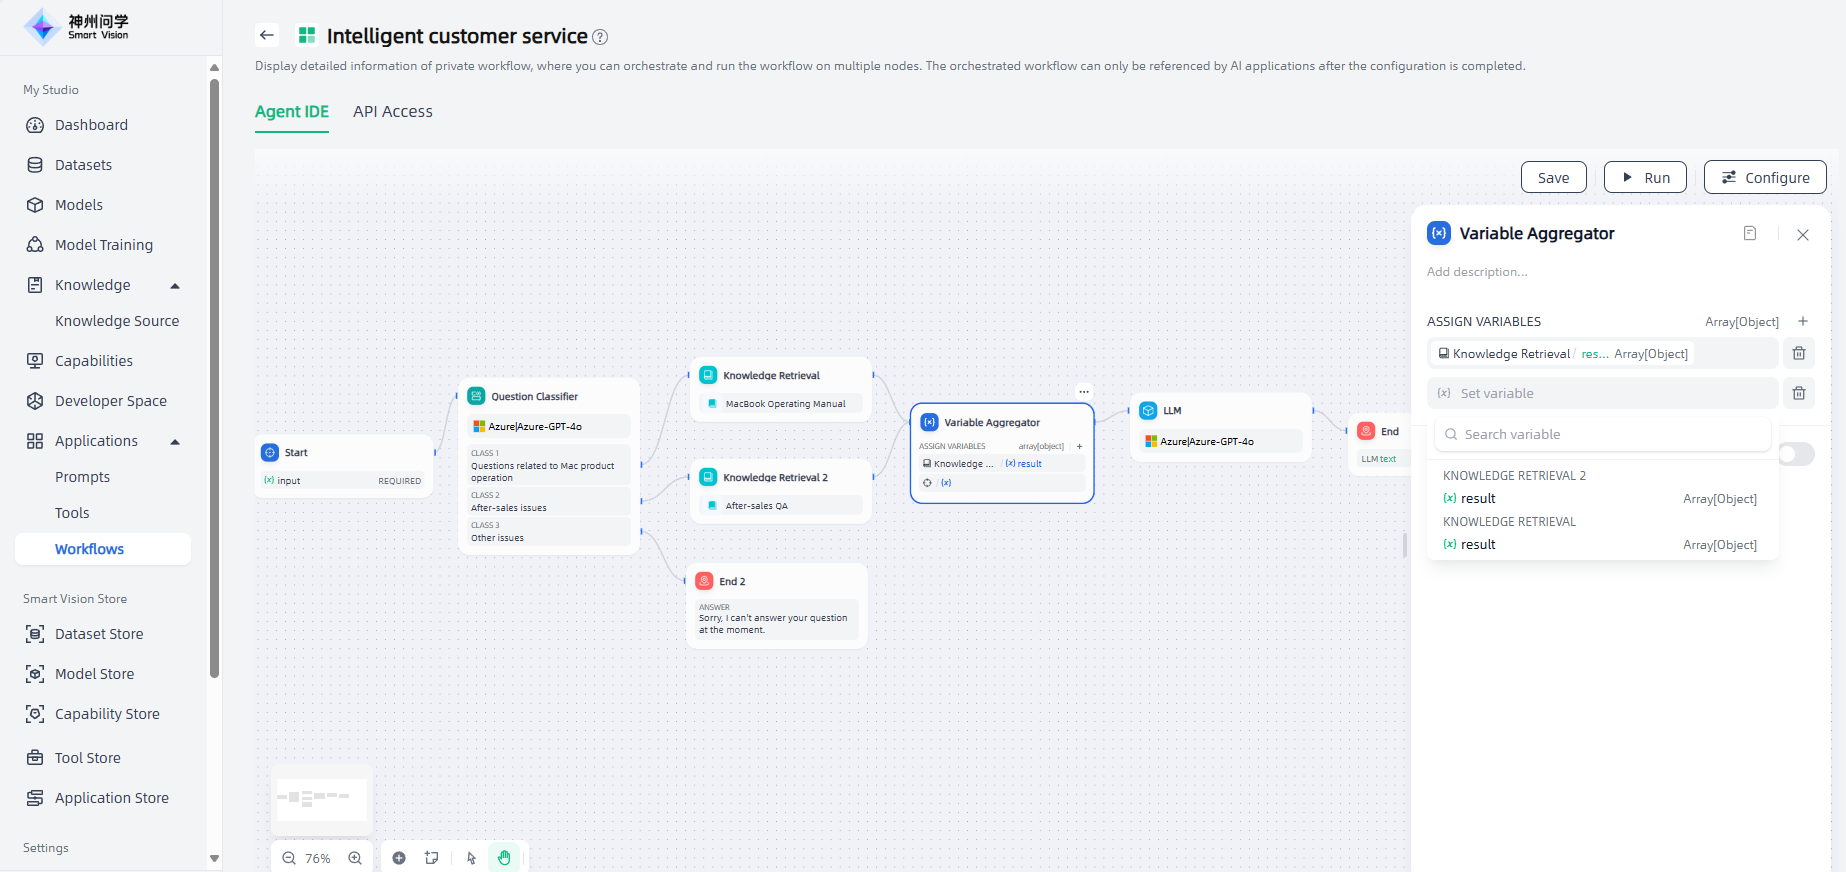
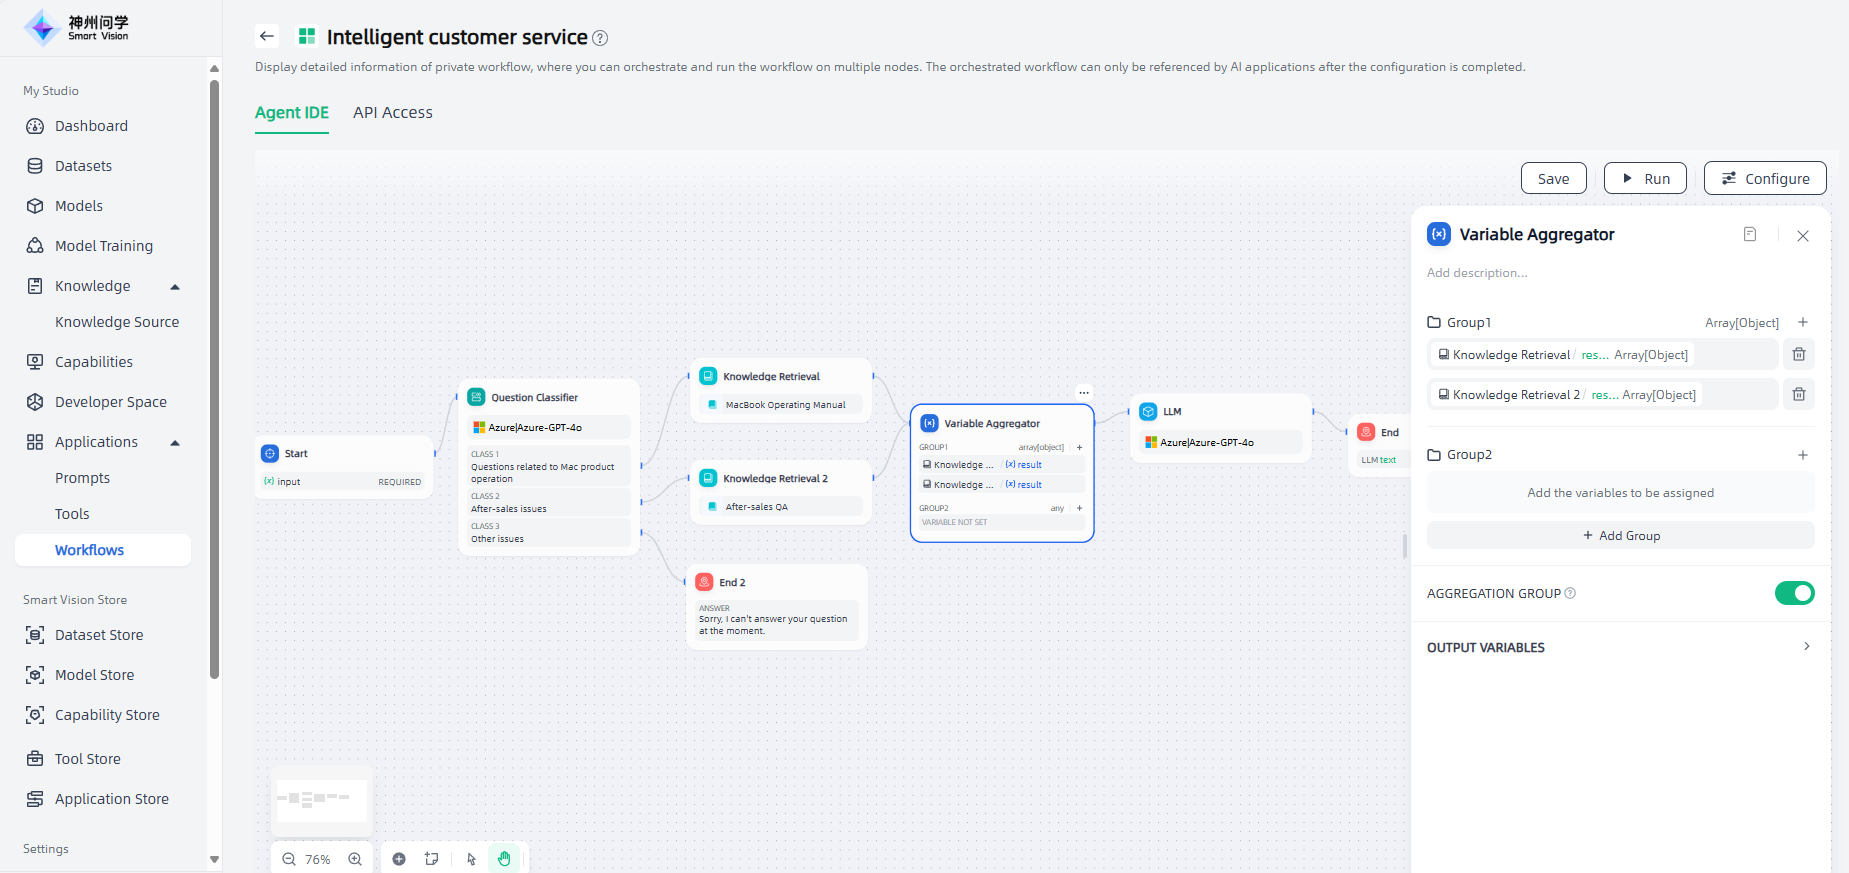
2.Aggregation Group: If your scenario involves aggregating multiple groups of variables, turn on this switch to enable the feature.
Note: When using the variable aggregator to aggregate multiple groups of variables, each group can only aggregate variables of the same data type.
Doc Extractor
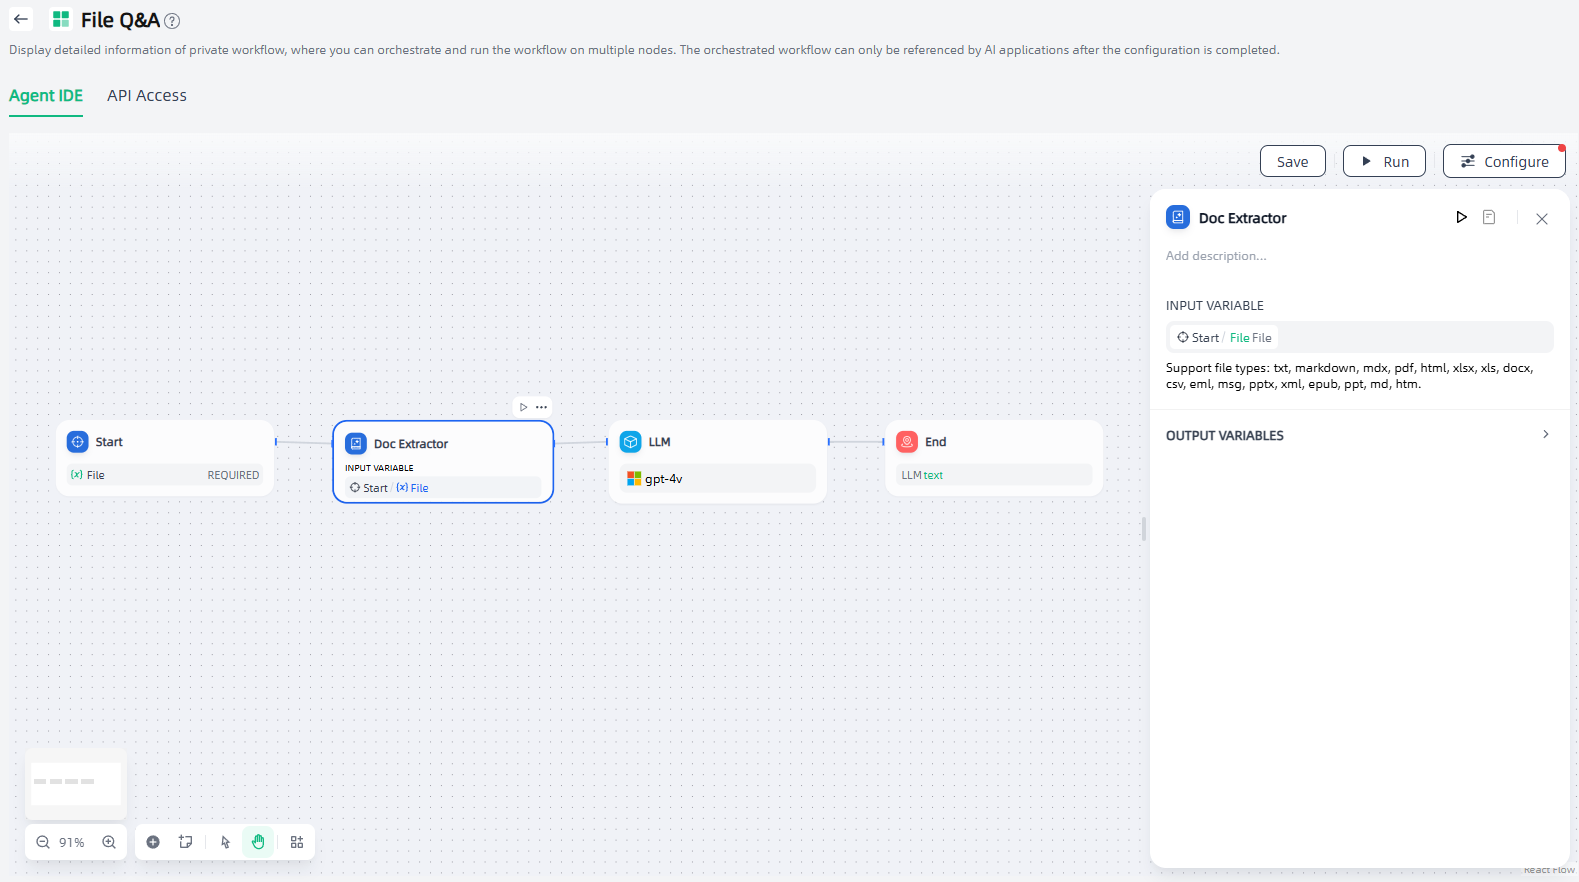
LLMs cannot directly read or interpret document contents. Therefore, it's necessary to parse and read information from user-uploaded documents through a document extractor node, convert it to text, and then pass the content to the LLM to process the file contents.
The document extractor node can be understood as an information processing center. It recognizes and reads files in the input variables, extracts information, and converts it into string-type output variables for downstream nodes to call. By using the document extractor node, it is possible to handle scenarios such as building applications that can interact with files, analyzing and examining the contents of user-uploaded files, etc. The document extractor can only extract information from document-type files, such as the contents of TXT, Markdown, PDF, HTML, DOCX format files. It cannot process image, audio, video, or other file formats.
For example, in a typical file interaction Q&A scenario, the document extractor can serve as a preliminary step for the LLM node, extracting file information from the application and passing it to the downstream LLM node to answer user questions about the file.
To use the document extractor node, input variables need to be set, which are variables used for document extraction input. The input variables supports two types of data structures (File a single file,Array[File] multiple files).
Parameter Extractor
Some nodes in the workflow require specific data formats as input, and the parameter extractor node can infer and extract structured parameters from natural language, converting the user's natural language into recognizable parameters for subsequent tool calls or HTTP requests, etc. For example, when building a conversational Arxiv paper retrieval application, the Arxiv paper retrieval tool requires paper authors or paper IDs as input parameters. By using the parameter extractor, the paper ID/author can be extracted from the natural language input by the user, and the paper ID/author can be used as an input parameter for precise query.
The configuration steps of the parameter extractor node are as follows:
1.Input variable: Usually set to variable input for parameter extraction.
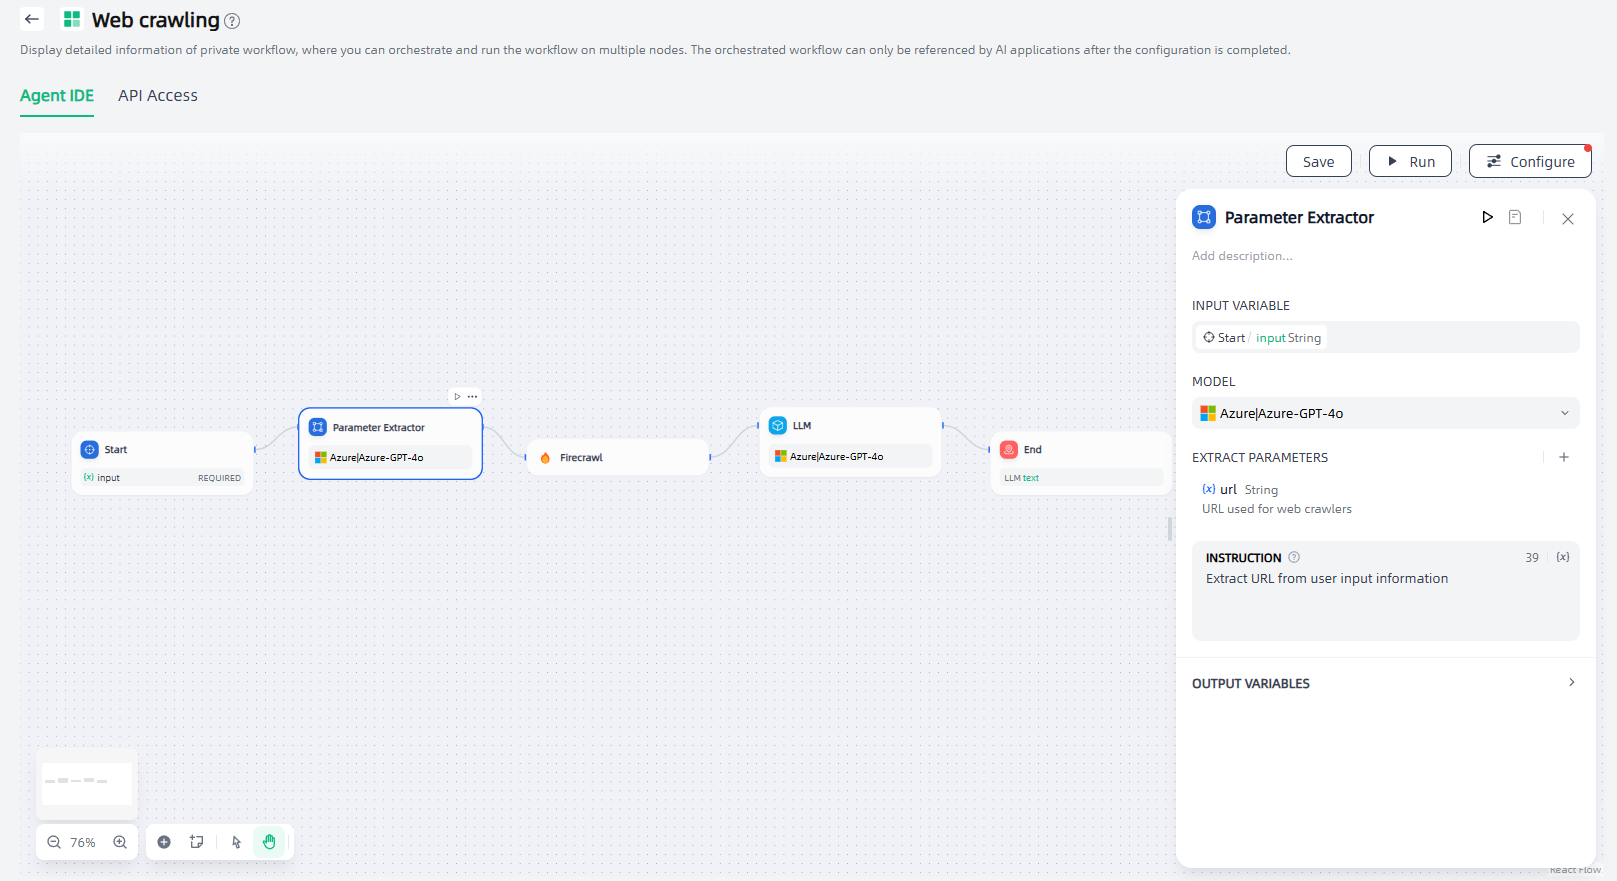
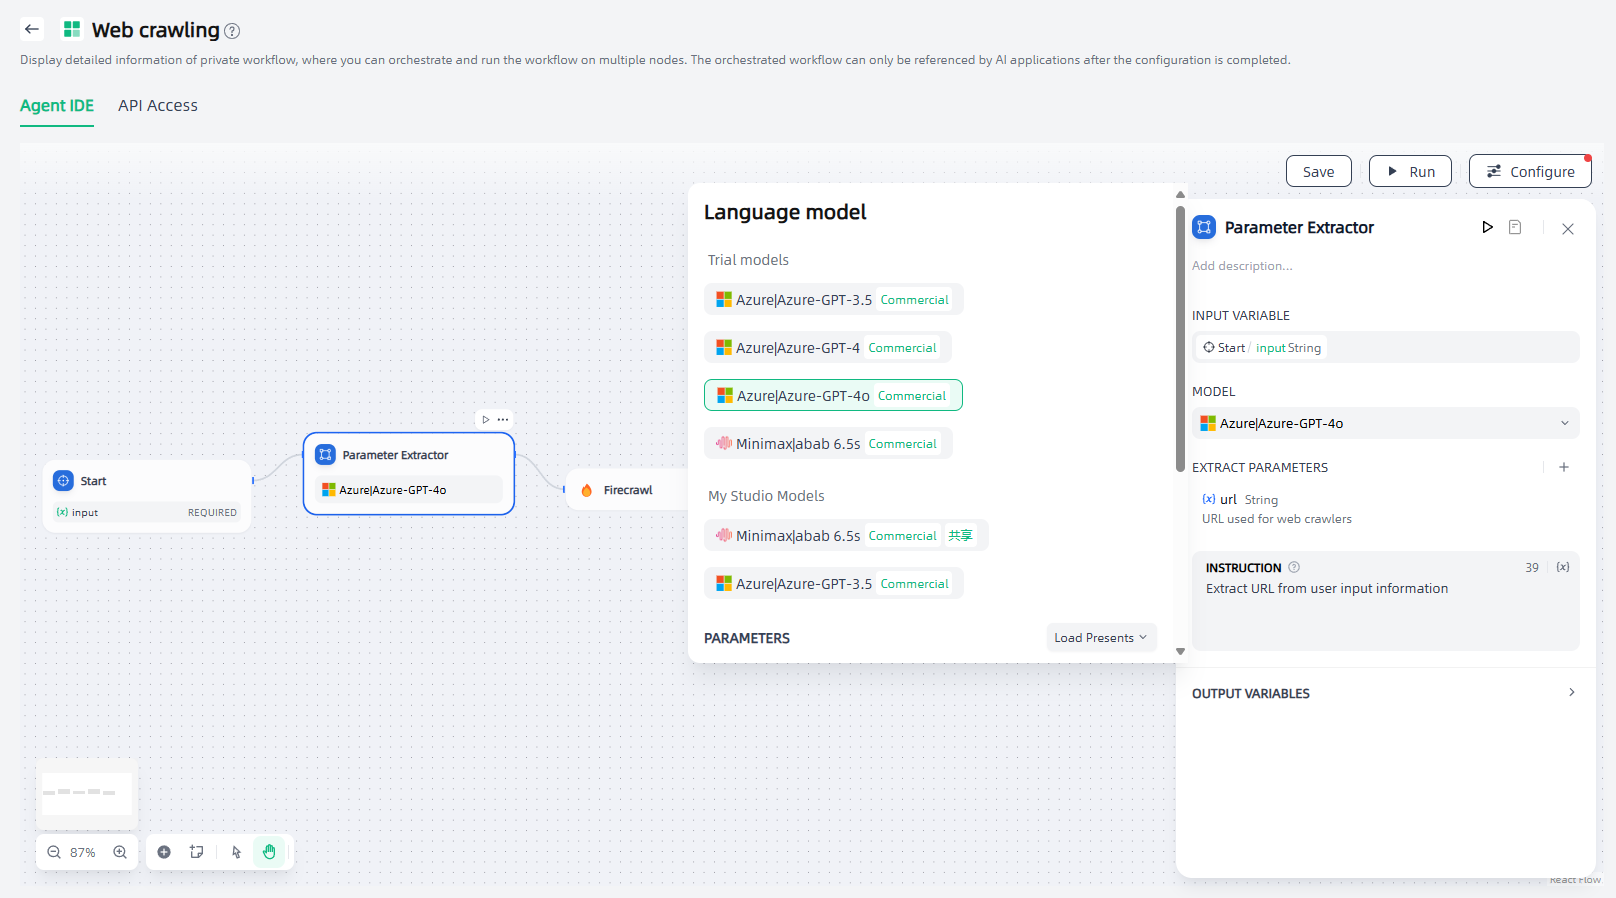
2.Select model: The parameter extractor relies on the reasoning and structured generation capabilities of LLM. You can select a suitable model based on your scenario requirements.
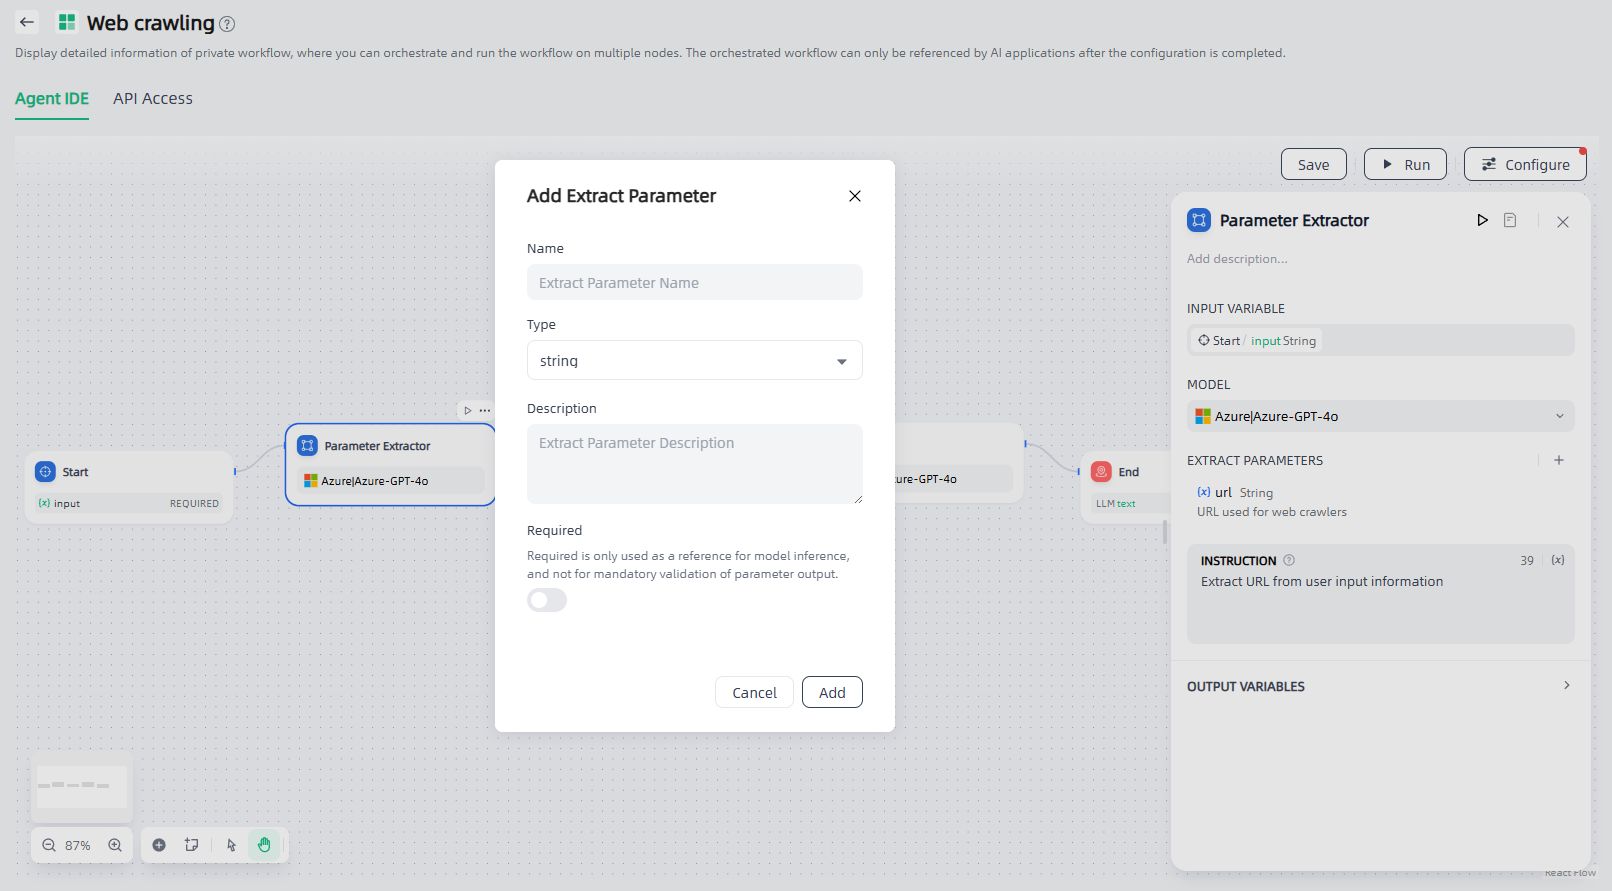
3.Extract parameters: You need to define the parameters to be extracted and their types, click "+" to add them.
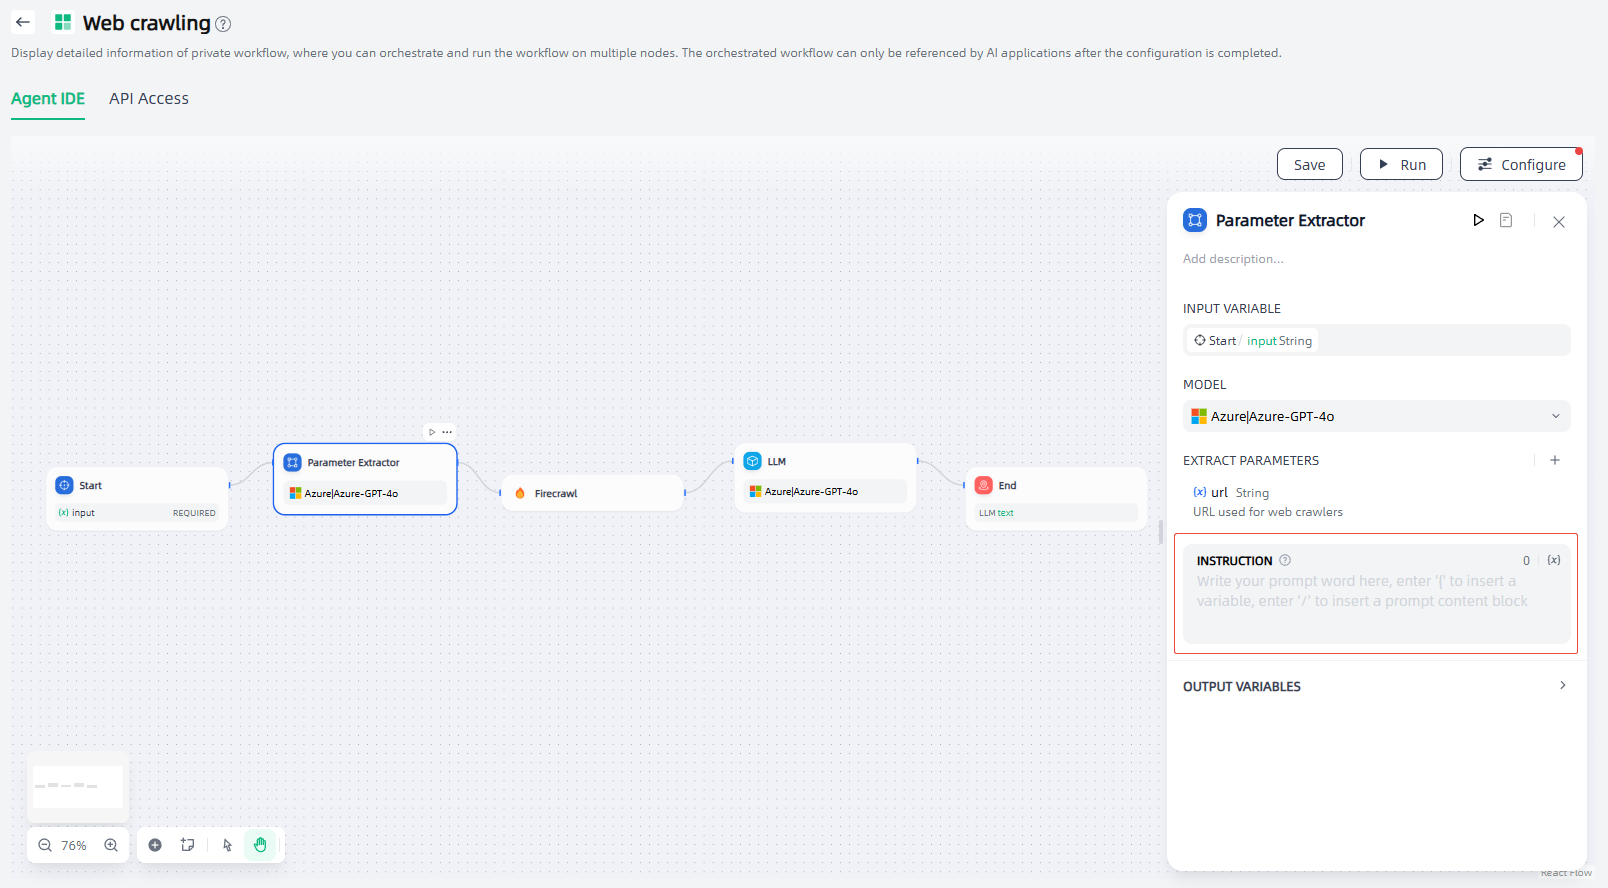
4.Instructions: Edit prompts to help LLM improve the effectiveness and stability of extracting complex parameters.
HTTP Request
The HTTP request node supports sending server requests to the specified Web address through the HTTP protocol to achieve interconnection with external services. It is suitable for scenarios such as obtaining external data, generating images, and downloading files.
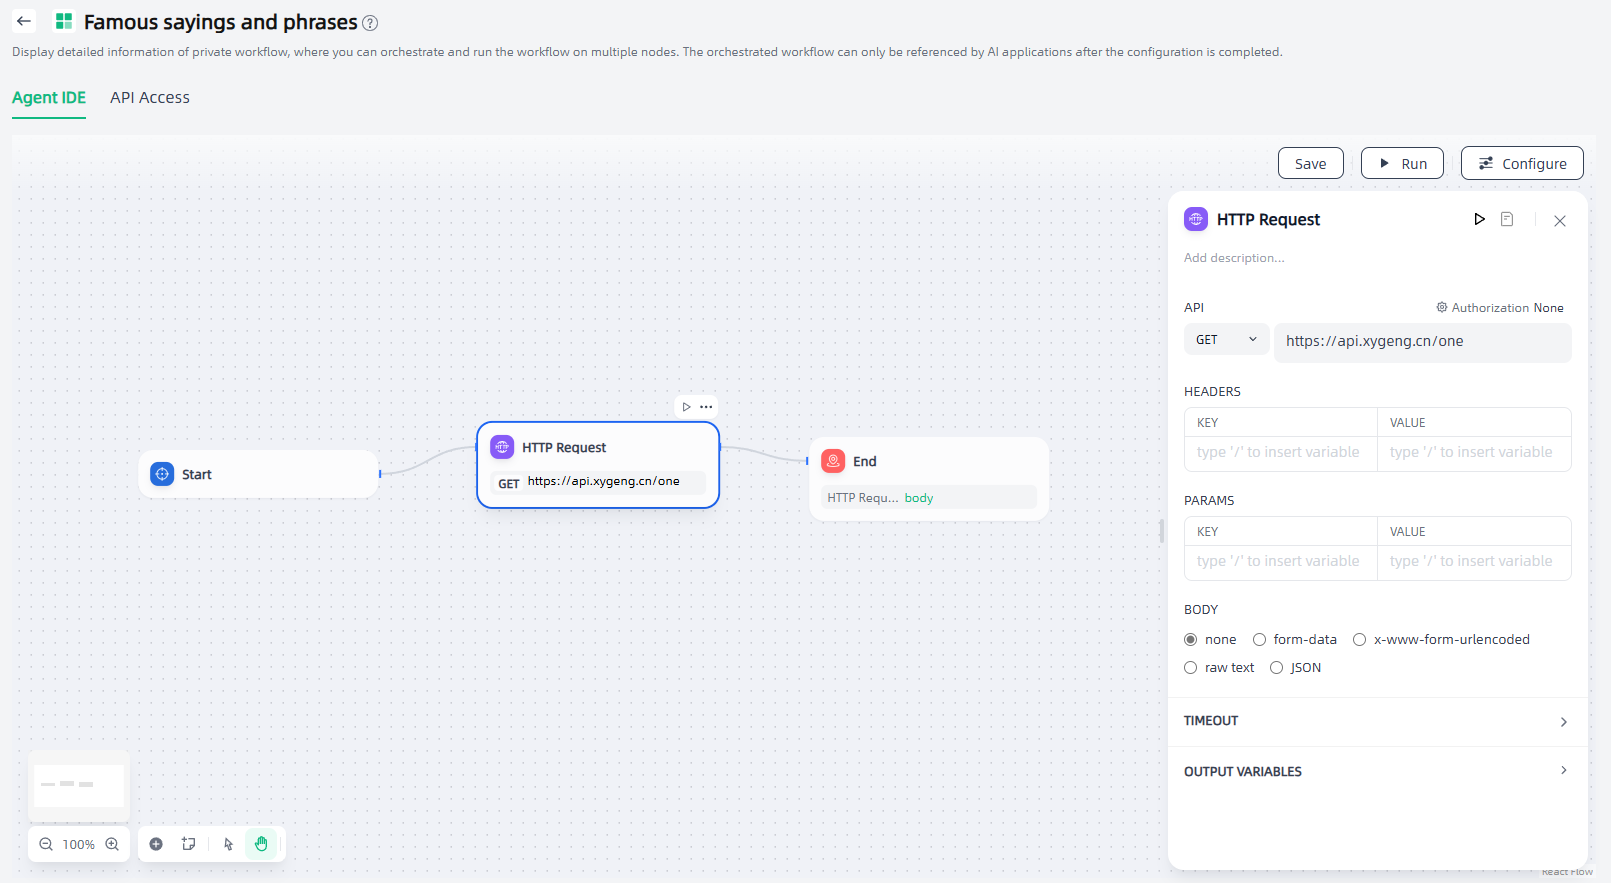
The configuration steps of the HTTP request node are as follows:
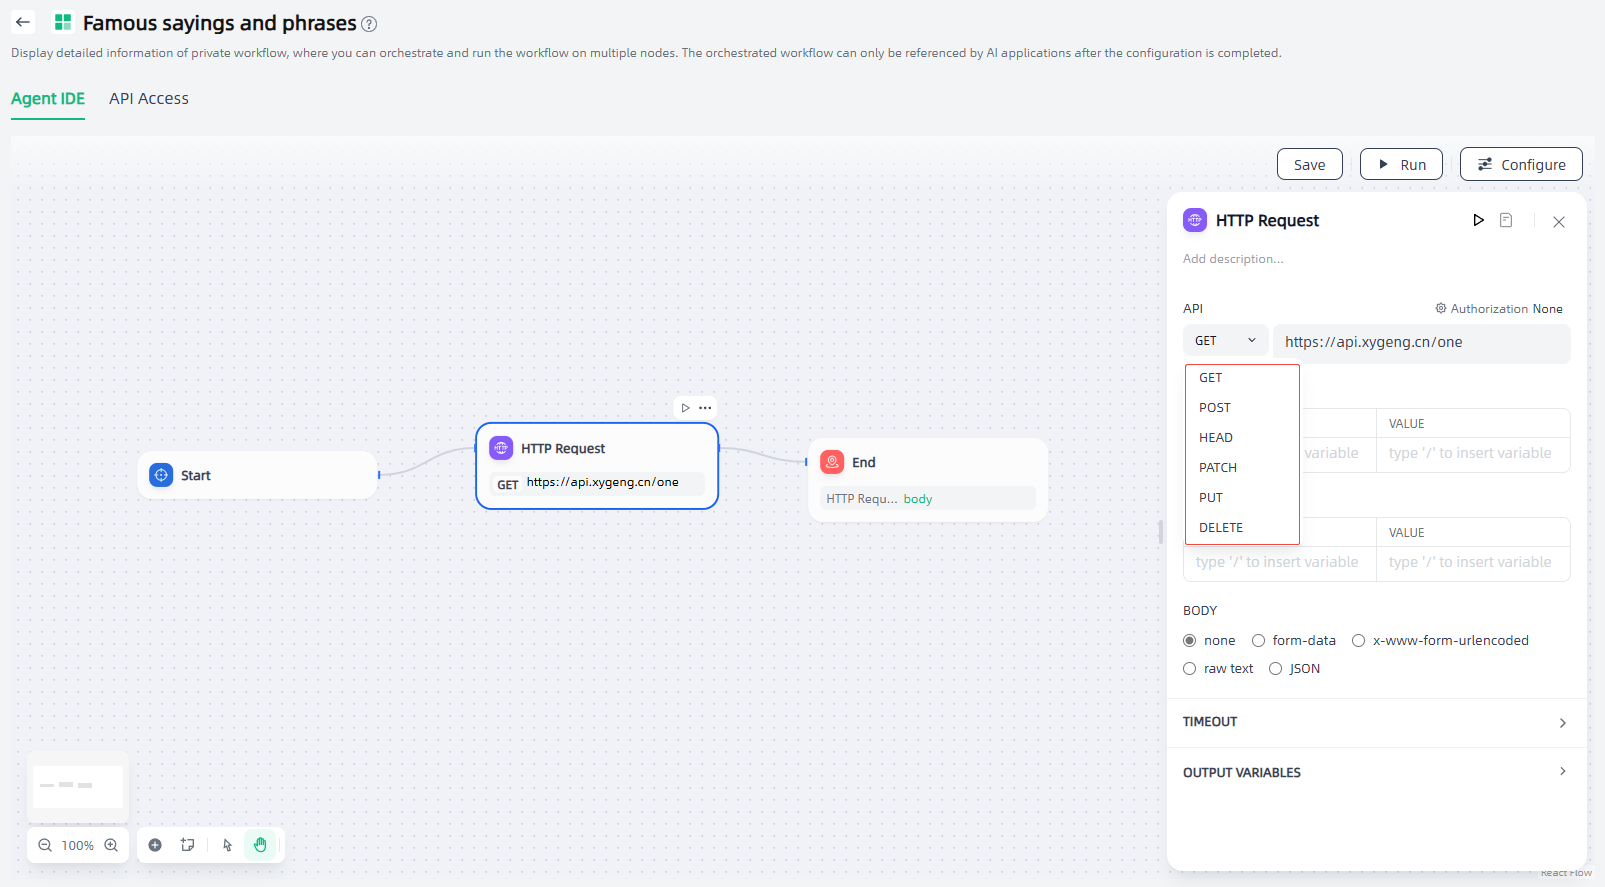
1.Request configuration: The HTTP request node supports 6 request methods: GET, POST, HEAD, PATCH, PUT, and DELETE. You can select the appropriate request method as needed and configure the URL, request header, query parameters, etc.
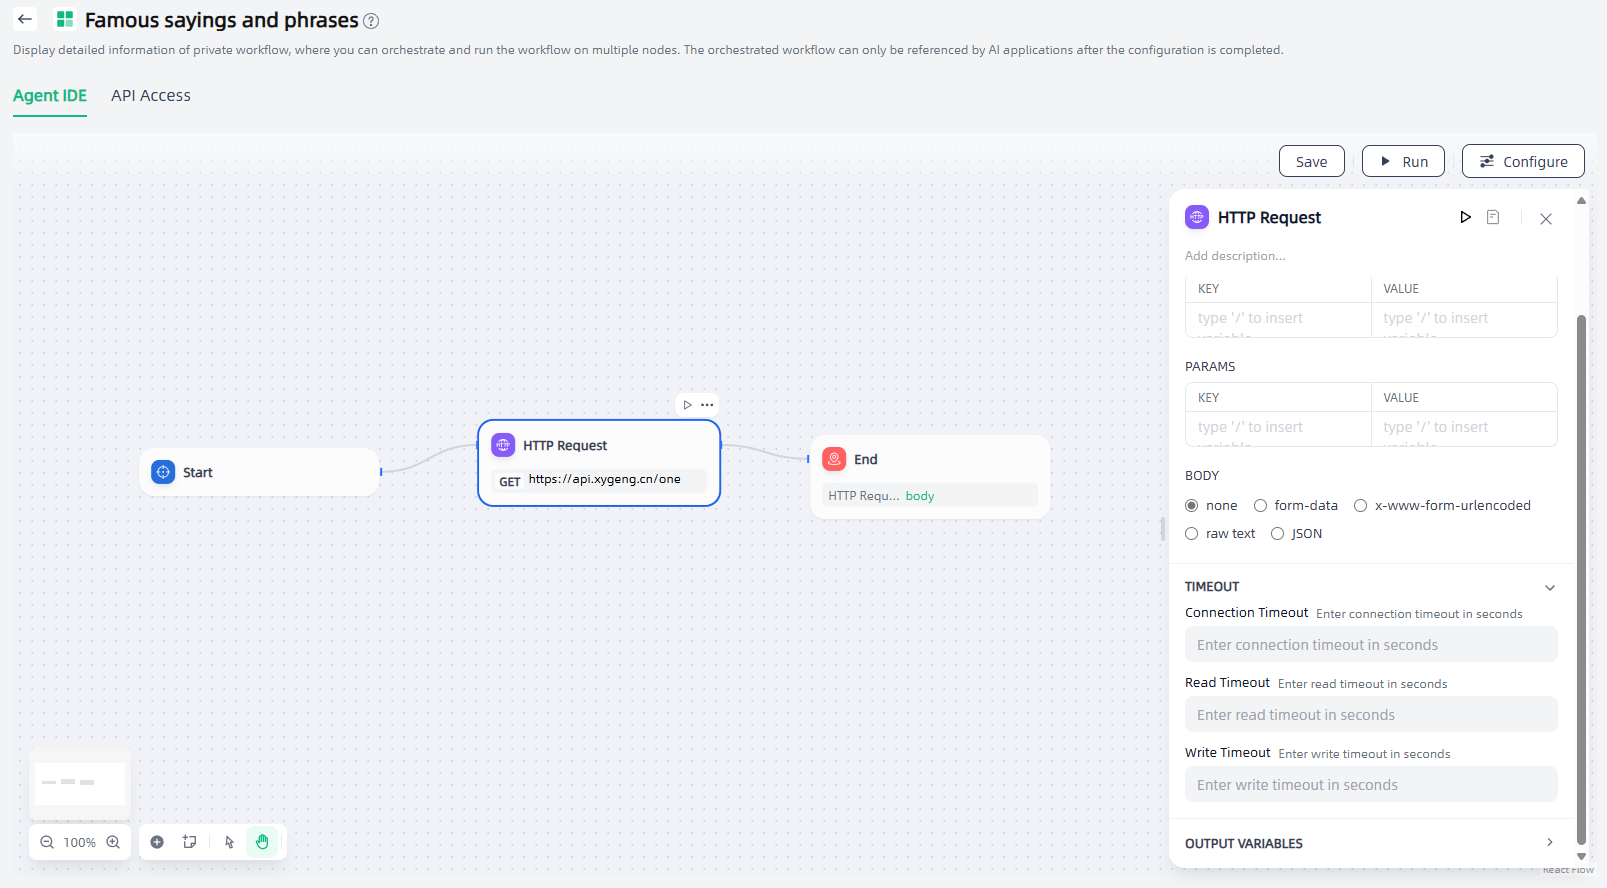
2.Timeout settings: You can set timeout settings as needed, including connection timeout, read timeout, and write timeout.
List Operator
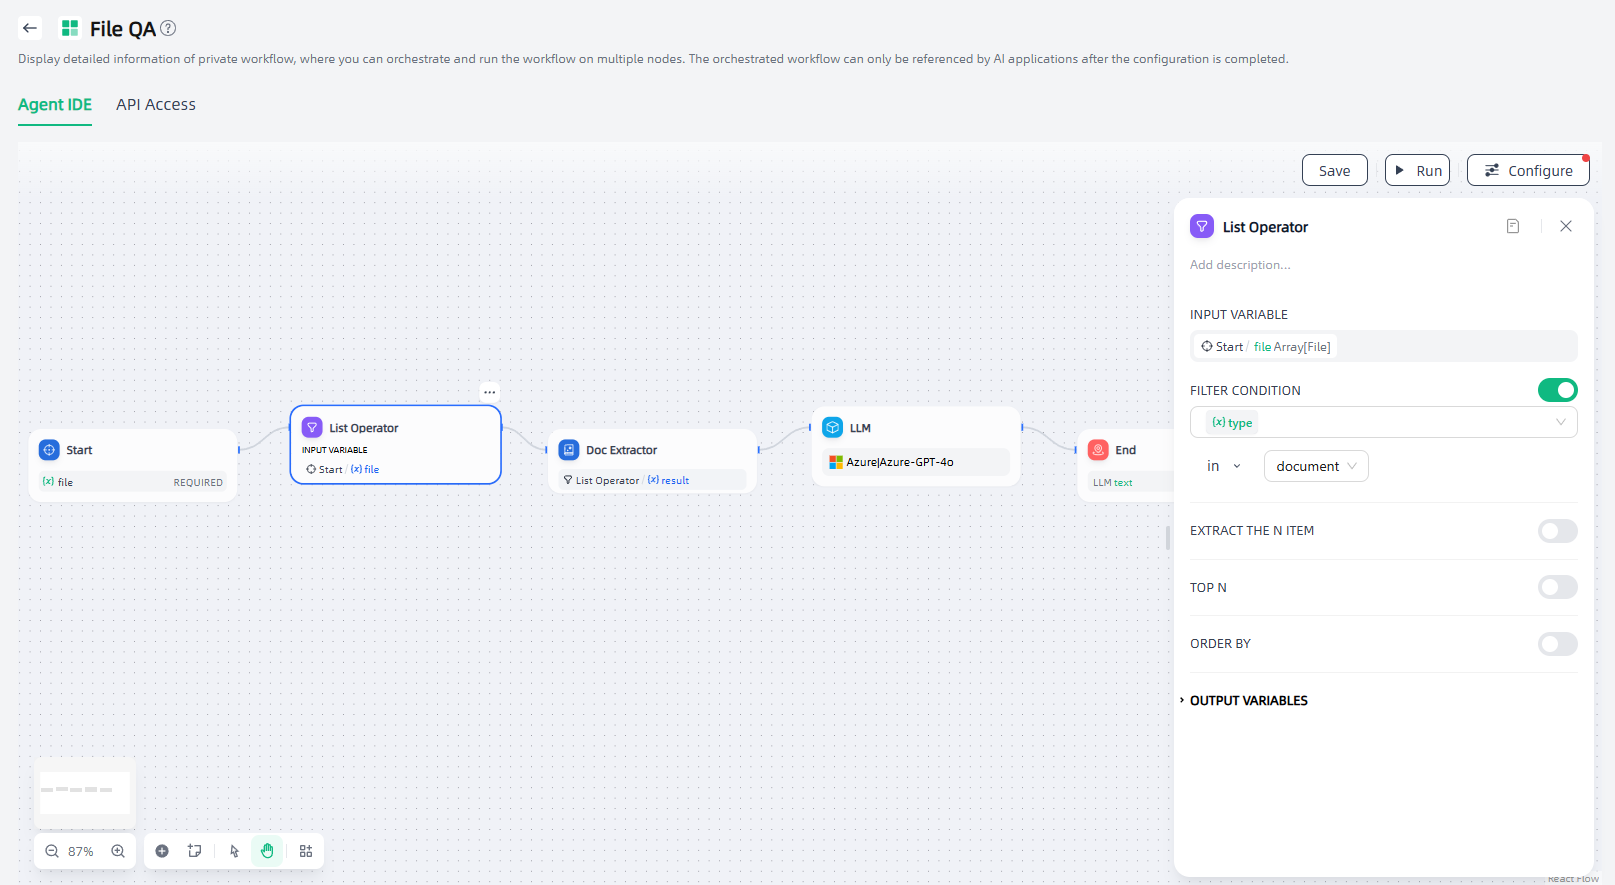
File list variables support simultaneous uploading of multiple file types such as document files, images, audio, and video files. When application users upload files, all files are stored in the same Array[File] variable, which is not conducive to subsequent individual file processing.
The list operator can filter and extract attributes such as file format type, file name, and size, passing different format files to corresponding processing nodes to achieve precise control over different file processing flows. For example, in an application that allows users to upload both document files and image files simultaneously, different files need to be sorted through the list operation node, with different files being handled by different processes.
List operation nodes are generally used to extract information from array variables, converting them into variable types that can be accepted by downstream nodes through setting conditions.
The configuration steps of the List Operator node are as follows:
1.Input Variable: Set variable inputs for list operations. The list operation node only accepts data structure variables such as Array [string], Array [number], and Array [file].
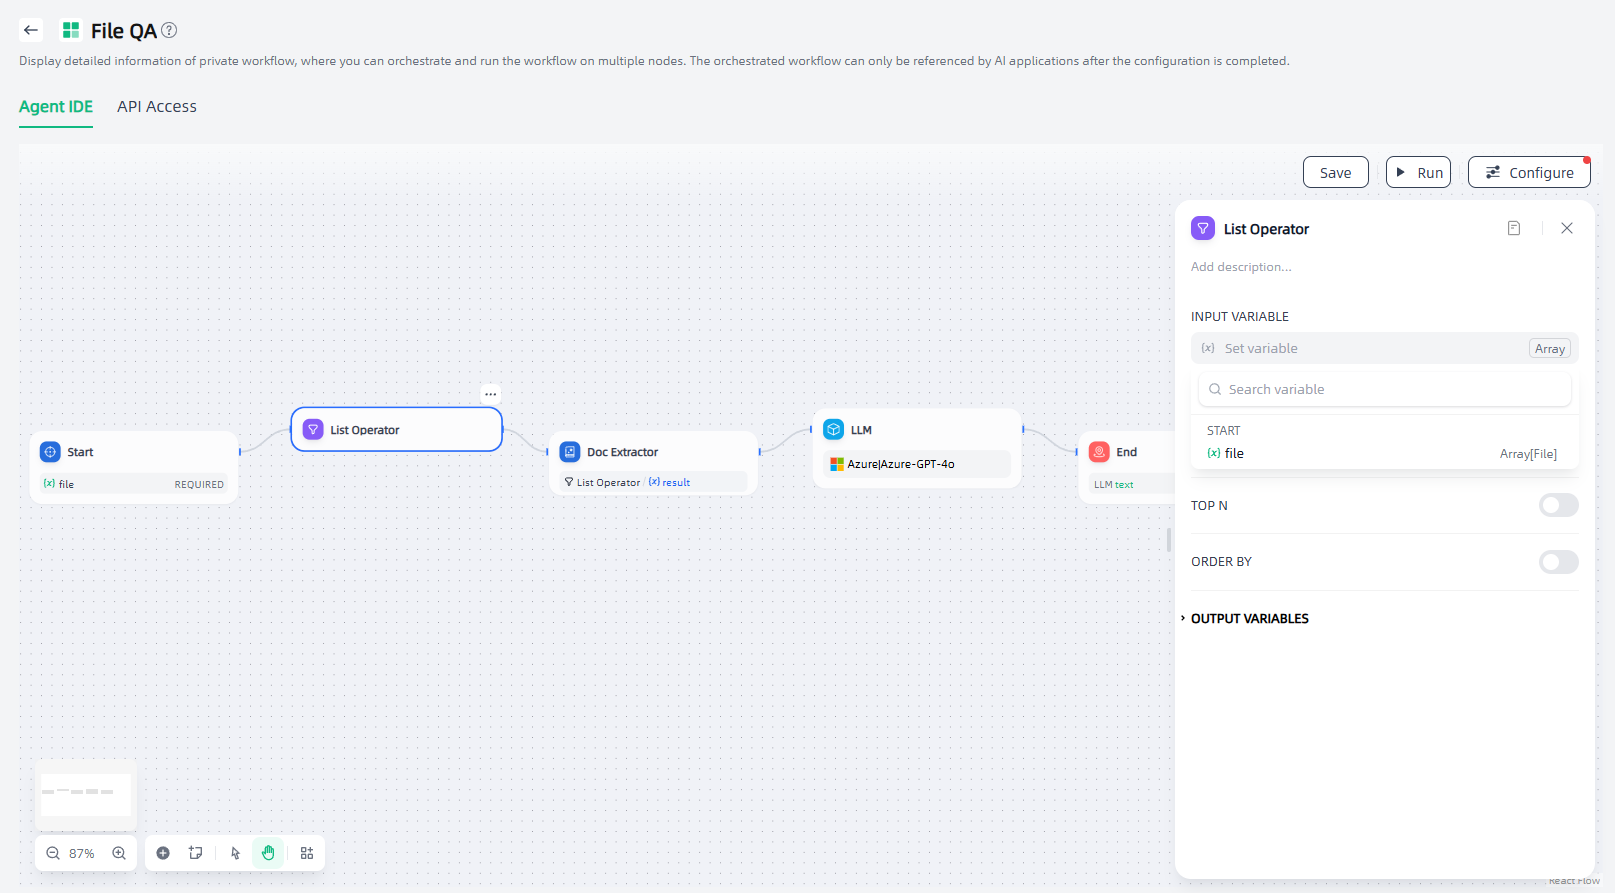
2.Set operation rules: Set Filter Condition, Extract the N item, Top N, and Order by as needed.
Tool
In addition to the above nodes, workflows support adding external plug-ins or internal tools in "My Studio-Applications-Tools" as nodes in the workflow, allowing you to orchestrate richer workflows.
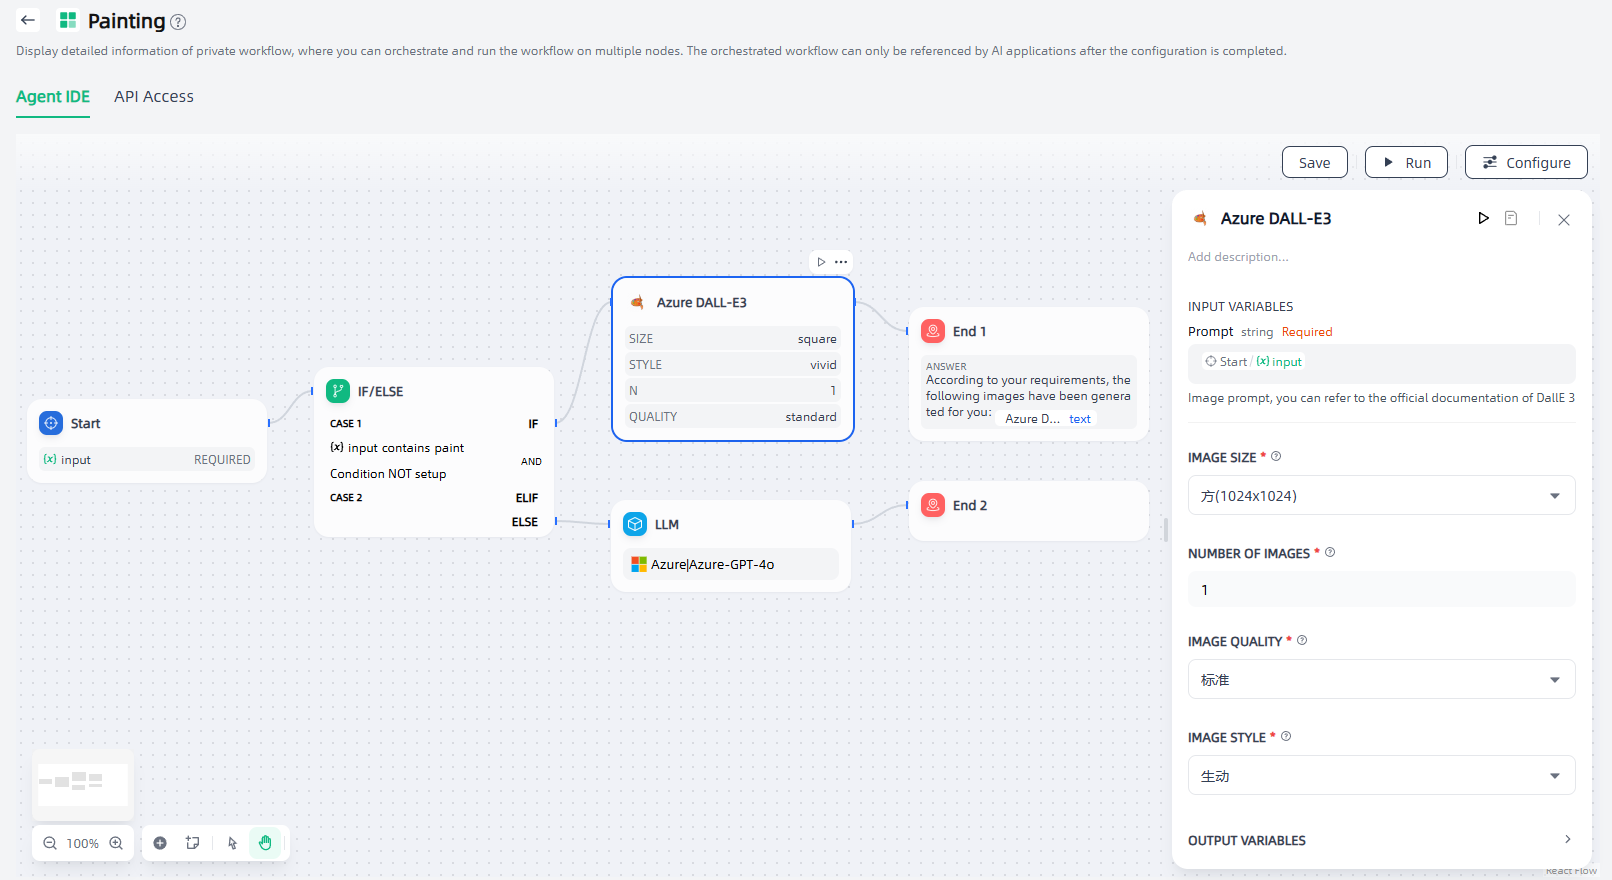
If you need to use a tool as a node, you need to add the corresponding tool and set input variables, tool parameters, etc. Taking Azure DALL-E3 as an example, the configuration steps are as follows:
1.Input variables: prompts for Azure DALL-E3 generating images.
2.Tool parameters: size, style, etc. of the images generated by Azure DALL-E3.
Workflow
In addition to the above nodes, workflows support adding workflows in the "Configured" state in "My Studio-Applications-Workflows" as nodes in the workflow to meet your more diverse application scenarios.
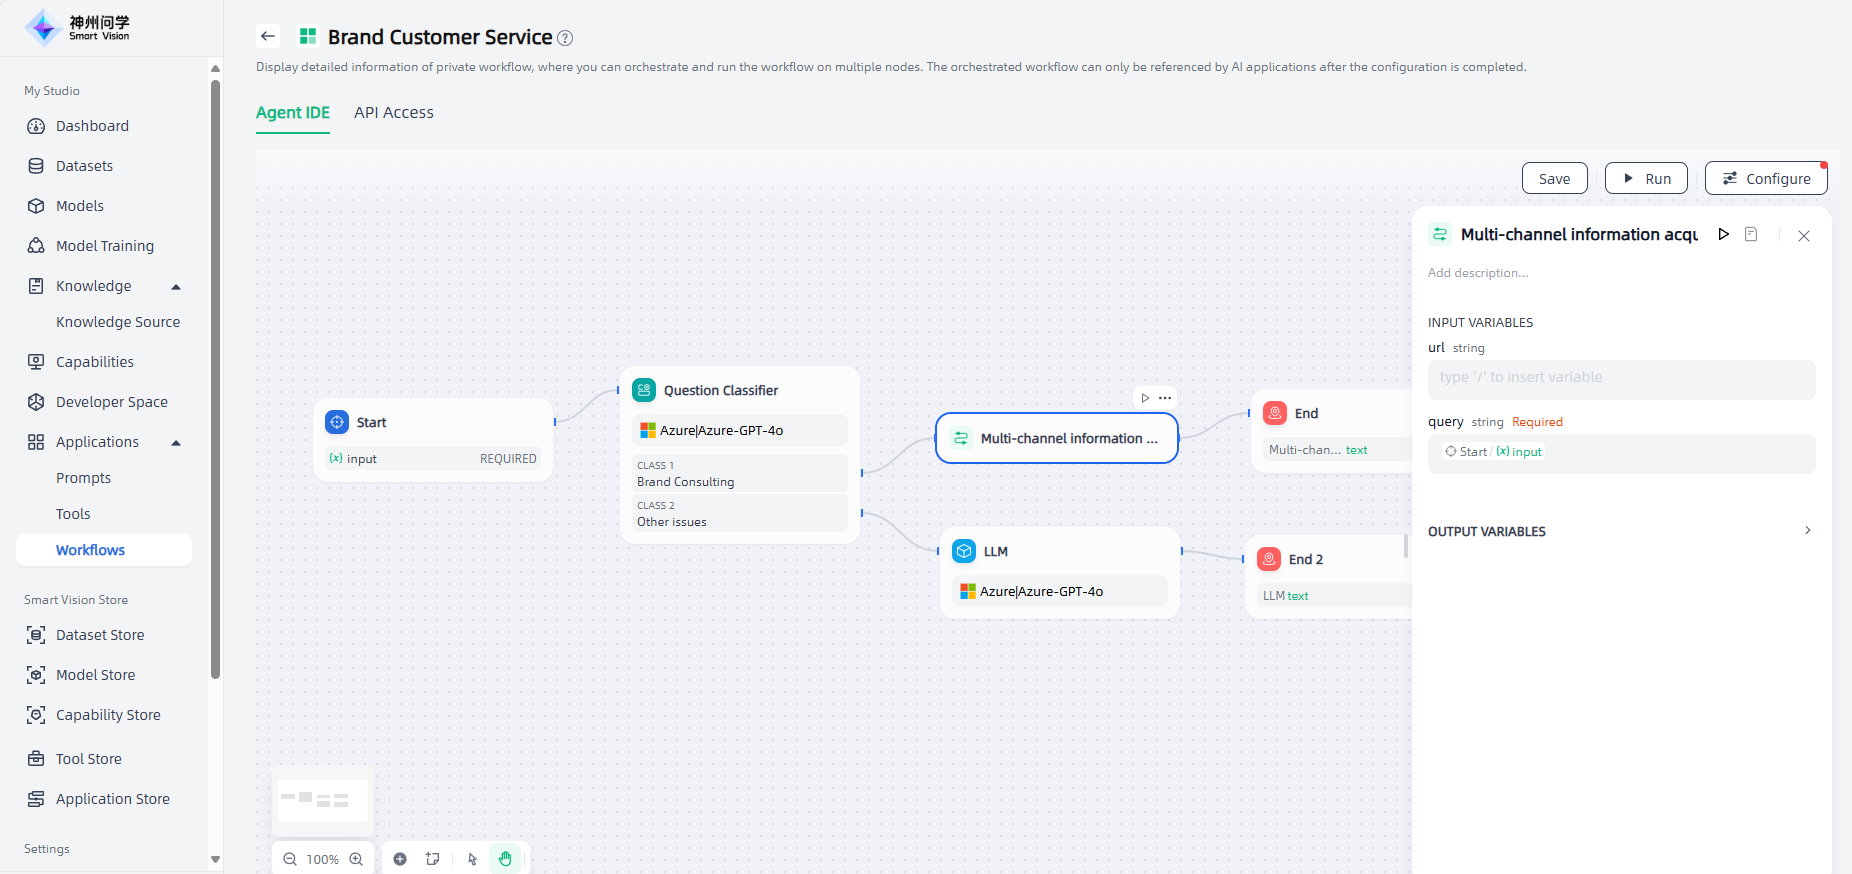
In the workflow of the following scenario, the configured "Multi-channel Information Acquisition" workflow is embedded. If user inputs a question related to brand consultation, the multi-channel information acquisition workflow will be executed and its output results will be obtained.
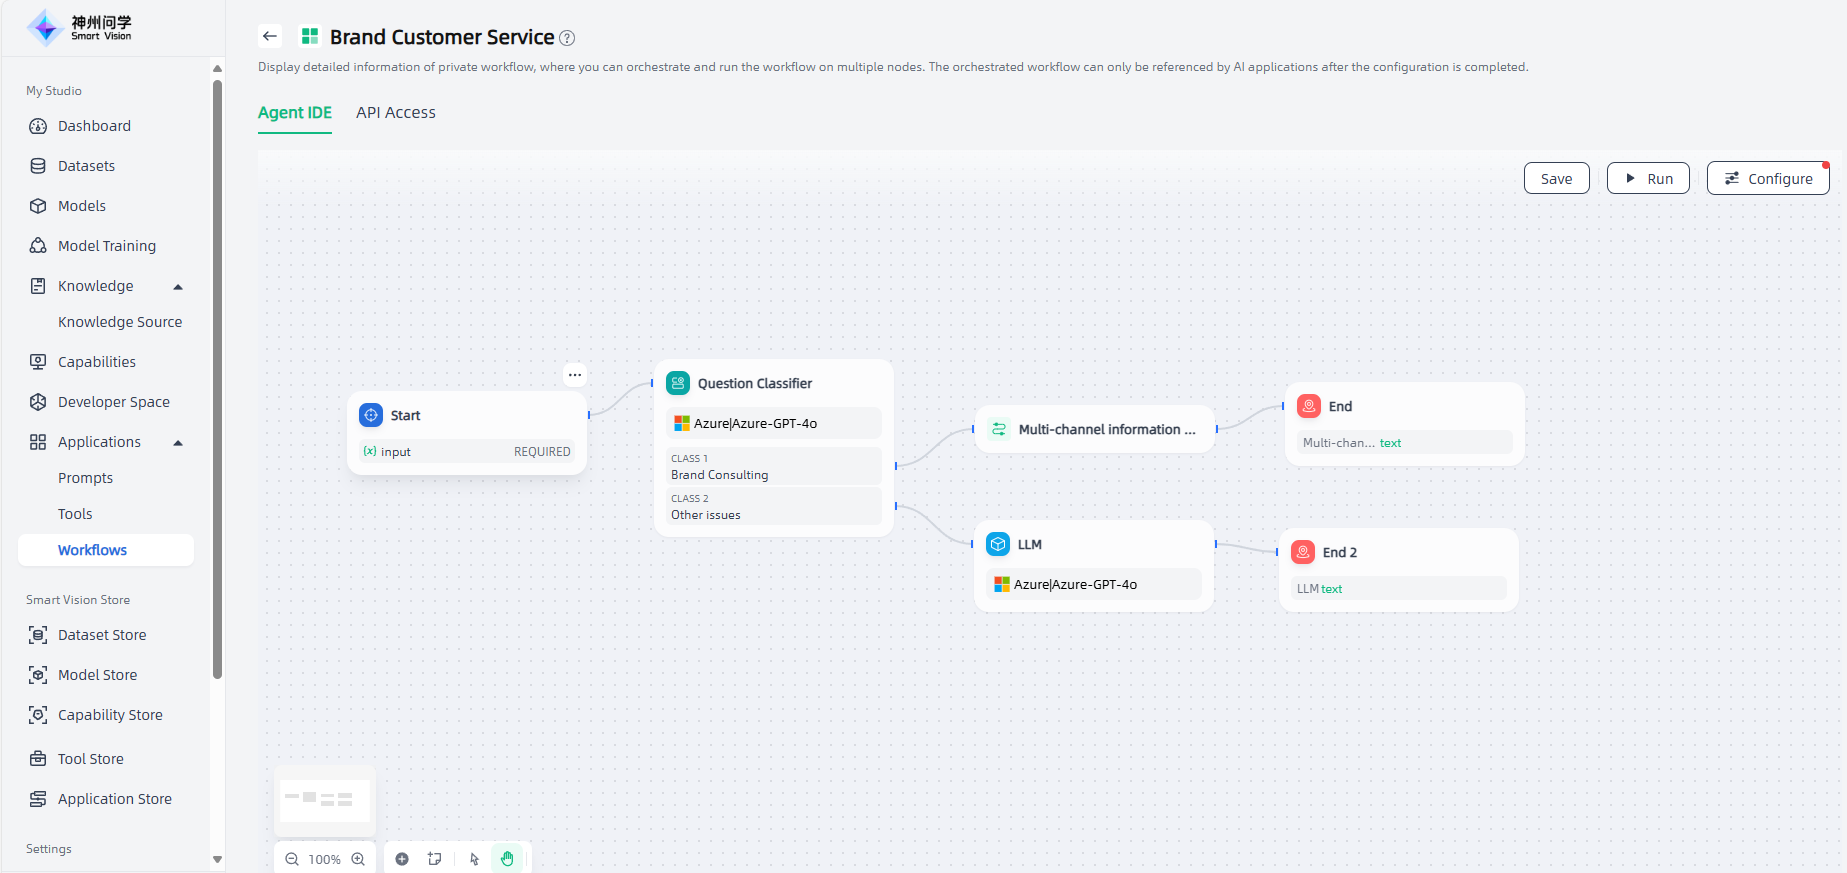
If you want to use a workflow as a node, you need to add the corresponding workflow and set its input variables.
Create Workflow
In My Studio-Applications-Workflows, click the "Create Workflow" or "Import Workflow" button in the upper right corner to create your own private workflow.
When you Create Workflow, you can flexibly build a variety of workflows based on node types to meet different business needs.
Operation Guide
Start: Go to "My Studio-Applications-Workflows", click the "Create Workflow" button in the upper right corner to enter the "Create Workflow" page.
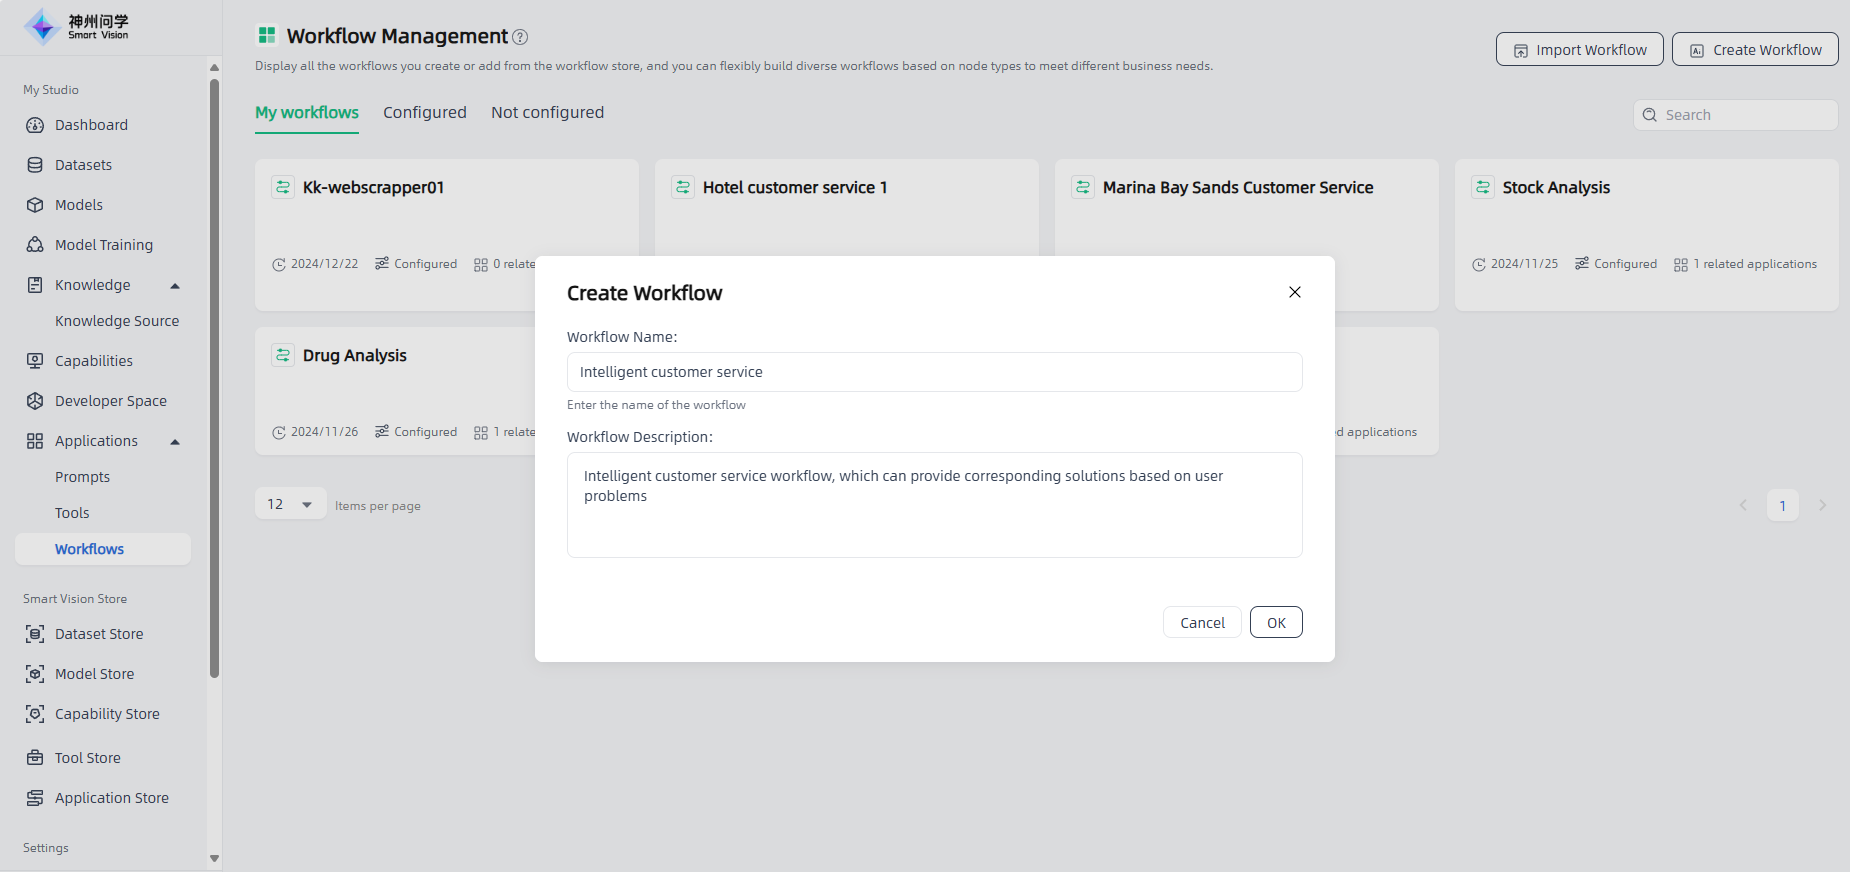
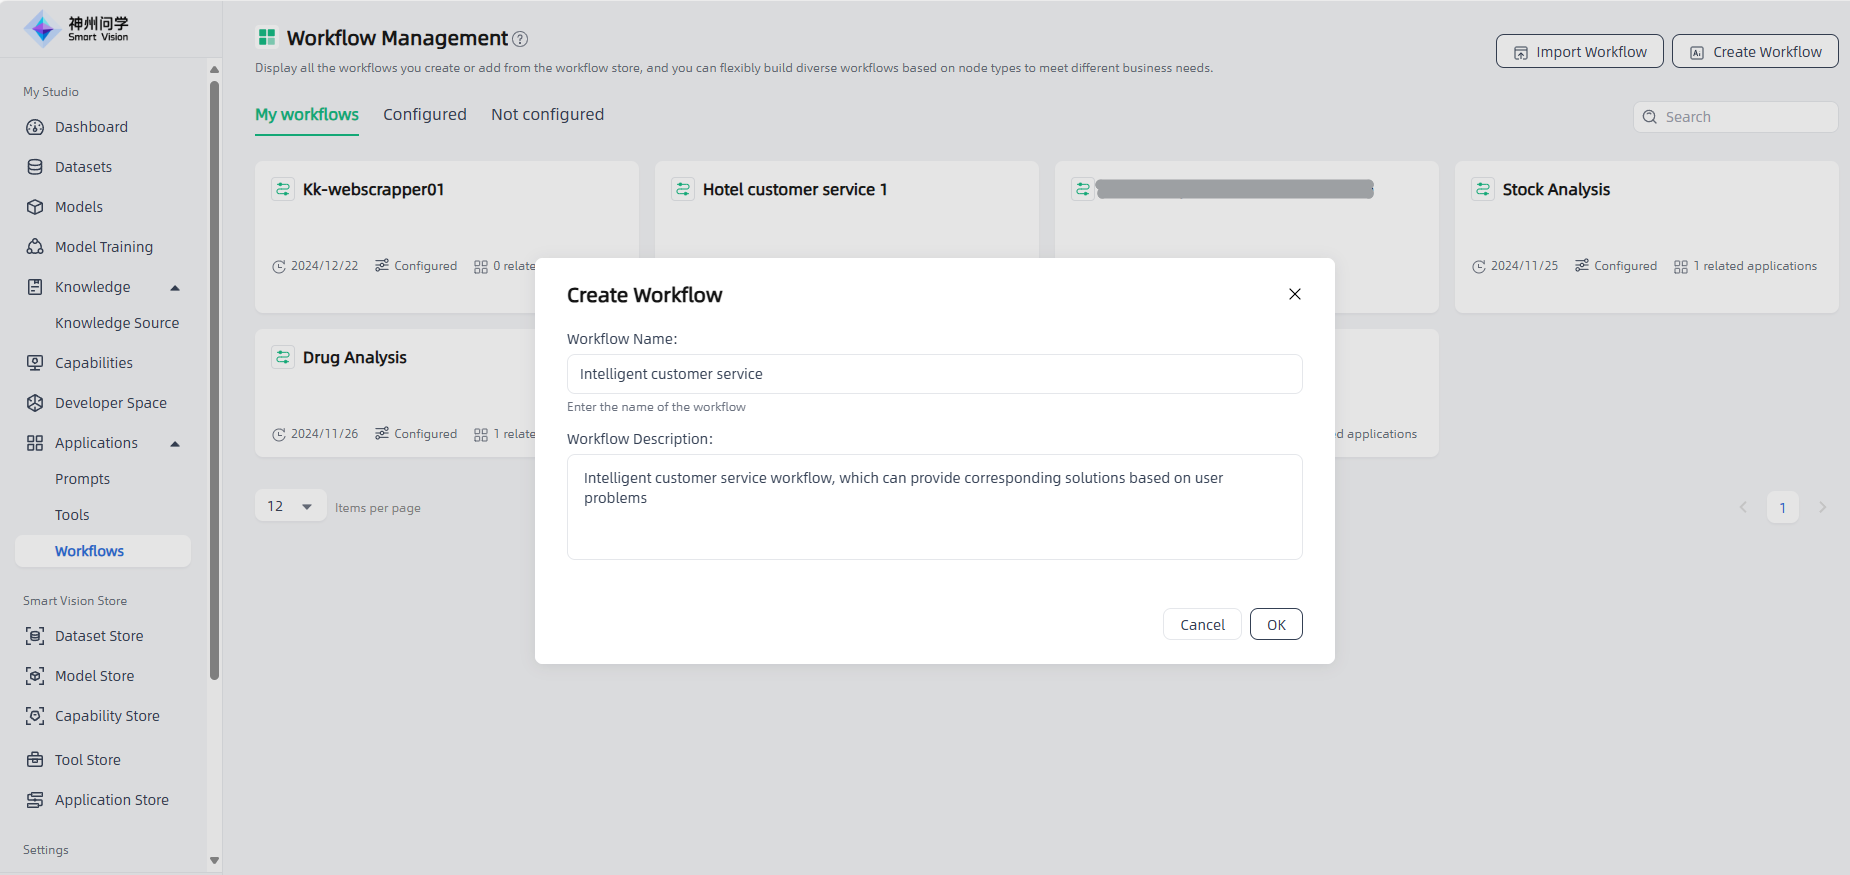
Fill in the workflow name and description: Edit the name and description of the workflow you created, and click the "OK" button to start creating the workflow.
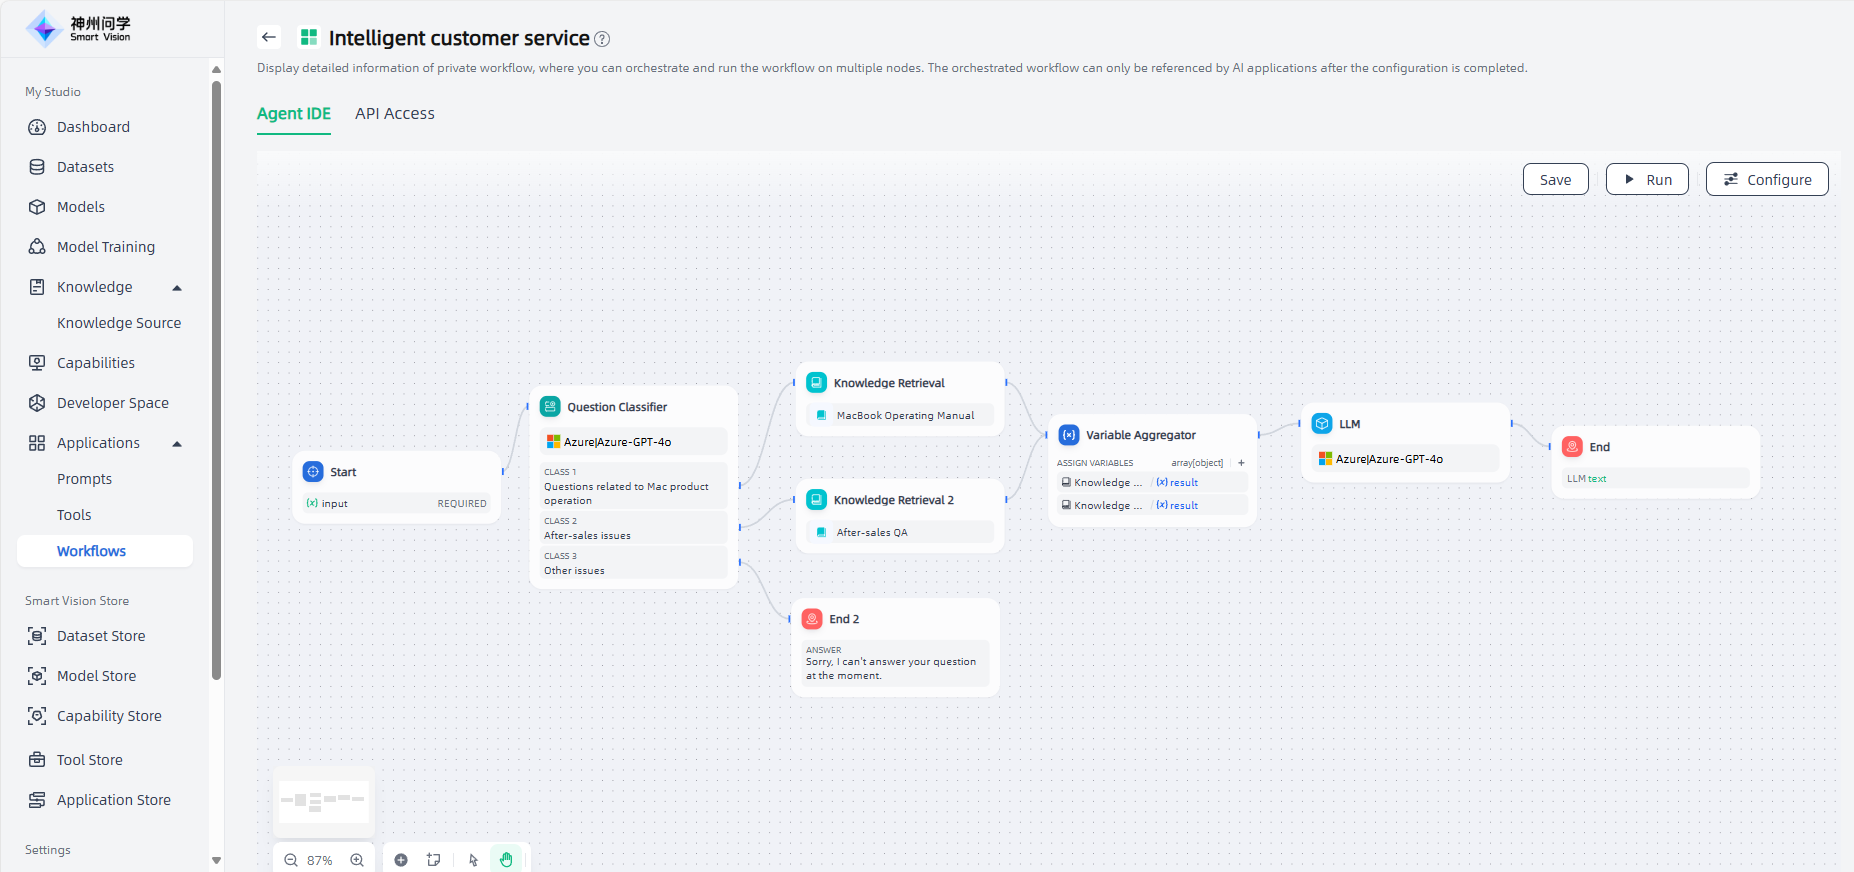
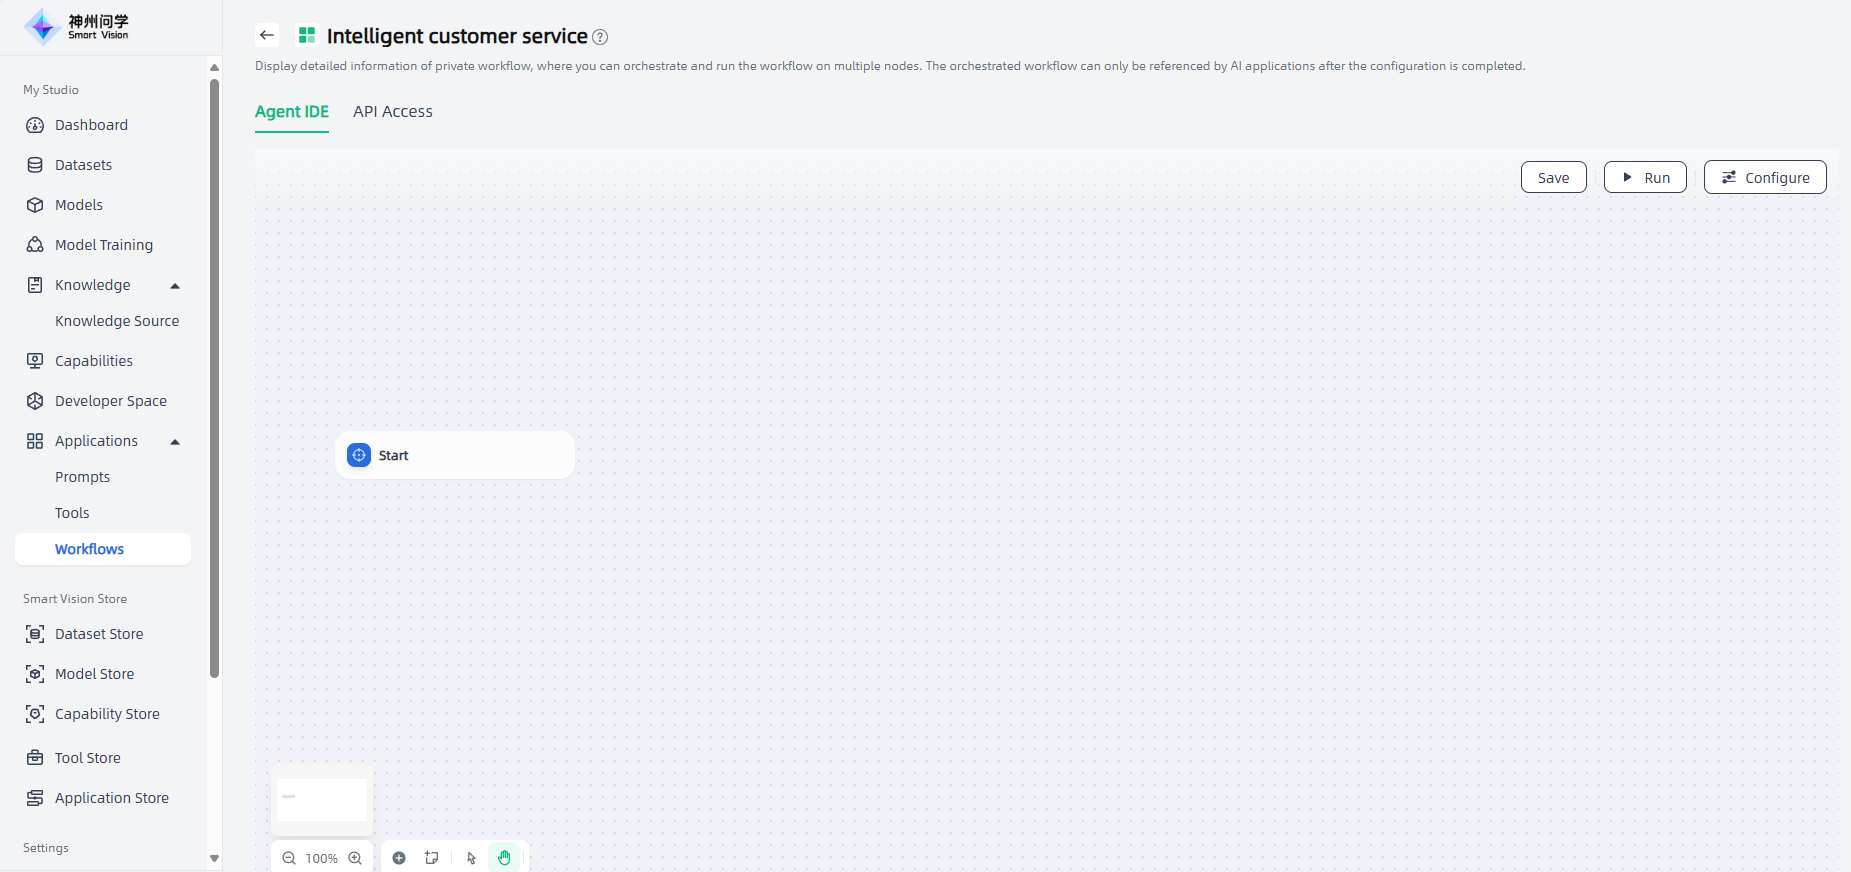
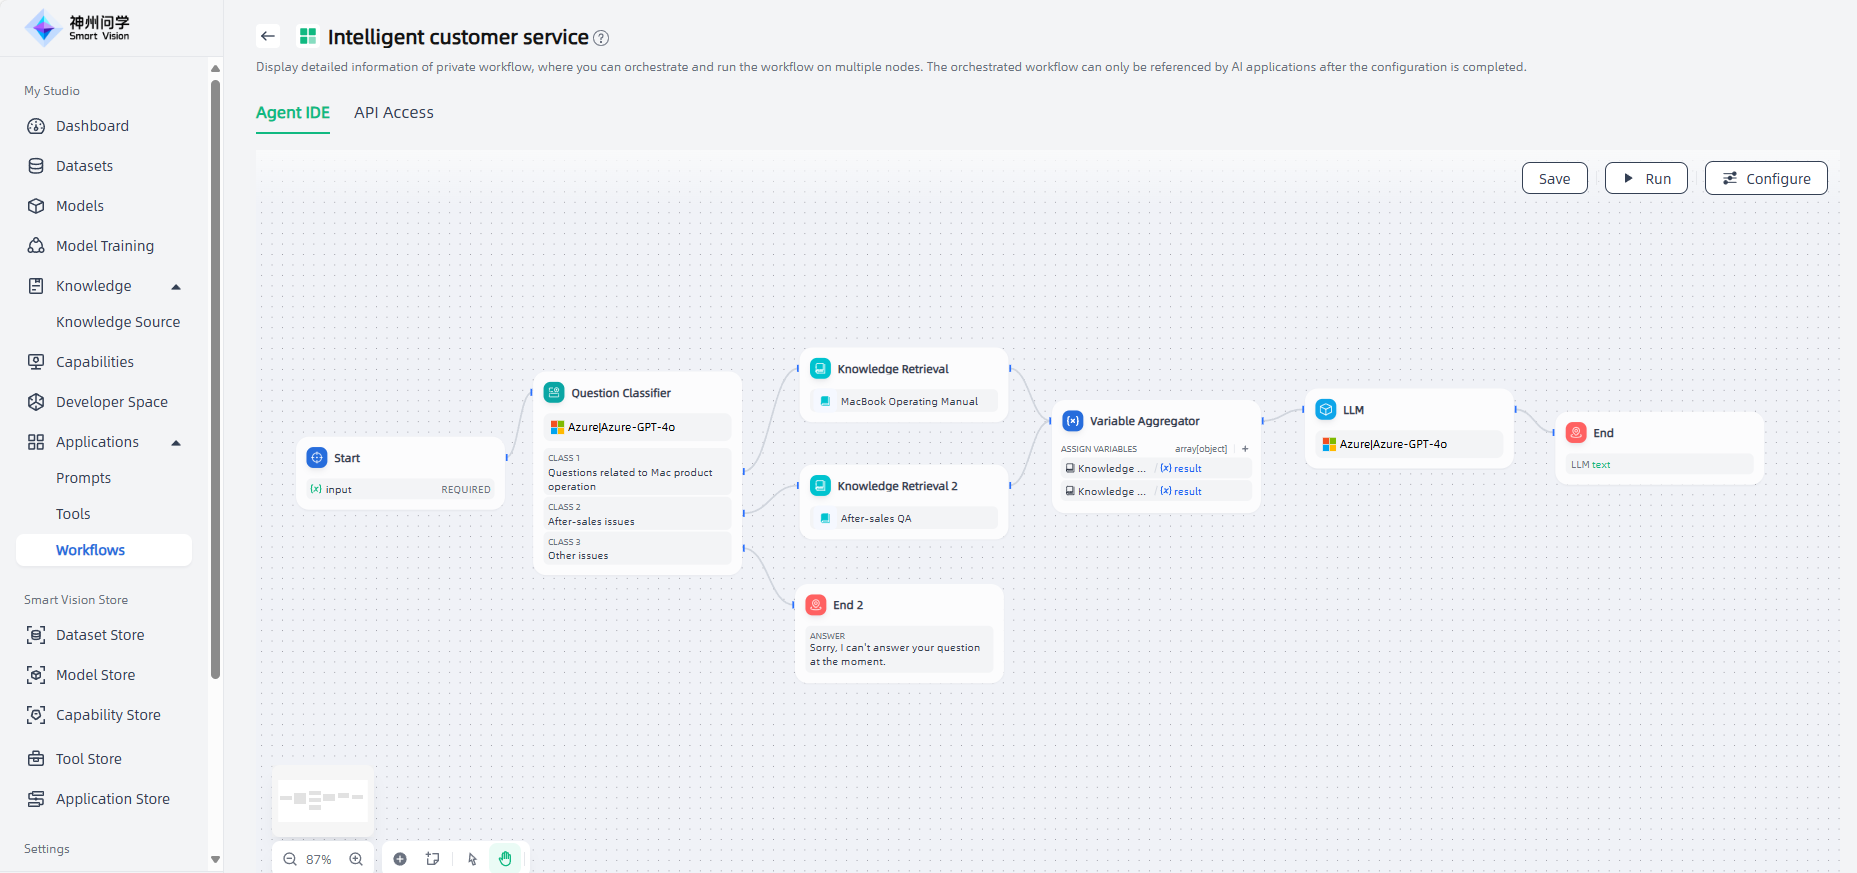
Workflow Orchestration: After starting to create, you will automatically enter the workflow orchestration interface of the workflow details page, and the "Start" node will automatically appear in the canvas, where you can flexibly orchestrate your workflow as needed. Take the intelligent customer service scenario as an example:
First, click the "Start" node, and the configuration interface will appear on the right. You can add descriptions and variables to this node as needed. Click "+" to add variables, and click "Save" after adding. The configuration of the start node is completed.
Since the questions input by users are diverse, a "Question Classifier" node is added after the "Start" node to facilitate the classification of questions input by users and accurately respond to user questions in subsequent processes.
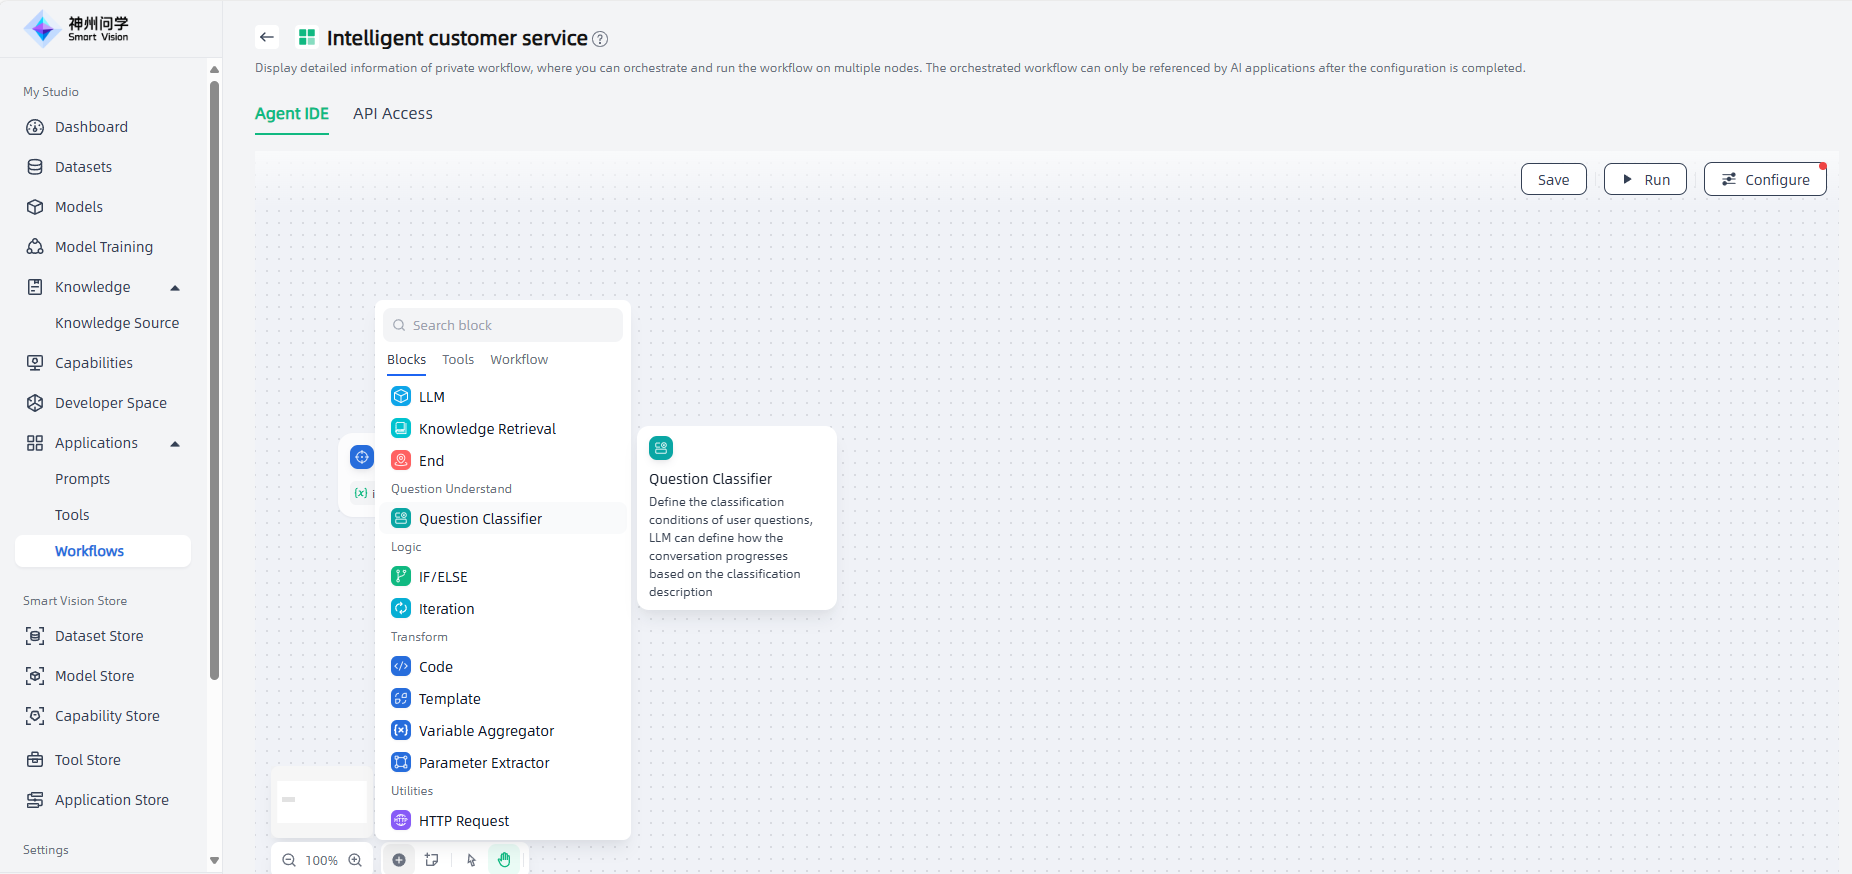
Click "+" below the canvas and select "Question Classifier". The node will appear on the canvas. You need to connect the node to the upstream "Start" node. Click the node to perform node description, input variables, model selection, classification and other related configurations. After completion, click "Save" in the upper right corner.
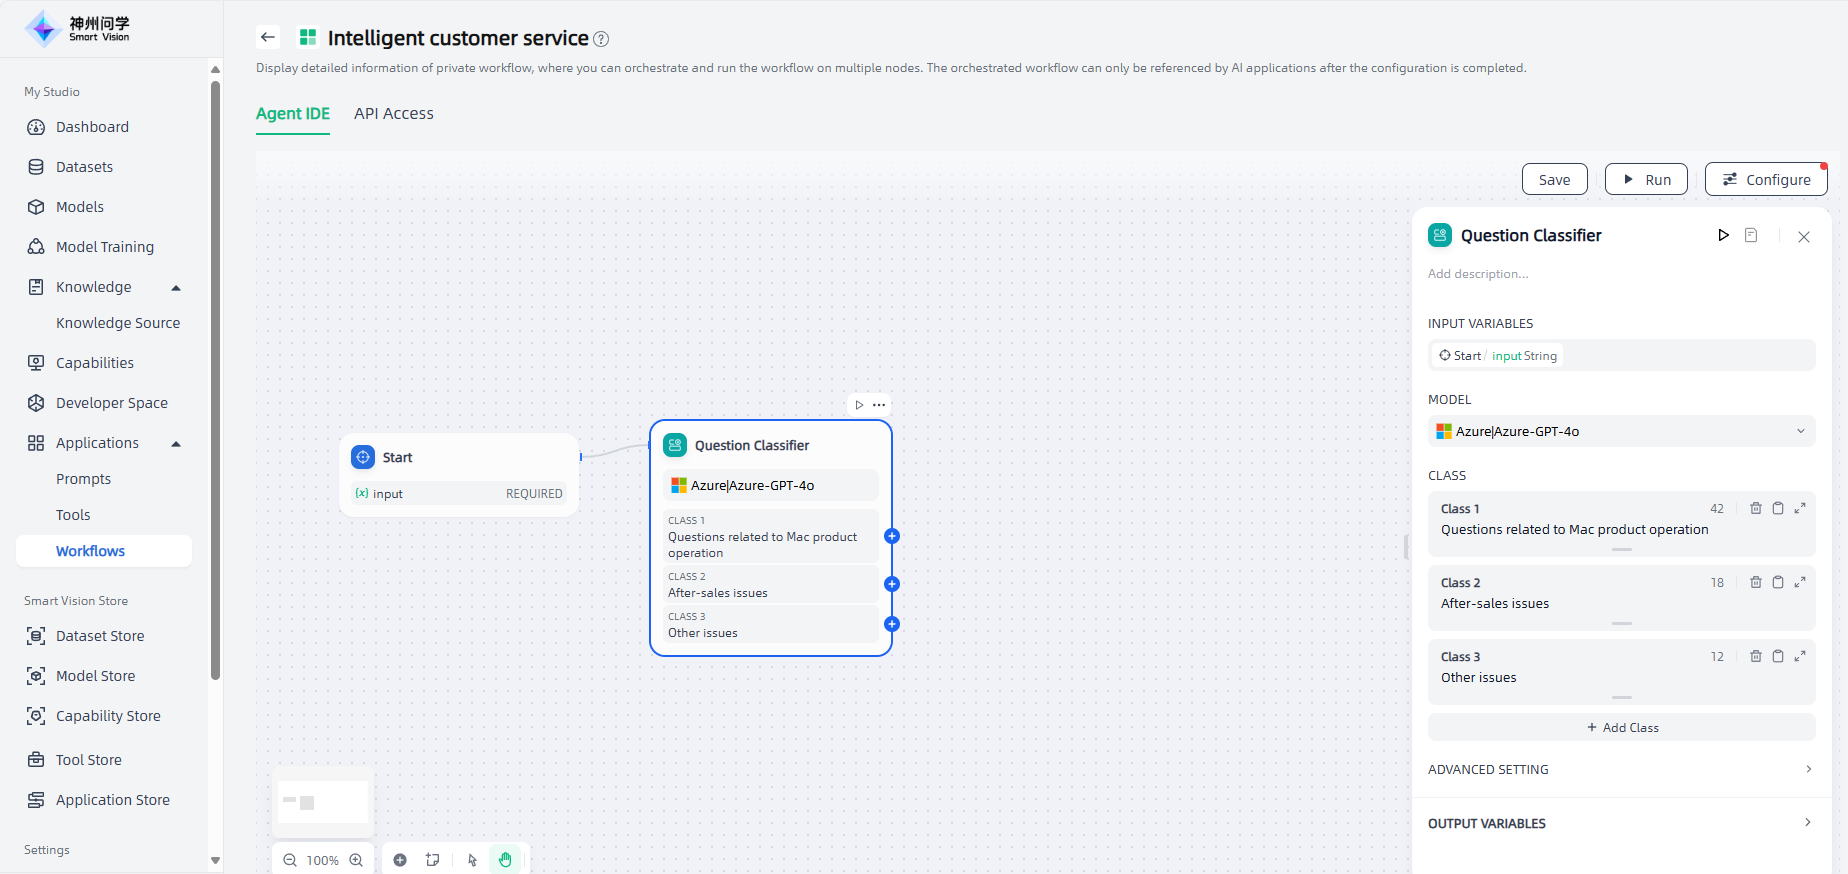
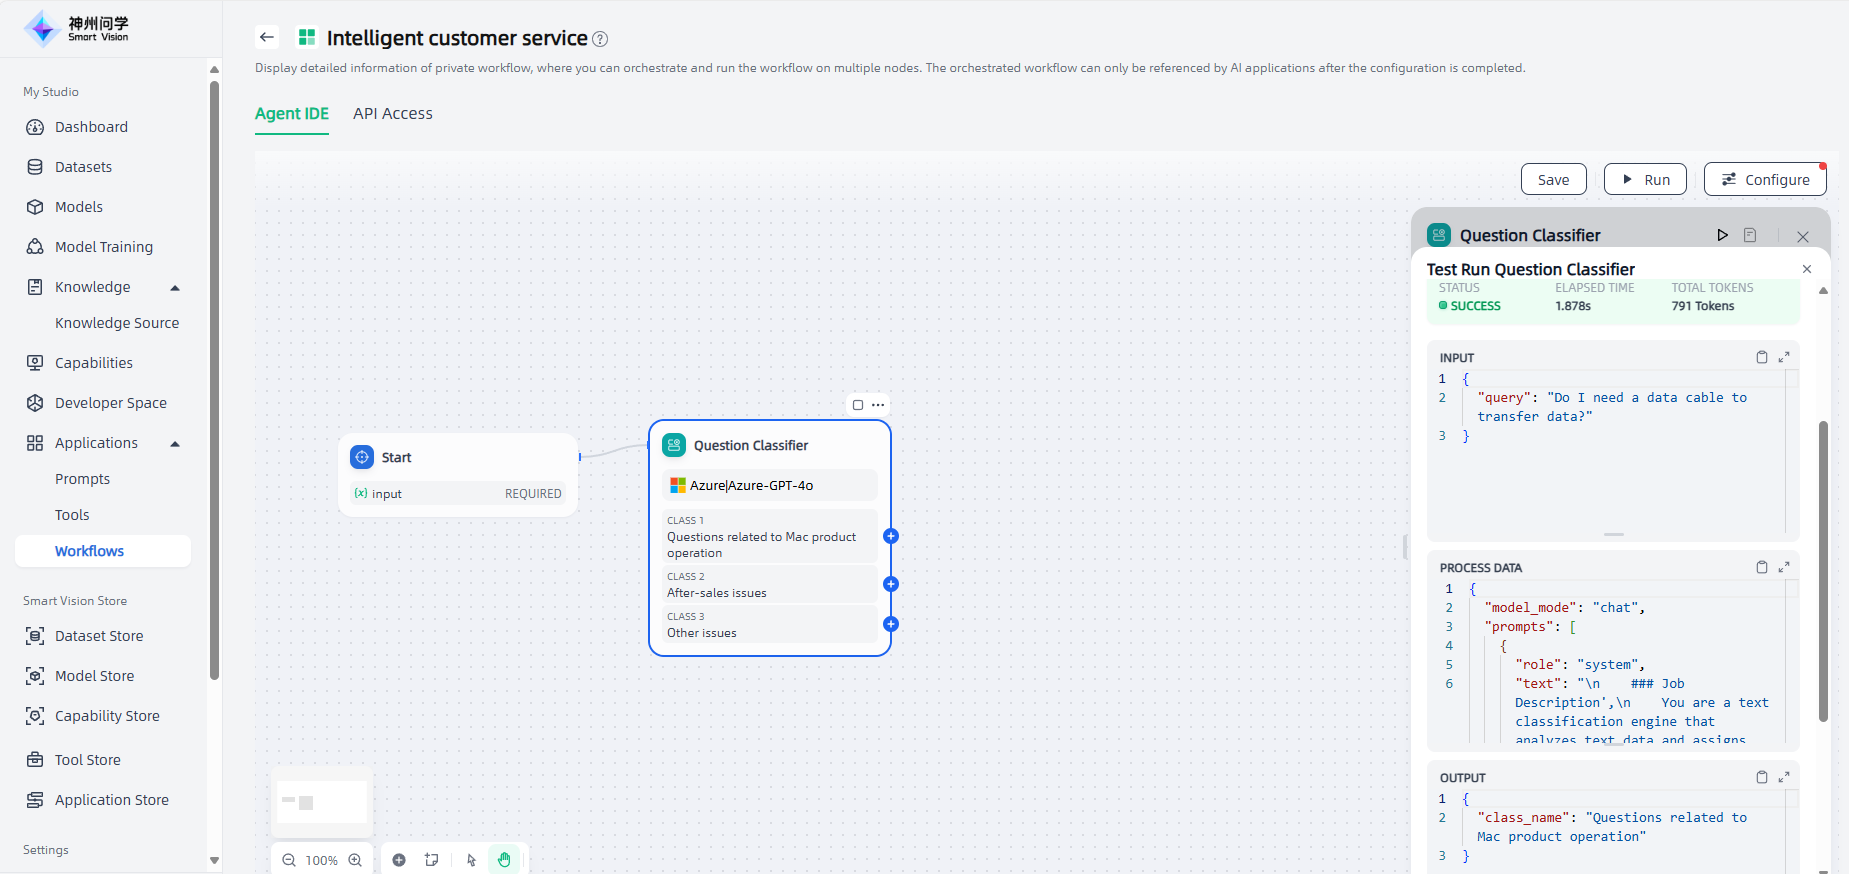
After the configuration is complete, you can click the Run button in the upper right corner of the node or in the upper right corner of the node configuration interface to run and view the effect of this node.
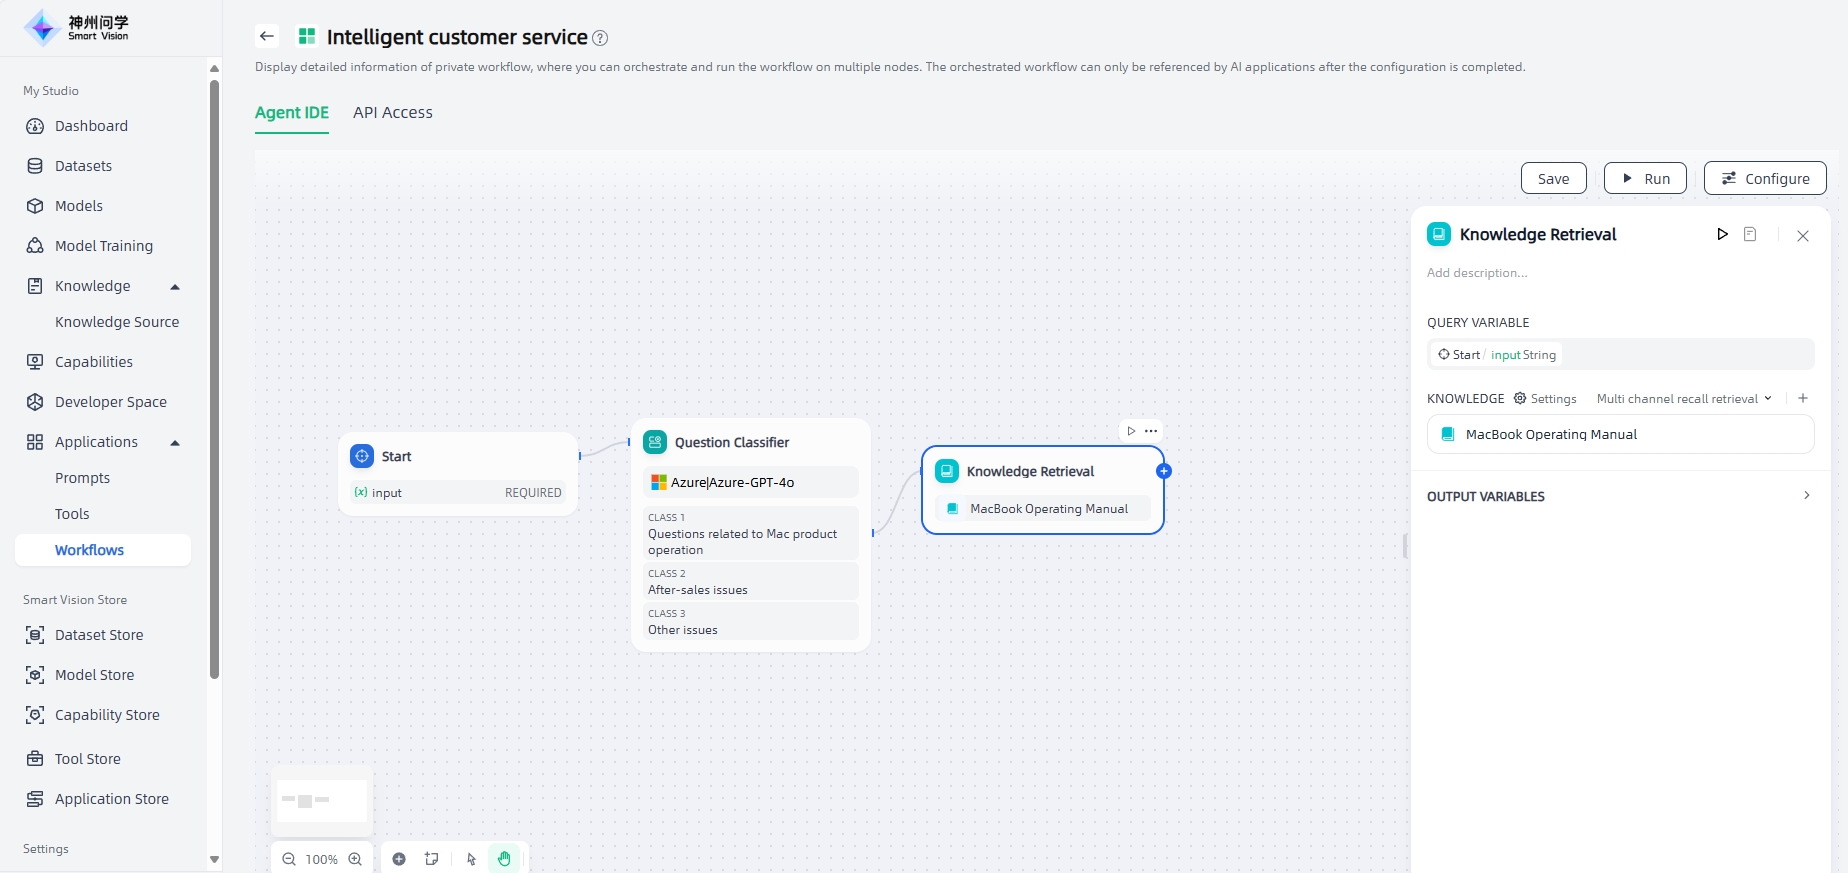
For product operation related issues in Category 1, add a knowledge retrieval node to facilitate querying such issues through knowledge base retrieval. After adding the "Knowledge Retrieval" node, connect it to the upstream node, click the node to perform node description, query variables, recall settings, RAG selection, knowledge base addition and other related configurations, and click "Save" in the upper right corner after completion.
The downstream node of knowledge retrieval is generally an LLM node, and the output variables of knowledge retrieval need to be configured in the context variables within the LLM node. After the knowledge retrieval node for Category 1, add an "LLM" node, connect it to the upstream node, click the node to configure the node description, model selection, context, etc., and click "Save" in the upper right corner after completion.
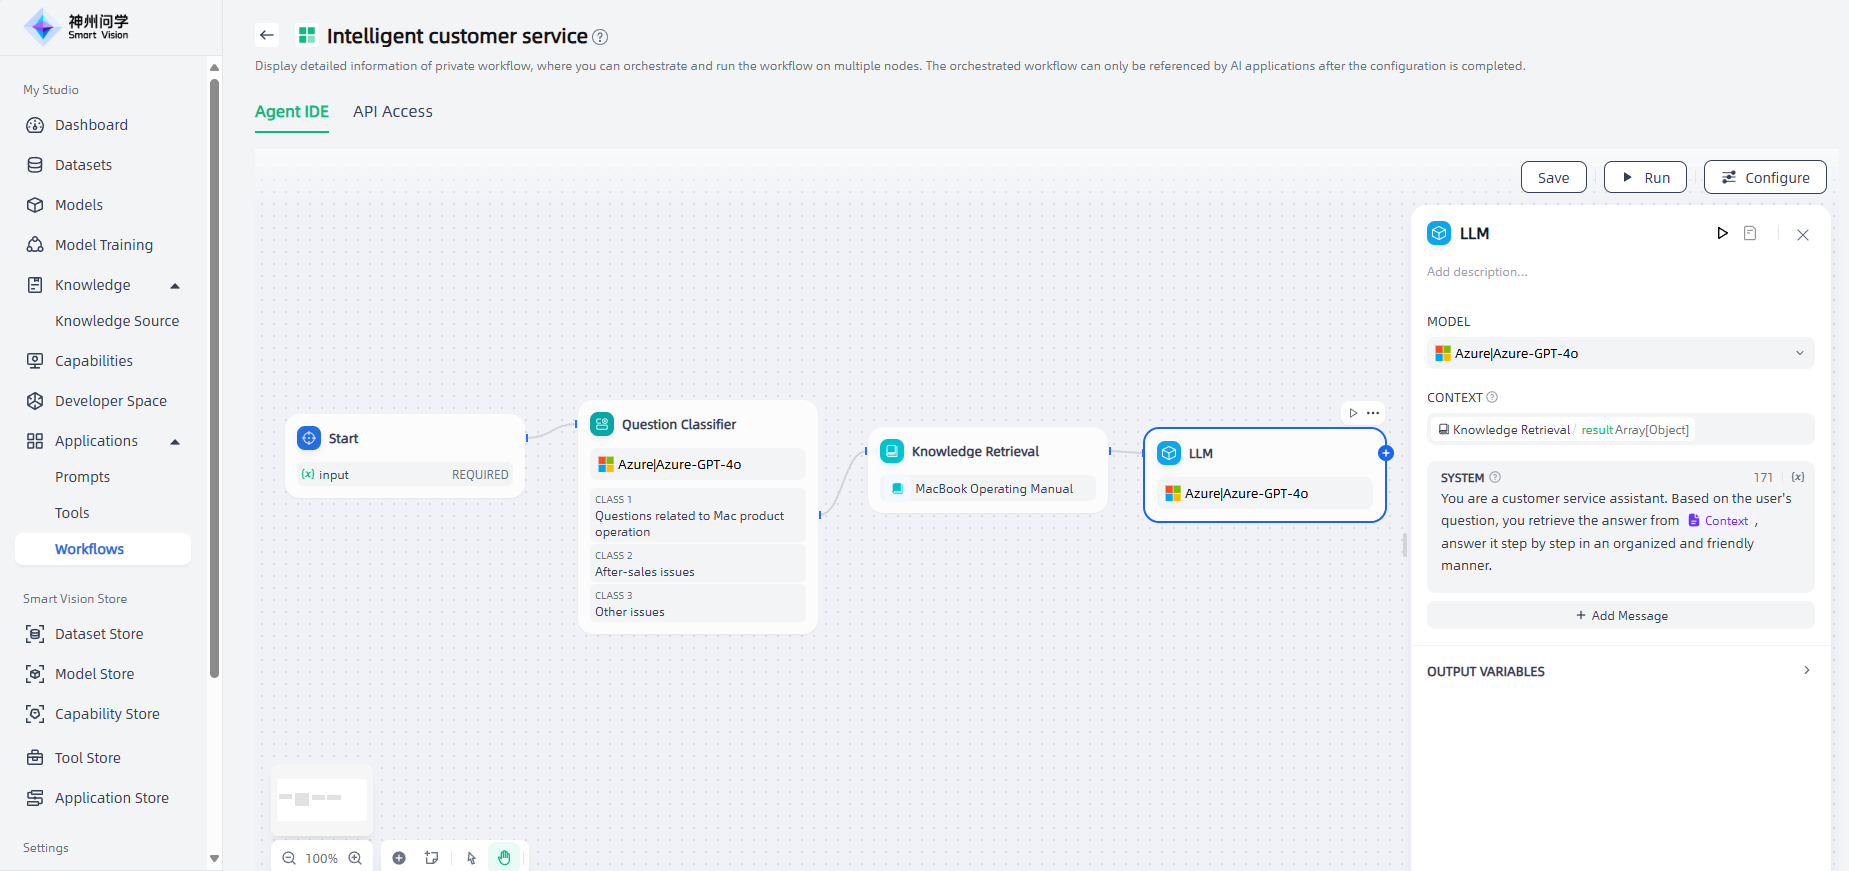
After the LLM node, add an "End" node to output the final result, and the workflow of question category 1 is set up. The End node supports two answer modes: ① Return variables and generate answers by the large model; ② Use the set content to answer directly.
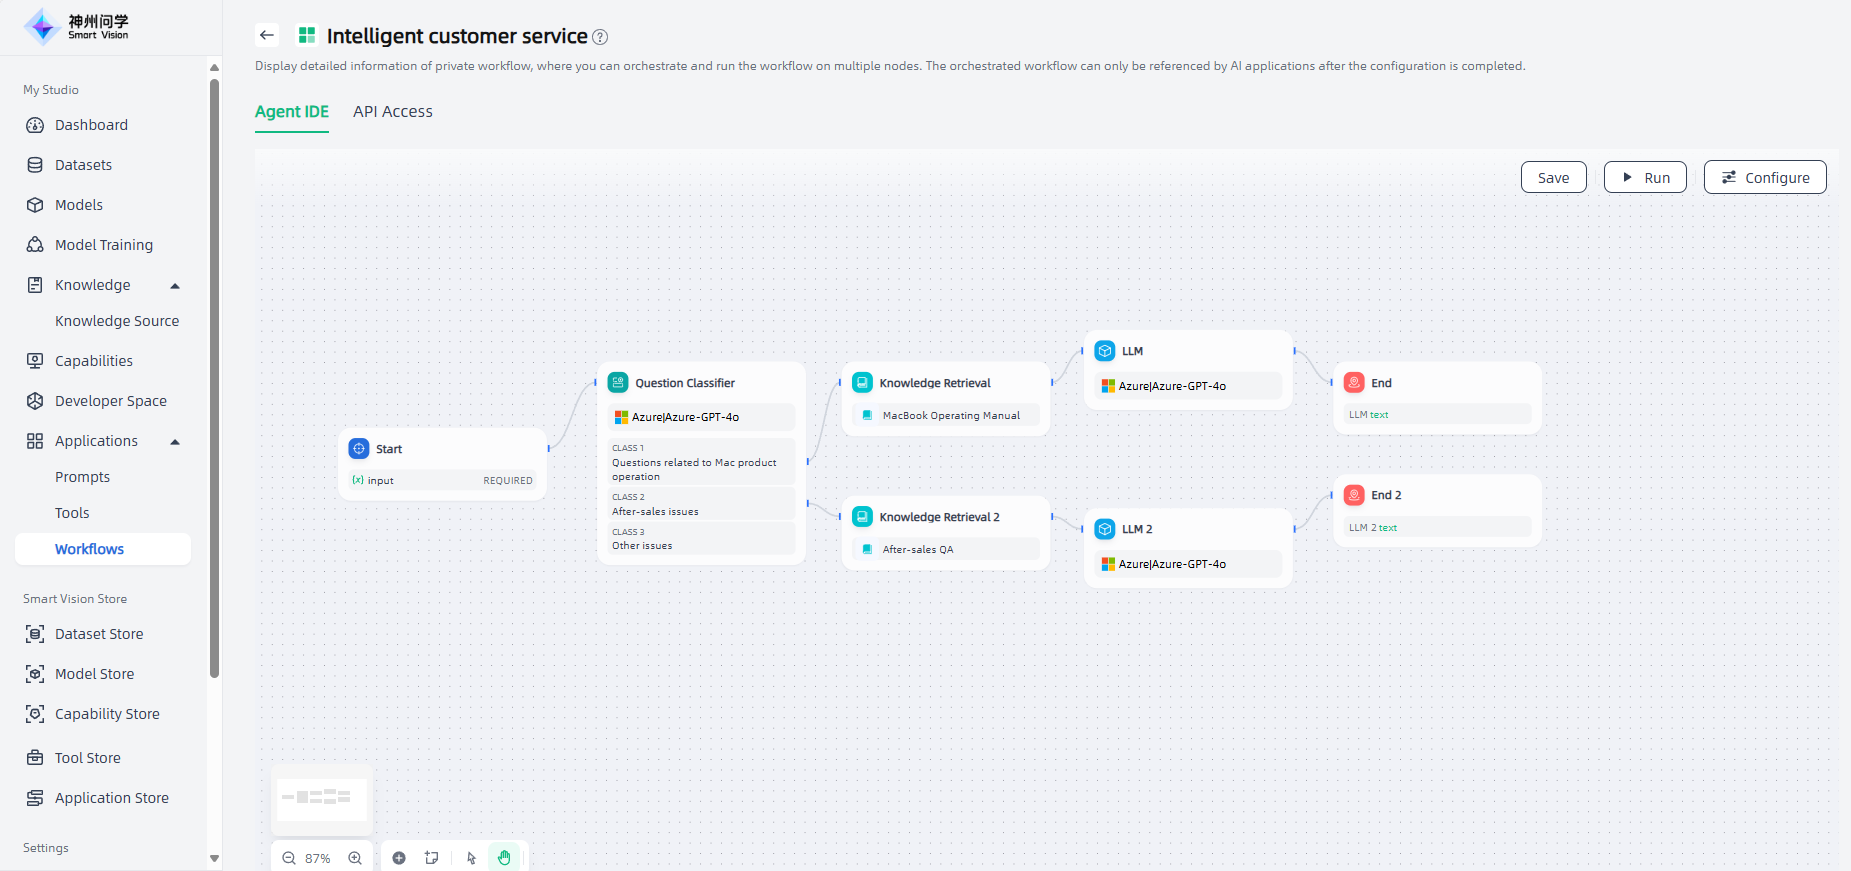
For after-sales problems in category 2, knowledge retrieval nodes are also added to facilitate querying and ultimately outputting such problems through the corresponding knowledge base retrieval.
In addition, we can also add a "Variable Aggregator" node to integrate the results of the two branches of category 1 and category 2. This can help us simplify data flow management and avoid the need to repeatedly define downstream nodes after the two branches are retrieved from different knowledge bases.
For other issues in category 3, if there is no special solution, you can directly add an "End" node to end this process. At this point, the workflow orchestration of this intelligent customer service scenario is completed.
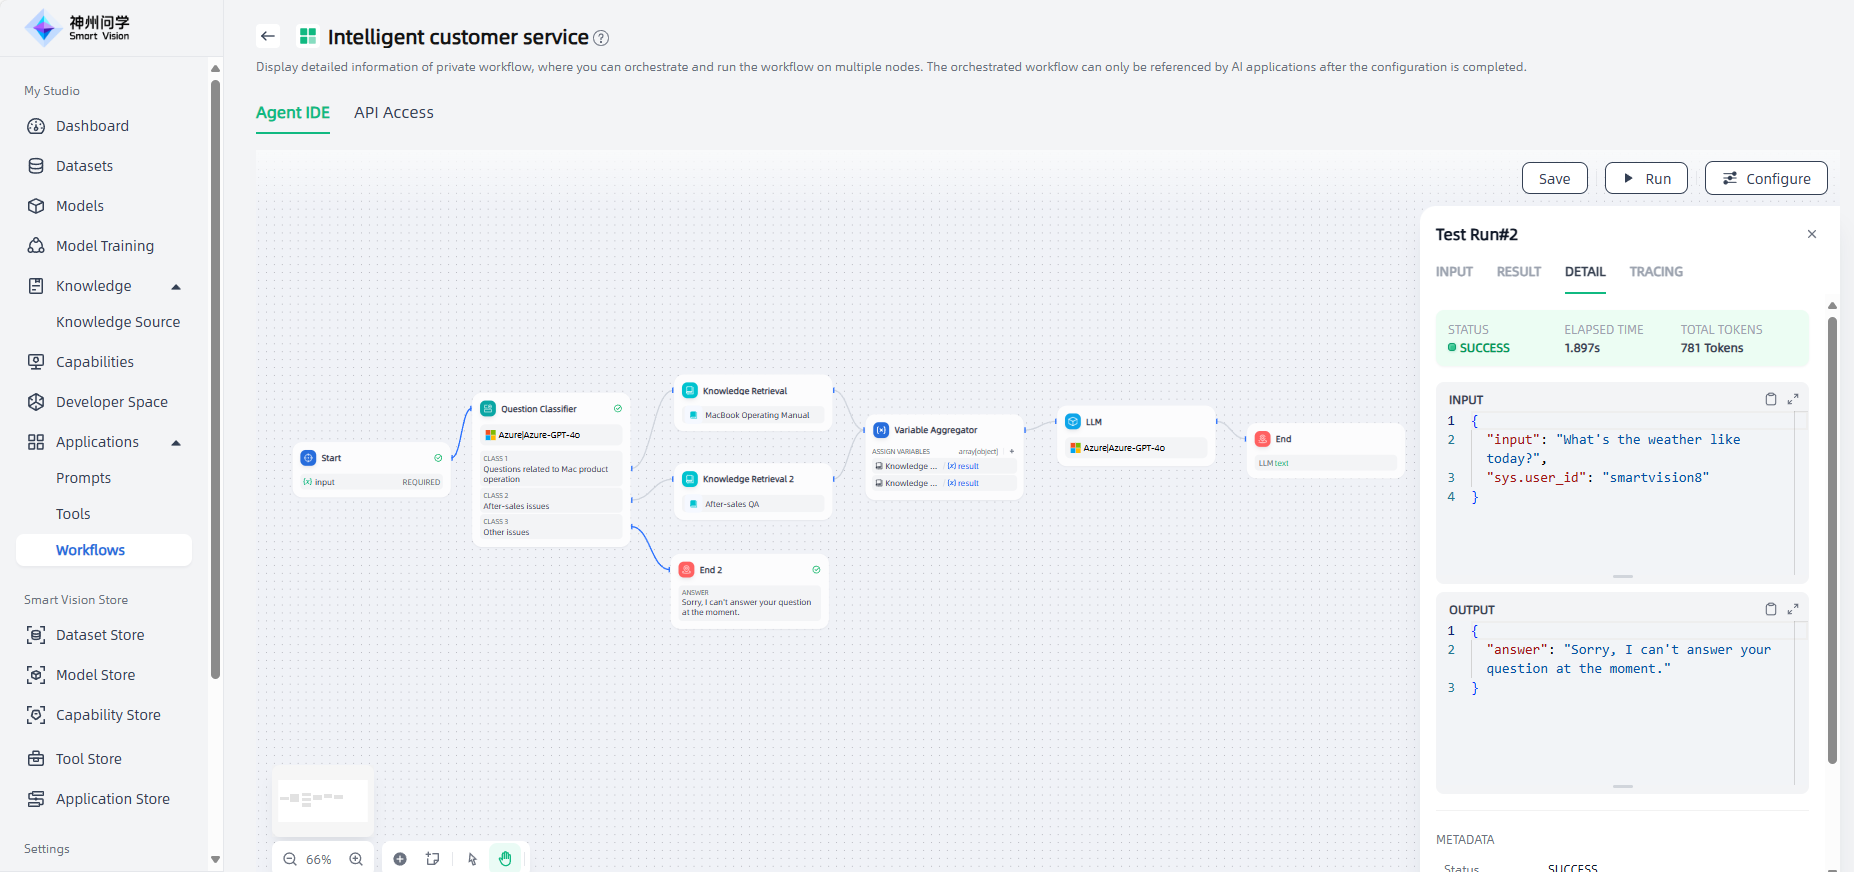
Run and debug: After the workflow is orchestrated, click the "Run" button in the upper right corner of the canvas to view the running results of the workflow. It also supports viewing details and process tracking, so that you can debug and preview the workflow.
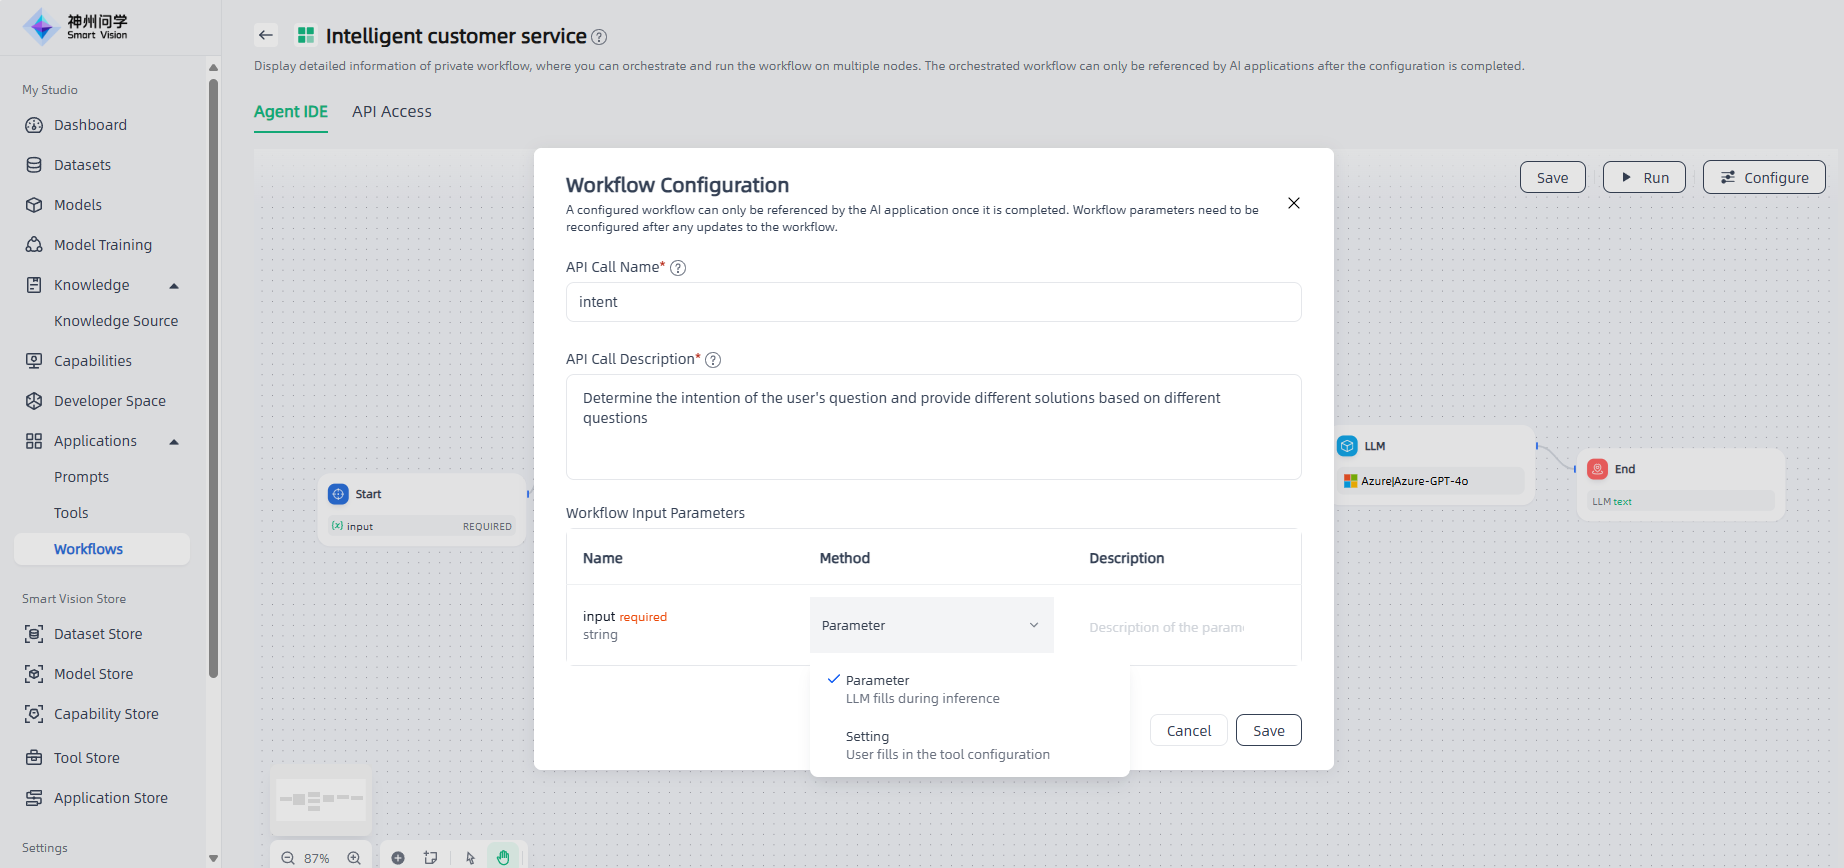
Workflow Configuration: The configured workflow can be referenced in the AI application. Click the "Configure" button in the upper right corner of the canvas to configure the workflow. Note that the API call name and description here are used for machine/model recognition and understanding, which are different from the name and description filled in when the workflow is created.
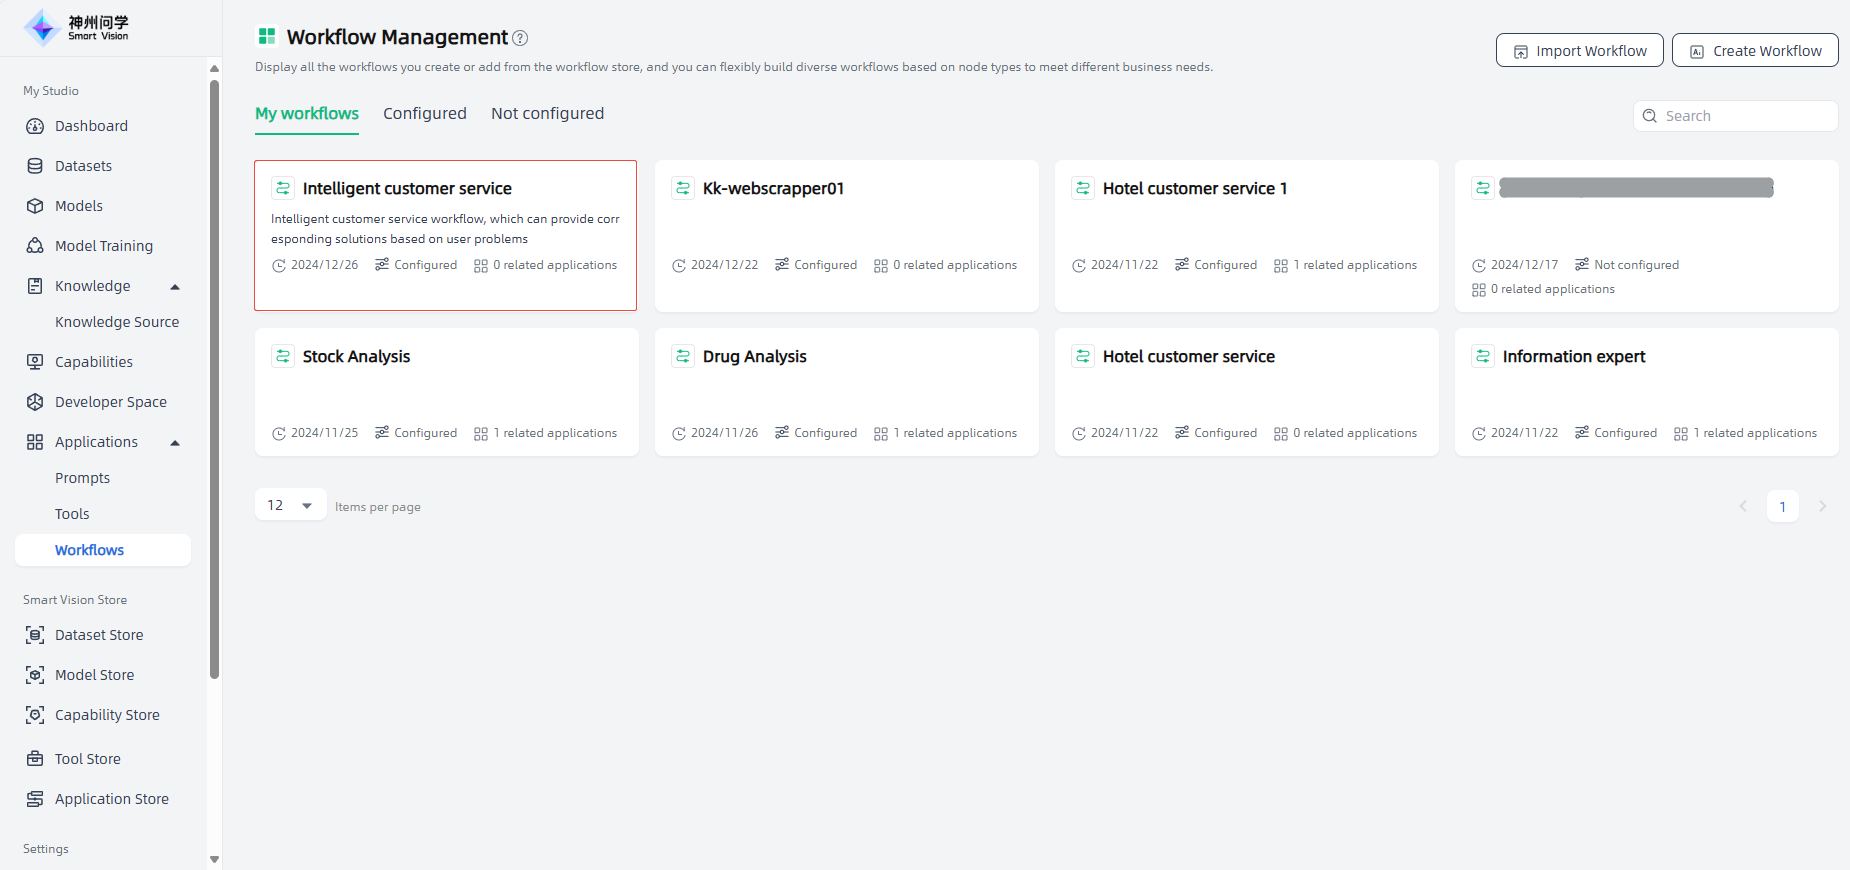
The status of the configured workflow will change to "Configured" and will be displayed in My Studio-Applications-Workflows-Configured. It can be added for reference when orchestrating AI applications.
Import Workflow
In My Studio-Applications-Workflows, click the "Import Workflow" button in the upper right corner to directly import existing workflow files. The imported workflow will be displayed in "My Workflows". It is convenient for you to directly configure and use it or make adjustments based on it.
When importing a new workflow, if the name is the same as that of an existing workflow in Studio, the original workflow with the same name can be overwritten and the API Key of the original workflow will be retained.
After importing a new workflow, the Studio will detect whether it contains the large model/knowledge base/tool/workflow that the new workflow depends on, and will give an error prompt on the workflow details page to ensure user experience.
API Access
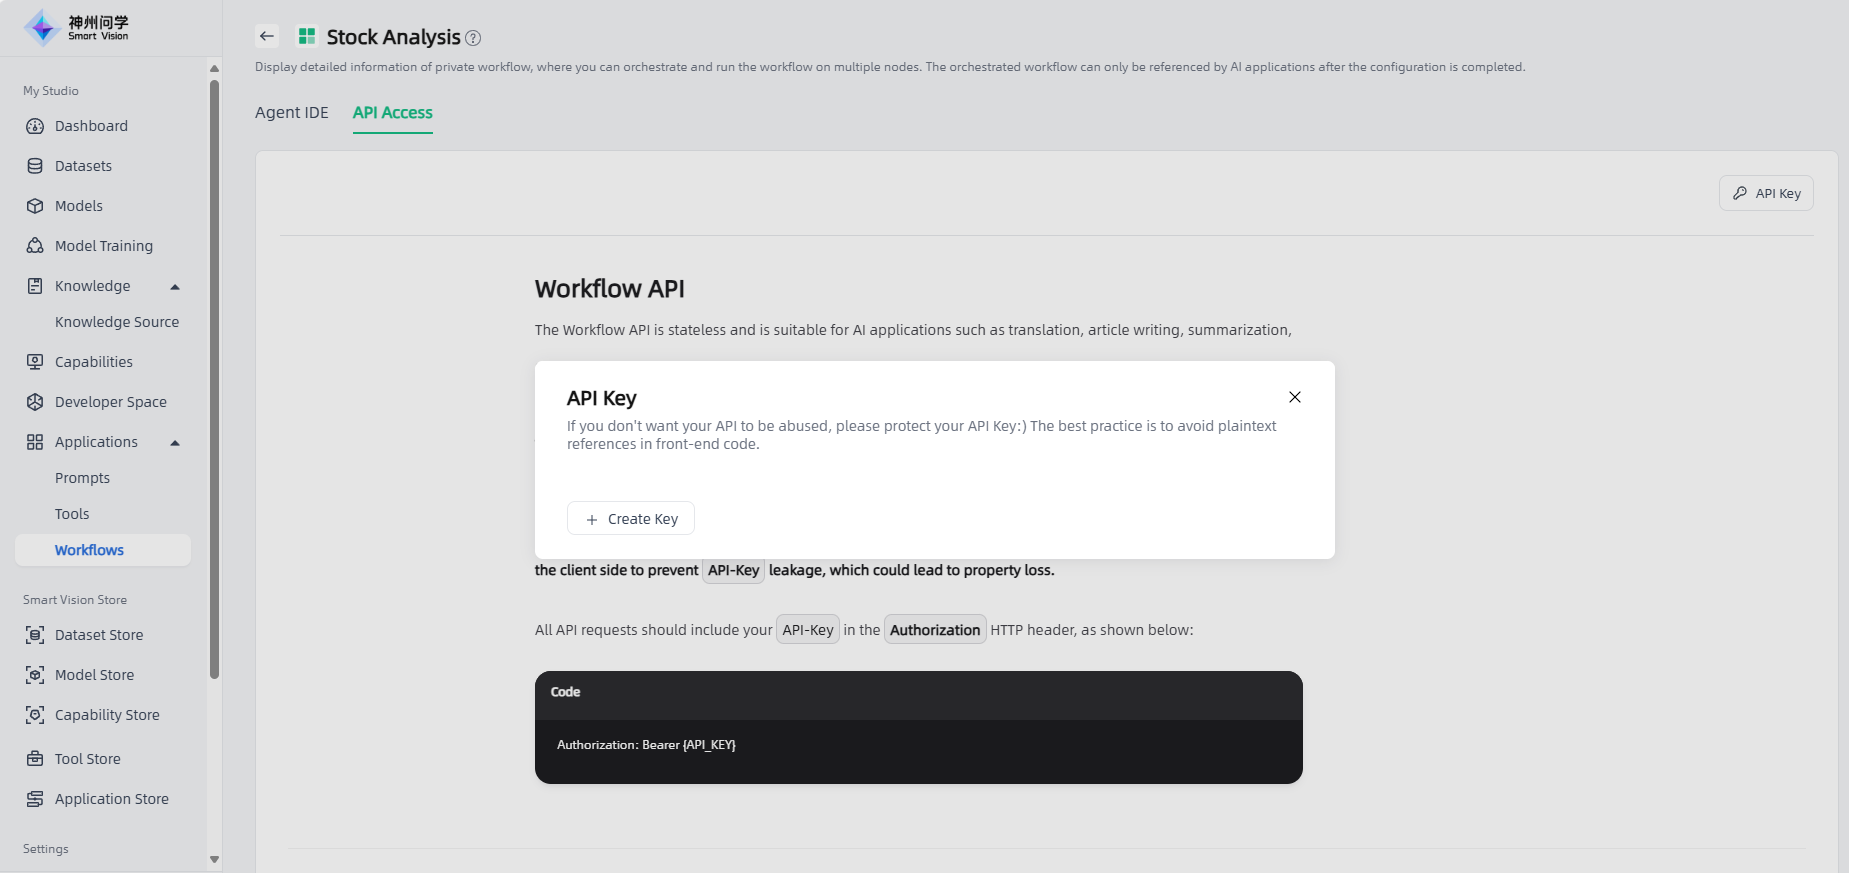
Click "API Access" to view the API access method of the workflow. Workflow access API supports authorization key management, and an API key is required to call the API (click the "API Key" button to create an API key).
